In this second post of a series, we will build and start our first hypervisor. It won’t do much just yet, but it is good to get known with its build system. We will be using Bareflank.
An introduction to the VMX (Virtual Machine eXtensions) can be found in the previous post, but it isn’t really necessary here.
What is Bareflank?
Keep in mind that Bareflank isn’t a full hypervisor as such, it is more like an SDK for building our own hypervisors with it. In its basic implementation, most of the handlers are simple pass-through to the underlying hardware. This has some implications, they will be mentioned later.
There are more open source hypervisors available, such as SimpleVisor, HyperPlatform, ACRN or even Xen. Bareflank was chosen for this series because it is a relatively simple project, providing a friendly API for custom handlers, with low hardware and software requirements.
We will be running this hypervisor on MinnowBoard Turbot board, but it should work on most UEFI platforms with VMX and EPT-capable CPU.
Getting the source code
At the moment of writing this blog post, the newest tagged Bareflank version is
rc2.0.4, but soon after it was released there was a big change in the
structure of this project. Extended APIs (which are required for UEFI build and
many other things) were merged into the main repository, earlier they were a
project of its own. This made it difficult to maintain coherent interfaces
between those two, usually one version of hypervisor was not compatible with
some versions of extended APIs.
As we really want to use extended APIs, in these series we will use
commit
Merge pull request #733 from rianquinn/eapis_merge. It was the latest commit
that worked for UEFI platforms at the time of writing this article - code on
master branch is not always working for all platforms; this is what tags are
used for in this repository. There are also some examples merged into the
hypervisor repository in later commits, earlier they were separate projects,
just like the extended APIs. This ensures that they use the latest API, too.
Perhaps we will look at them later in these series.
|
|
This file needs to be changed in order to build Bareflank as a UEFI application.
config.cmake is modified with almost every change, so it must be copied and
set again if a different commit is used (also, clear build directory after
such a change). Open this file in your favourite editor and change the following
three lines:
|
|
into this (note the lack of hashtags):
|
|
Fixing serial newline
All Bareflank debug output is sent to the serial port (I/O port 0x3F8). Without heavy reverse engineering of OS it is impossible to print to the screen from VMM level. Only lines printed by UEFI entry point (either running at VM level or before entering VMX) to the hypervisor are visible also on the screen.
Most clients for capturing data from UART assume that every line ends with
\r\n, but Bareflank sends only ‘\n’. As a result, the cursor goes to the next
line, but it does not return to the first column. This can be fixed with just
one line added at the very beginning of the write() method in
serial_ns16550a.cpp:
|
|
Building
There are some dependencies required for building Bareflank. All of them are fulfilled in the Docker container that we prepared for playing with this hypervisor SDK. This makes it possible to get reproducible builds. It also saves time and patience required for manually installing and/or building all dependencies - some of them may not be available as a package in your OS distribution. This is especially true for LTS releases.
To download and start the container run the following instruction in the
directory with config.cmake, build and hypervisor:
|
|
To build the hypervisor, run:
|
|
cmake will download some additional packages into the cache folder, it will
be located in the same folder that Docker was started. Those include libraries
required for providing standard C/C++ environment on the bare metal. There is
also gnuefi for compiling the hypervisor as a UEFI application.
make takes some time. In our experience this build system is pretty robust,
so, unless changes are made to the config.cmake (or any other Cmake file) and
cmake must be re-run, there is no need for clearing the contents of build.
Successive executions of make should successfully build all of the changed
files only, which can save a lot of time.
Final Bareflank executable is located in build/efi/x86_64-efi-pe/build. It
should be a 1.2 MB bareflank.efi file.
While we’re at it, we may take a look at other files created in the build
process. Arguably the most important file is vmm - the VMM part of our
hypervisor, i.e. everything except UEFI entry point and other platform-specific
functions (platform memory management, running code on different cores, virtual
to physical address translation). There is also C include file vmm.h, which is
the same file in the form of table of bytes - this saves all the work with
finding and opening file, which may not be trivial with some of the UEFI
implementations. Both files are created in
hypervisor/bfdriver/src/platform/efi/CMakeLists.txt:
|
|
The original VMM file is located in build/prefixes/x86_64-vmm-elf/bin and it
has the name we configured as OVERRIDE_VMM in config.cmake, postfixed with
_static. Note that all integration targets are built, so it is better to
change one test at a time or you may end up with compilation errors in the
places you wouldn’t expect.
Testing
For testing purposes, a live USB image of Ubuntu was used. If you are interested in its UEFI boot process read on, otherwise go straight to the TL;DR section.
A few words on UEFI, GRUB and Secure Boot
Ubuntu, like many other Linux distributions, used GRUB as its main bootloader for quite some time already. The current version is GRUB2, which can be built as a UEFI application.
Secure Boot is a technology preventing bootkits from being installed and run. It is a part of a chain of trust, where every part of the software (the root of trust should be in the hardware) validates the next one before allowing it to execute. The validation includes checking the hash of the image that is being loaded and its signature - image must be signed with a key that is known to the previous stage.
Most UEFI vendors implement only Microsoft keys for Secure Boot (if it works
with Windows, it works), so other developers must ask Microsoft to sign their
software (or ask the users to turn off Secure Boot). However,
Microsoft UEFI CA Signing policy
puts restrictions on what can be signed by Microsoft. One of these restrictions
is that code submitted for UEFI signing must not be subject to GPLv3, so GRUB2
can’t be signed, even though it may be aware of Secure Boot and continue the
chain of trust.
To deal with this problem, an additional signed stage must be added before GRUB2 (a bootloader for bootloaders). An example of such might be PreLoader or shim. The latter is used by Ubuntu.
This shim is included in live images, otherwise the users would be welcomed by a verification error printed by UEFI, with no pointers on how to start the system. The error message most definitely wouldn’t ask them to turn the Secure Boot option off.
All these problems result in an additional file in \EFI\BOOT\ directory. There
is an application signed by Microsoft in bootx64.efi (shim) and another one,
grubx64.efi (GRUB2). GRUB is verified by the shim - shim was build with GRUB’s
certificate. With Secure Boot turned off grubx64.efi can be started directly.
A similar approach should be possible with Bareflank, but for testing and fooling around it is easier to just turn the Secure Boot off.
TL;DR
Disable Secure Boot. Download and prepare a live USB drive of
Ubuntu. Optionally edit
boot/grub/grub.cfg to enable serial output - add console=ttyS0,115200 to the
end of linux /casper/vmlinuz ... line, after the three dashes in the
Try Ubuntu without installing section.
By default, bareflank.efi tries to run \EFI\BOOT\bootx64.efi file. The same
file is searched for in standard UEFI search for bootloaders. Because of that,
it is difficult to start Bareflank and then the real bootloader automatically.
There are basically 3 options for starting Bareflank. All files mentioned below
(except bareflank.efi) are located in \EFI\BOOT\ directory on the USB drive.
1st option
Unless UEFI Shell can be forced to start despite a valid bootx64.efi file, the
most automatic option is to modify the Bareflank source to start a different
file. The line responsible for that is located in load_start_vm(), in
hypervisor/bfdriver/src/platform/efi/entry.c. Change it to point to
grubx64.efi to start GRUB directly and copy bareflank.efi to bootx64.efi:
|
|
2nd option
Another option is to just remove the original bootx64.efi, put the
bareflank.efi in the root directory of the USB drive and start the platform.
It should fall back to the shell, then bareflank.efi can be started manually.
It will fail to load bootx64.efi and return to the shell, where the
grubx64.efi bootloader file can be started.
3rd option
The third option is to replace the original bootx64.efi with
UEFI Shell.
This option is useful when there is no built-in shell available, as is the case
with most PC firmwares. In this case Bareflank will start another instance of
UEFI Shell, but it’s OK, the shell memory is not reserved and can be reused
later when the OS starts its own memory manager.
The first option is fully automatic, while the next two give more room for e.g. comparing memory maps before and after starting Bareflank (try it). They can also print error messages when something breaks along the way. In the rest of this post I’ll be showing output as it is visible with option 2.
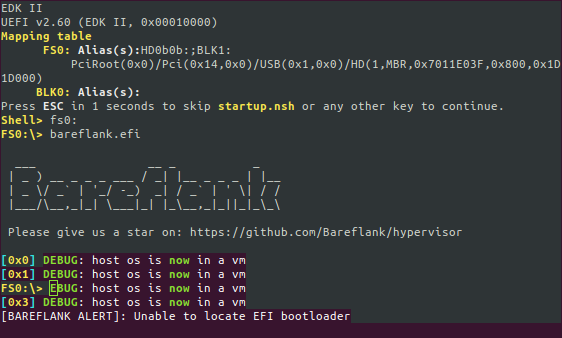
Bareflank even can print strings in colours (like, all 8 of them!), as long as
the client handles
ANSI escape codes. The
DEBUG: host os is now in a vm lines are visible only on the serial output.
UEFI overwrites Bareflank output on the attached image because it is not aware
that something else is printing through UART.
As expected, the Bareflank entry point failed to start a bootloader. It didn’t stop the VMX operation, so the UEFI is now running in VMX non-root mode, as will be the OS that we are going to start now:
|
|
Remember to use backslashes, tab-completion is somewhat buggy otherwise. GRUB
may not be printed on the serial output, but the OS should start automatically
after 5 seconds, plus some more before Ubuntu starts printing anything. After it
loads you can log in using default user ubuntu, or you can just use this
system with GUI. It should behave more or less just like it does without any
hypervisor.
Quirks and issues
All modern CPUs use microcode to translate CISC x86 instructions to smaller, RISC-like micro-operations. Microcode can be patched by the operating system or BIOS firmware to workaround bugs found in the CPU after release. This allows for fixes on the user site without product recalls, which are expensive and problematic both for vendors as well as for customers.
Usually BIOS does its update, but then OS can update microcode to even later version - this is done for a) inexperienced users b) lazy users c) lazy BIOS vendors. OS often has some kind of automatic upgrades, while BIOS does not. Sometimes workarounds are developed before new microcode is available (e.g. retpolines were available before IBRS in the case of Spectre).
For VMs these microcode updates should be turned off - imagine a situation where one VM updates microcode after another checked CPU for its bugs and applied OS-level workarounds. Those, in the best case, would slow down code execution, but in some cases it could result in unexpected behaviour or wrong results of some instructions. Ideally, firmware should always have the latest microcode patches available.
In our case this can be checked by doing:
|
|
The same command when Ubuntu is started outside of VM:
|
|
Note the revision field. This is set in
microcode.cpp
and effectively turns the OS microcode updates off.
Another issue is that Bareflank does not have (at least in the version we are working with) built-in support for handling CPU exceptions in VMM, other than printing some debug info and halting CPU in the VMX root operation. Some operations are intercepted by VMM, which would normally run and cause CPU exception that OS could handle. In this case exception should be injected to the VM, but it is up to hypervisor developer to implement this feature. After all, Bareflank is not a hypervisor, so its handlers are pretty bare (pun intended).
This could be shown by reading non-existing MSRs, but MSRs are no longer intercepted because of MSR bitmaps, which by default do not cause VM exits on MSR access. It was not the case in earlier versions of Bareflank, where all accesses were handled by the VMM, which in turn resulted in CPU hang. This happened on the VMM side, so only a hardware reset could fix this issue. There is a note about this issue in rdmsr.cpp.
Summary
This post described all steps required for building and deploying Bareflank-powered hypervisor. We did not touch any VMM code yet, other than a small fix for serial output. We also didn’t check for a performance impact - I leave this as a task for readers, although the results can change after we add more custom handlers in the future.
Most of this post should be a one-time operation, there was also some
theoretical background, so the next builds shouldn’t take as much time. Only
make and a way of starting the application on the platform are really
necessary unless something breaks along the way.
Next post will be about VMX exit reasons and their handlers. We will take a look on some handlers that are implemented out-of-the-box, we will also modify MSR bitmaps to show the problem described earlier.
If you think we can help in improving the security of your firmware or you are
looking for someone who can boot your product by leveraging advanced features of
used hardware platform, feel free to book a call with
us or
drop us email to contact<at>3mdeb<dot>com. And if you want to stay up-to-date
on all things firmware security and optimization, be sure to sign up for our
newsletter: