Recently we started preparation of coreboot training for one of our customers. Our platform of choice for that training is MinnowBoard Turbot. There are couple reasons for that:
- During training we can show recent firmware trends - despite we don’t like blobs (FSP, AGESA, PSP, ME etc.) and bloated designs (UEFI) we cannot escape reality and have to show customers how to deal with those components. MinnowBoard Turbot use couple of them, but also supports coreboot.
- We can present recent Intel SoC features - MinnowBoard Turbot Dual-Core has Intel Atom E3826 which has support for VT-x, TXE, PCU (Platform Control Unit), JTAG and other features that can be very interesting from firmware engineer point of view.
- We can use the platform which is used as a reference design for various products - it looks like market for BayTrail (and newer Intel platforms) is quite big and there are many companies that develop solutions based on it.
MinnowBoard was also used in UEFI security related trainings in which we are really interested in. Key problem with presentation and workshop preparation was need for SF100 as SPI programmer. This tool is high quality, but is quite expensive. When we add it to cost of MinnowBoard, equipment and shipping we end up with cost of one development environment ~530USD (MinnowBoard Turbot: 200USD, SF100: 230USD, peripherals+power supply: 50USD, shipping: 50USD). If we want to have 3-4 developers working on that project we end up spending >2k USD, which is not negligible cost. Obviously in this case DediProg is first component to cut price. DediProg is high quality hardware and truly we don’t always need to bleeding edge quality. It was already proven, that accepting wiring hassle, we may have hardware solution that is much cheaper. Namely we can utilize Raspberry Pi 3 what reduce cost to 46USD and using RPi Zero W reduce that to 7USD. So the purpose of below blog post is to use RPi Zero W (RPiZW) as flasher for MinnowBoard Turbot and possibly other platforms. This is nothing new as many times this procedures were described on various RPi versions.
RPiZW preparation Get recent
Raspbian Lite. In this guide I used 2017-09-07 version. Flash it on SD
card and boot system. I am using USB to TTY converter so serial console
configuration was needed. To do that modify config.txt on boot partition of
Raspbian with below entry and the end of file:
|
|
Next you have to setup WiFi. Easiest way is through modification of
wpa_supplicant.conf. Please note that wpa_supplicant is not started
automatically without additional configuration, so it is good to add below
configuration to /etc/network/interfaces:
|
|
After reboot your WiFi should be connected.
Flashrom installation
|
|
Electrical considerations
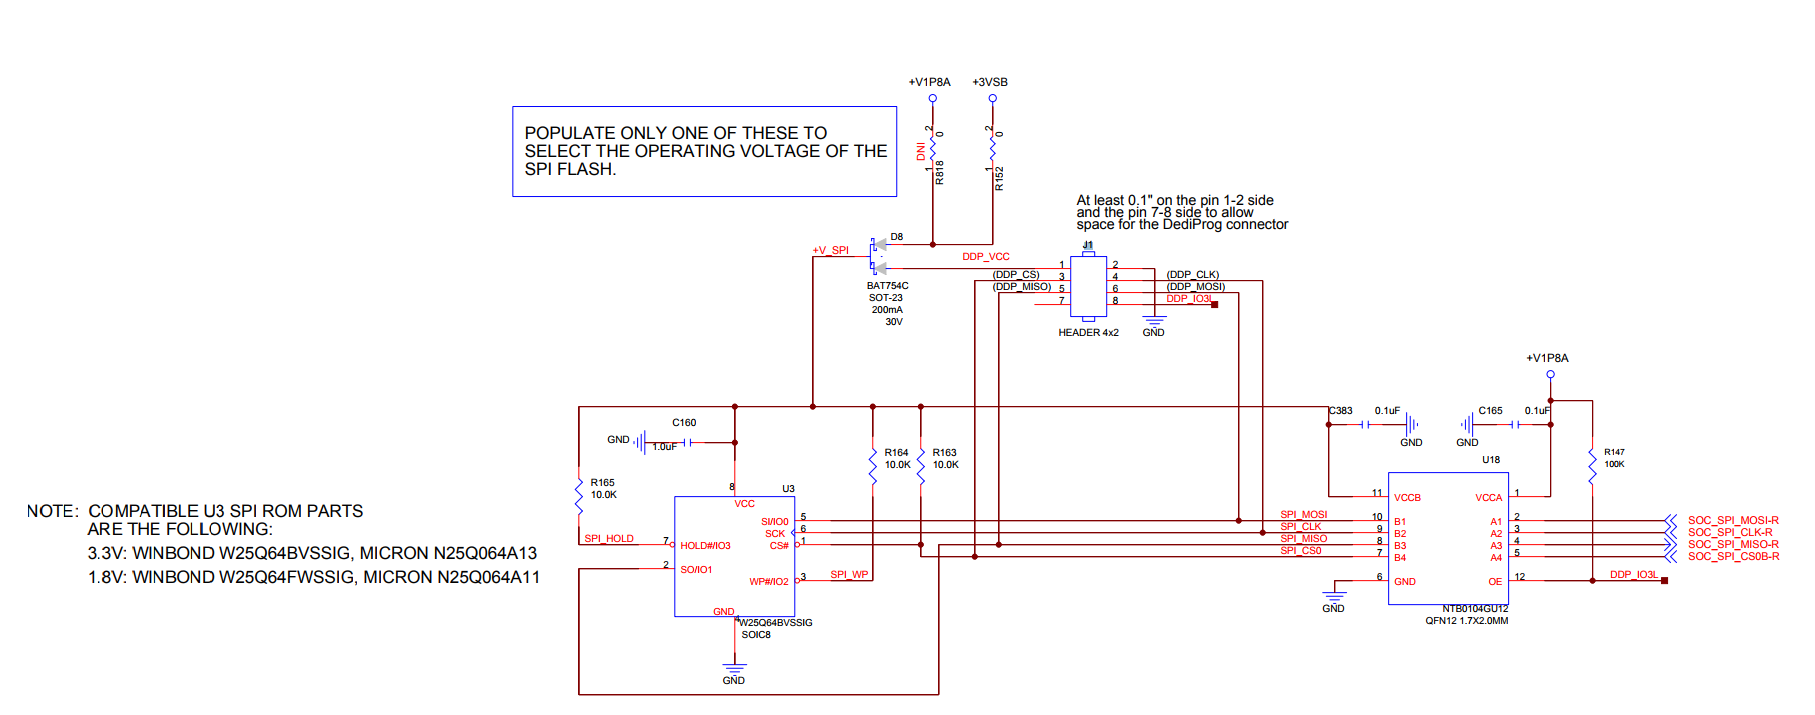
MinnowBoard Turbot B uses Winbond Electronics W25Q64BVSSIG flash chip. This
chip requires power supply voltage range 2.7V - 3.6V. The energy needed to power
this memory may come from the internal power circuit of MinnowBoard Turbot B or
by connecting the voltage to the pin 1 of J1 MinnowBoard header. In each of
these cases the current flowing from the power source flows through the
NXP Semiconductors BAT754C Schottky barrier diode, which causes 0.6V voltage
drop. Therefore, it is necessary to supply a voltage of at least 3.3V to
properly supply the memory chip. Winbond Electronics W25Q64BVSSIG has WP and
HOLD input pins. The first of them activates write protect state. The second
one pauses device even if it is selected by SPI CS pin. WP and HOLD are
activated by a low logical state. Both inputs are pulled-up to the power line.
Therefore, when 3.3V is applied to the 1 pin of J1 header write protect and
pause states are disabled due to the presence of a high logical state on WP
and HOLD inputs. This is required when we want to flash memory chip via SPI
bus using external device. If J1 header pin 1 not connected, voltage present on
power supply line may be floating. It may cause problems to read and write data
to the W25Q64BVSSIG memory chip. MinnowBoard Turbot B external SPI bus
operates on voltages in the range 0V - 3.3V, although the SOC used in Turbot B
requires a voltage not exceeding 1.8 V. It happens because
NXP Semiconductors NTB0104 dual supply translating transceiver mediates
between the SPI buses. This device changes voltage levels to the right values
for each bus. NTB0104 chip has OE input, which corresponds to whether the
signals are transmitted on the 1.8 V side. For a high logical state signals are
transmitted, for a low logical state not. OE input is connected to J1 header 8
pin of MinnowBoard Turbot B and it is pulled up to 1.8V power supply line.
Therefore, when we want to make sure that the bus is isolated from SOC, it is
advisable to short pin 8 with ground. Then we communicate on SPI bus only with
the Winbond Electronics W25Q64BVSSIG memory chip. During tests we figured out
that this is not necessary to get correct results.
Wiring
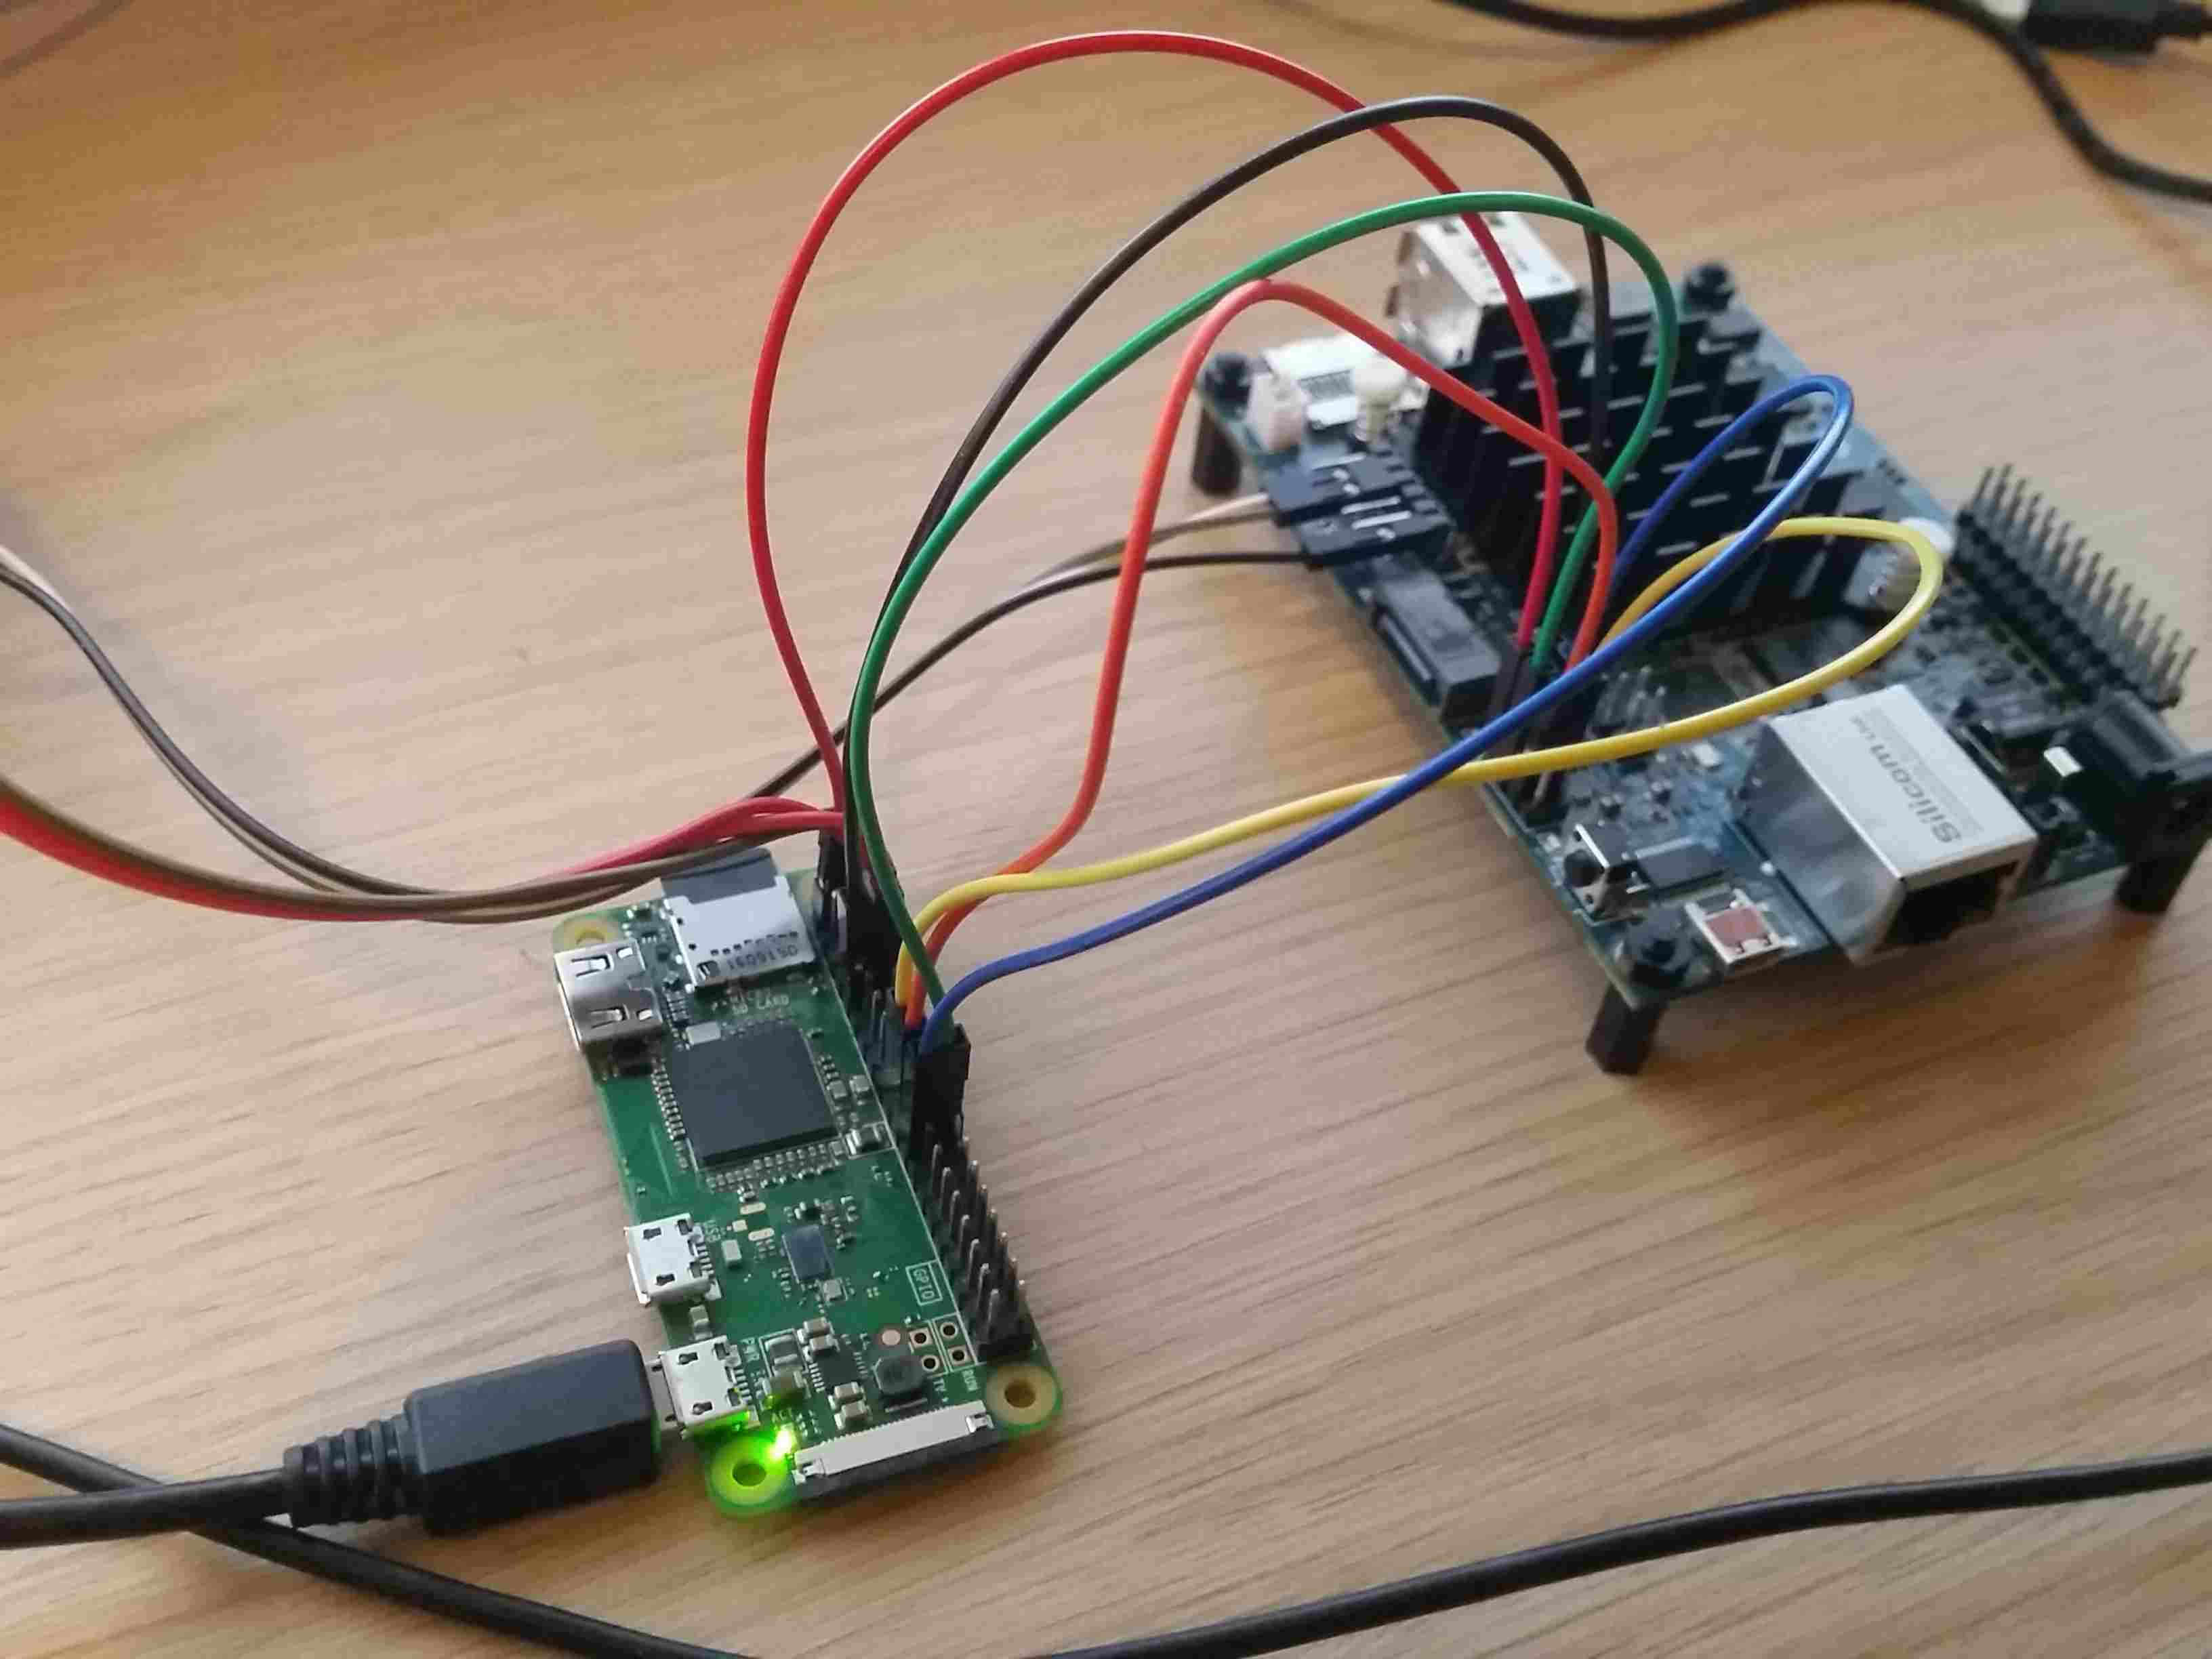
It is hard to explain that without nice drawing tool, but I will try with the table and above picture:
| RPi Z W pin on J8 | MinnowBoard pin on J1 | wire color |
|---|---|---|
| Pin 1 - 3V3 OUT | Pin 1 - DDP_VCC | red |
| Pin 9 - GND | Pin 2 - GND | black |
| Pin 24 - SPI CS0 | Pin 3 - DDP_CS | green |
| Pin 23 - SPI SCLK | Pin 4 - DDP_CLK | blue |
| Pin 21 - SPI MISO | Pin 5 - DDP_MISO | orange |
| Pin 19 - SPI MOSI | Pin 6 - DDP_MOSI | yellow |
Running flashrom read
|
|
It is good practice to read couple times and confirm that we reading the same
binary. We faced some problems when HOLD# and WP# were not pulled-up. After
reading, binwalk can be used to look inside binary:
|
|
If you want to get back to recent MinnowBoard firmware you can find it here.
Flashing coreboot binary
Easy way to bake coreboot binary on your workstation is using our
coreboot-trainings-sdk container:
|
|
Choose mainboard vendor (Intel) and model (Minnow Max), then go to Chipset and
choose Use Intel Firmware Support Pakcage.
|
|
Get flash layout
To boot MinnowBoard Turbot we need binary blobs like flash descriptor, ME and GbE. Those binaries should be already flashed on SPI. To avoid overwriting those parameters you should use flashrom feature and point it to area you want to replace.
|
|
From above we know that bios region, in which coreboot.rom should be flashed,
has range 00400000:007fffff.
Flashing
Then copy coreboot/build/coreboot.rom to Raspberry Pi and flash:
|
|
Disconnect wires after flashing. After powering on MinnowBoard Turbot you should see serial output:
|
|
Speed up flashing procedure
There is magic flashrom parameter spispeed. Value it accepts depends on
hardware. RPi supports max 125MHz, but MinnowBoard chip has max speed of 80MHz.
Typical flashing time without that parameter is ~6min and it seems that default
SPI speed is set to 512kHz, so changing it matters a lot. From my experiments
32MHz works without problems.
|
|
This is impressive improvement and knowledge about this feature is not so common.
Recovery procedure
If for some reason you will overwrite different regions then needed and you end up with not bootable platform you can write stock firmware and reflash coreboot again. For example:
|
|
Stability issues
Above solution is low cost as well as low quality. A lot depends on quality of wires. Probably well fitted connectors would save a lot of headache. Continuous connecting/disconnecting cables damage pins and cables making things not stable in long run. It would be useful to have header that match this setup on both sides.
Summary
I’m pretty sure that for most coreboot people this is not new stuff, but we needed that post to refresh knowledge for beginners as well as for internal usage. It’s good to have all instructions in one place. If you have any comments please feel free to contact us.