MPL is a Swiss company, which designs and manufactures embedded computers and microcontroller hardware for rugged environment, extended temperature range, and with long-term availability. The PIP series is a family of low-power, ready-to-use embedded computers manufactured by MPL. Recently we tackled the problem of integrating UEFI Secure Boot in Yocto build on platforms from the PIP4x series. The goal of the project was to verify that the platform in question is compatible with UEFI Secure Boot and to enable automatic signing of system components during build in Yocto.
UEFI Secure Boot integration and all other features described in this post are part of Zarhus OS - a cutting-edge, adaptable and secure operating system designed for embedded systems, which is being developed by 3mdeb.
Verifying UEFI Secure Boot compatibility
The first step we took was verifying that UEFI Secure Boot could indeed be implemented on the platform and identifying potential issues and vulnerabilities. To do that, we developed and executed various automated tests within the Dasharo OSFV (Open Source Firmware Validation) environment. It utilizes the Robot Framework – an open-source automation framework, which simplifies the creation and execution of test cases. The tests can be run on the actual platform, or in QEMU. OSFV provides a script, which allows testing QEMU with Dasharo.
Setup
The Dasharo OSFV README page. lists the steps that were taken to prepare the environment for tests.
Test implementation
Development of test cases in the Robot Framework consists of defining reusable keywords and utilizing them in concrete scenarios. Dasharo OSFV introduces many such keywords, which allow reading and writing to the terminal, navigating menus, etc. This allows the developer to implement test cases with much more ease. Below is an example of a test case, which verifies that UEFI Secure Boot does not allow booting files that are not signed.
|
|
As we can see, the test case is brief and easily readable thanks to its use of predefined keywords.
The test suite can be found in the OSFV repository and the detailed description of each test is available on the Unified Test Documentation page.
The test suite can be run using the following command:
|
|
Most flags are specific to the OSFV infrastructure. They are explained in the repo’s README.
The -L TRACE option sets the log level to TRACE and the final argument
specifies the test suite that will be run.
To use QEMU execute this instead:
|
|
Results
The tests were performed on MPL PIP44 running PIP40 Family BIOS V057. The BIOS documentation can be found here. We need to be logged in to access the document.
The following images show the test suite results:
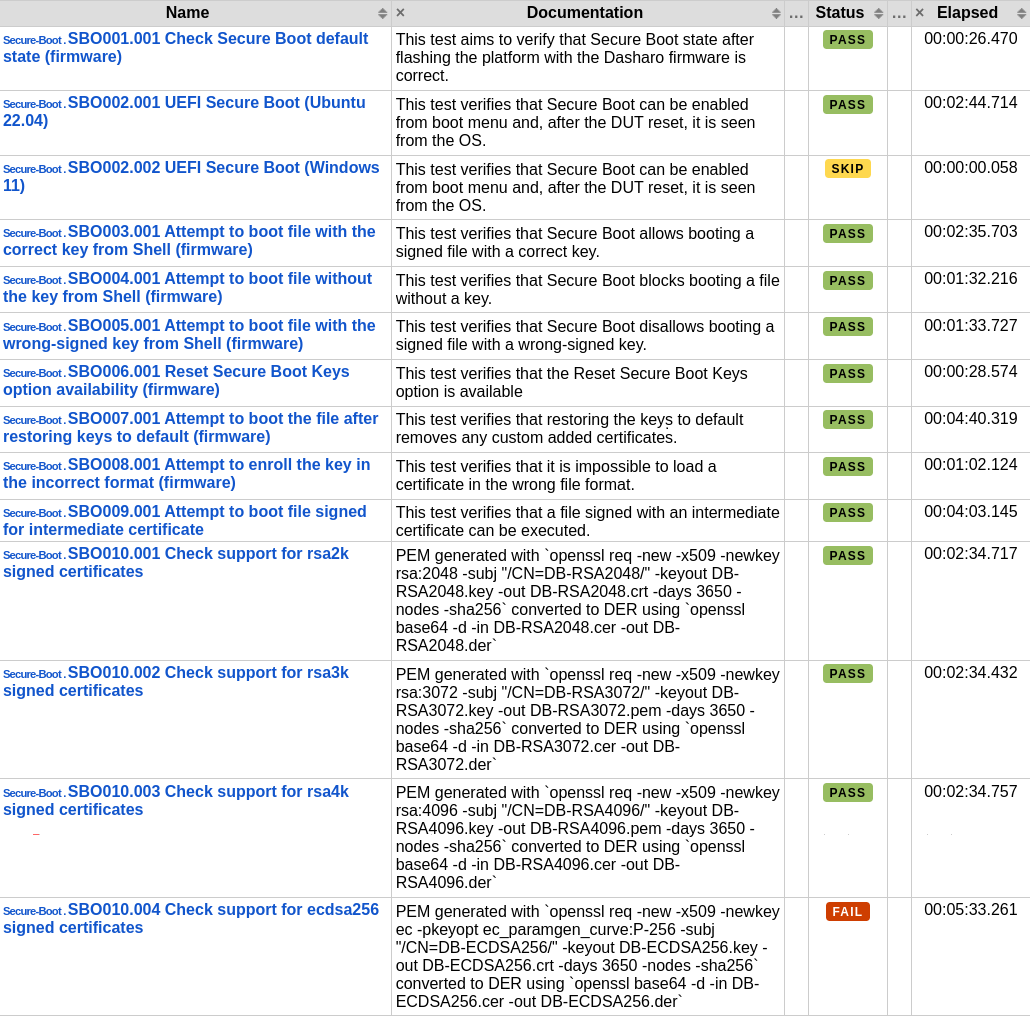
The results lead to the following conclusions:
- The state of UEFI Secure Boot functionality can be freely modified from the UEFI BIOS Menu, and it is correctly detected from the operating system.
- Verification of launched images works correctly when UEFI Secure Boot is enabled. The firmware allows the execution of files signed with the appropriate keys but blocks the booting of unsigned files or files signed with keys not present in the database (DB) or files with hashes not stored in the database (DB).
- The firmware correctly recognizes the chain of trust when intermediate certificates are used, allowing their use in the verification process.
- Keys intended for UEFI Secure Boot must be generated using the RSA cryptographic algorithm and sizes 2048, 3072, and 4096. Keys generated with the ECDSA cryptographic algorithm are not correctly supported.
- The firmware does not verify the expiration date of certificates during the verification of launched files. It means that enrolled certificates may expire and will not affect the ability to boot files verified by them. This is potentially dangerous: an expired certificate should theoretically not be used any longer. Therefore, its owner may cease to bother about the corresponding private key’s privacy. Accepting an expired certificate risks using a public key for which the corresponding private key has been compromised.
- The firmware only allows the resetting of enrolled certificates when they have been added from the UEFI BIOS Menu. If they are added from the operating system, the certificates are marked as External, and only a full firmware reset (for example, by removing the CMOS battery) allows their removal.
- Certificates enrolled through the Automatic Certificate Provisioning method are correctly used to verify launched files.
- The sbctl tool can be used to manage UEFI Secure Boot certificates.
- Automatic tests of the sbctl tool and the Automatic Certificate Provisioning methods have been omitted due to their logic, assuming that firmware can remove certificates enrolled this way from the UEFI BIOS Menu.
The conclusions allowed us to proceed with UEFI Secure Boot integration into Zarhus.
Integrating UEFI Secure Boot into Zarhus
Integrating UEFI Secure Boot into an existing Yocto layer is possible by using
the meta-secure-core layer in
our build. Its sublayer – meta-efi-secure-boot introduces mechanisms that
allow verifying various files used in the boot process. It offers two
technologies increasing security:
- UEFI Secure Boot, which verifies images loaded by UEFI firmware against certificates enrolled into it.
- MOK (Machine Owner Key) Secure Boot, which extends UEFI Secure Boot by introducing user-added Machine Owner Keys.
Custom certificates
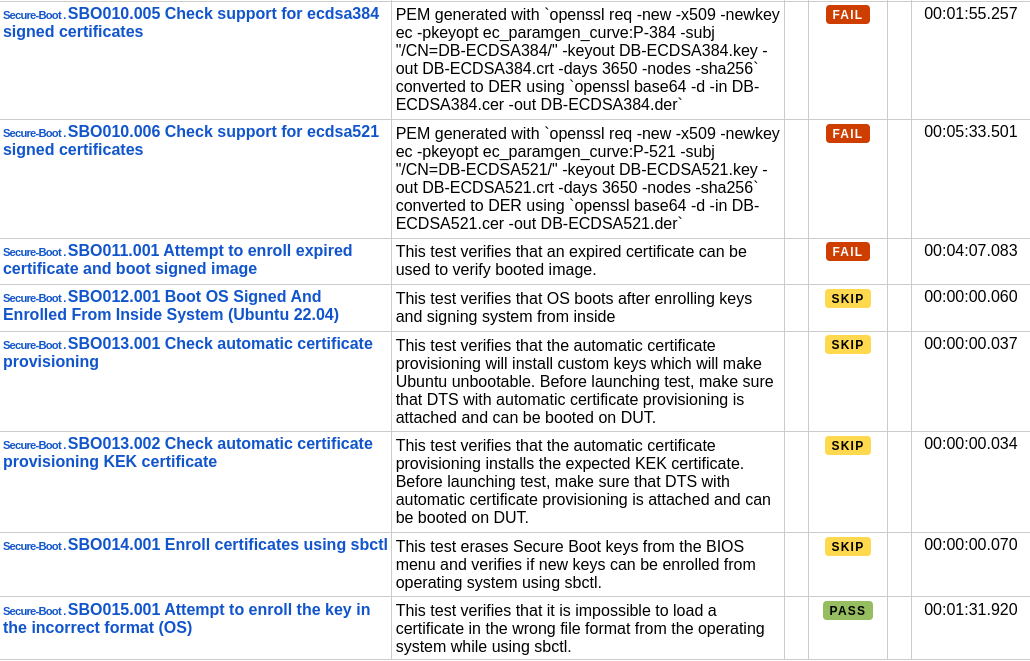
UEFI Secure Boot allows the user to enroll custom certificates which will be
used to verify images. The certificates can be loaded automatically thanks to
the Automatic Certificate Provisioning procedure provided by meta-secure-core.
The procedure uses LockDown.efi, which can only be executed when UEFI Secure
Boot is disabled. The provisioning process looks the following way:
- Secure Boot is manually disabled by the user.
- BIOS boots
LockDown.efi. LockDown.efiloads the new certificates, which are built into it during build, into BIOS.
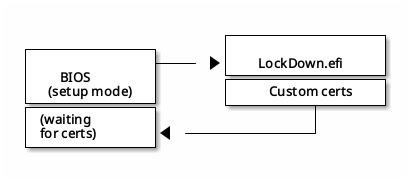
The boot process looks the following way:
- BIOS verifies GRUB against the DB key.
- GRUB verifies the kernel,
grub.cfgandgrubenvagainst a GPG key used in the build process. - GRUB loads the kernel.
If any of the checks fail, the respective file cannot be booted. This mechanism increases the system’s security by making sure that the firmware does not boot untrusted files.
Implementation
To integrate the mechanisms available in meta-secure-core we needed to
integrate that layer into our build. We use
kas-container to set
up bitbake projects.
In the kas configuration file we added the following to the repos section:
|
|
We defined meta-secure-core variables in the layer’s local.conf:
|
|
UEFI_SELOADER is a flag, which enables the SELoader, which is a bootloader
used in MOK Secure Boot. Setting MOK_SB enables MOK Secure Boot. Since we did
not want that, we set both flags to 0. When GRUB_SIGN_VERIFY is set all GRUB
components are signed during build and verified by GRUB during the boot process.
Aside from setting the flags mentioned above, we also defined
features,
which help Yocto work out which packages to include in the image and how certain
recipes should be built. The efi feature adds support for booting through EFI.
efi-secure-boot supports the UEFI Secure Boot mechanism.
We had to install the efi-secure-boot packagegroup into the image:
|
|
The packagegroup consists of, among other packages:
grub-efi, which is a bootloader used in the system,mokutil, which can be used on a booted system to verify the state of UEFI Secure Boot.
We used the bootimg-efi wic plugin to set up a UEFI-compliant image. This
required us to define the
IMAGE_BOOT_FILES,
which lists files that should be installed into the boot partition by the wic
tool. We defined it in kas.conf. Note that the value of this variable heavily
depends on used system’s boot partition layout:
|
|
At this point, we encountered several problems with our build.
With GRUB_SIGN_VERIFY variable enabled, every GRUB component needed to be
signed so that grub could use it. The recipes from meta-efi-secure-boot take
care of generating the signatures. However, the grubenv signature was missing
from our output files. grubenv is a file, which allows defining environment
variables for GRUB. As it turns out, the layer does not automatically sign that
file. We had to append that feature to the grub-efi recipe:
|
|
Another issue was that Poky has its own grub-efi recipe, where it installs its
own grub-efi-grubx64.efi file. It conflicted with the boot files from
meta-efi-secure-boot, so we had to remove it:
|
|
Now the files get signed automatically during the build. They are deployed along
with their signatures. By default, they are signed using the sample keys from
meta-signing-key.
This is extremely unsafe and should only be used for testing. In public key
infrastructure a private key should never be made public. The person who knows
the private key corresponding to a certificate can impersonate the certificate’s
owner. Therefore we should always generate our own private-public key pair and
keep the private part safe. meta-signing-key provides a
script,
which generates custom user keys.
The script will prompt the user to provide boot key information, such as the email address and password. Note that not all generated keys will be used with UEFI Secure Boot, as some of them are only compatible with MOK Secure Boot. The script finishes by printing lines to be added to our layer’s configuration.
|
|
Follow the instructions above to use the generated keys in the build.
Demo
The demo below shows the process of enrolling custom keys and booting the signed system. The following steps are performed:
- UEFI Secure Boot is disabled
- UEFI is set to Setup Mode
- The
LockDown.efiexecutable is booted - Automatic Certificate Provisioning is triggered
- After restart UEFI Secure Boot is enabled
- The system is booted correctly
- Another system, which is not signed by the custom keys, is selected
- The system cannot boot due to incorrect signatures

What’s next
After implementing the features described in this post the next step is to think of potential improvements that will increase the quality of Zarhus without compromising the security of the solutions. One such improvement is developing a CI/CD pipeline, which will automatically create signed images ready to be deployed on embedded systems. Since signing is done during build, this could be reduced to a single step. However, this leads to a problem - if the signing is to be done automatically, it is crucial to ensure that the signing keys are stored and managed securely. One such way could be to use an external Hardware Security Module (HSM). HSMs are hardware devices, which, among other things, safeguard and manage secrets. They often offer mechanisms, which provide protection from tampering with their contents. They can be used to ensure that the keys are not altered or accessed by unauthorized entities. As of now, Zarhus requires keys to be present within the file system. This means that they would need to be temporarily extracted from the HSM in order to be used for signing. This creates a vulnerability, where a potential attacker could intercept the keys when they are on disk. However, there are ways to access HSM keys without saving them to the file system. The PKCS#11 standard defines an API that can be used to safely access and use the keys. Using this standard will require modifying the Yocto layer so that such communication is possible. In case this is not feasible, another method is to use key wrapping. HSM can export the keys in a wrapped form, where they are encrypted under another key that is kept secure. Only the wrapped keys are stored on the disk, and they are unwrapped by the build system during the signing process.
Summary
We managed to show that utilizing UEFI Secure Boot on MPL PIP4x platforms is
feasible, although some features, such as verifying that the certificate used to
sign bootable files has not expired, are not supported. The meta-secure-core
layer helps developers implement automatic file signing and verification with
relative ease. Implementing CI/CD, however, will require extra work to make sure
that everything can be done securely.