This blog post describes the latest phase of TrenchBoot AEM project, which consists of support for UEFI, as well as some test automation. The history of this project can be found in previous blog posts ([1], [2], [3], [4]). There are also other, more general posts about TrenchBoot.
What’s new in TrenchBoot AEM?
Adding support for UEFI installations was the main goal of this part of the project funded by NLnet foundation. An approach similar to that of Linux (which is currently being upstreamed) was used (the details are below). Even though this isn’t how Xen is normally booted with Qubes OS, it gets the job done.
Second, but not at all less important, objective was to ensure that we don’t break existing implementation for legacy systems. In order to do so, we’ve implemented automated tests to catch any misbehavior early, while simultaneously saving time that we would have to spend installing and reinstalling Qubes OS and AEM packages. Final bits and pieces are still being polished, but we believe that this work may be a decent foundation for fully automatic tests in the future.
The progress was tracked in this milestone on GitHub, as well as in tasks and issues linked within.
Next sections describe some of the implementation details, as well as history and rationale for design decisions made along the way. If you’re not interested in those and just want to test AEM for yourself, skip directly to installation instructions.
UEFI implementation
There are no significant changes on OS side when it comes to UEFI vs legacy
booting, the only parts that are different are instructions for GRUB
installation, and how grub.cfg is created. Users won’t even notice the latter,
as this is done automatically on package installation and upgrade.
Main difference is in how Xen is started. Without AEM, Qubes uses Multiboot2 protocol for both legacy and UEFI boot. The only difference is that GRUB for UEFI parses and handles EFI boot services tag within Xen’s binary by:
- not terminating UEFI boot services, and passing the information that they weren’t terminated in Multiboot2 tag
- not passing some of the data that the launched payload is supposed to obtain by itself (memory map, among other things)
- using different entry point
- passing UEFI system table and image handle pointers in dedicated MB2 tags
In case of legacy boot, EFI boot services tag in image header is simply ignored,
and GRUB provides all the data a payload may need in MB2 tags. As we can’t use
UEFI boot services (they are not measured in the chain rooted in DRTM), we
started by testing what would happen on UEFI if the bootloader simply ignored
this tag if slaunch is used. We quickly discovered that Xen ignores some of
MB2 tags and tries to obtain the data “the old way” - by scanning specific
regions of memory in search of some structure.
An example of such structure is ACPI Root System Description Pointer (RSDP), which points to the rest of ACPI tables. Depending on how the system is booted, it can be found in one of these ways:
- on legacy BIOS, it is located somewhere in the low memory, which must be scanned in search for magic number in the header (this is what Xen on legacy does),
- on UEFI, it can be obtained with the help of boot services and system table pointer (this is what Xen on UEFI does),
- a copy of RSDP is stored in MB2 tag, and GRUB is responsible for obtaining it using one of the above mechanisms, depending on environment (Xen doesn’t use it).
To address this problem, and probably similar one with SMBIOS later on, it was decided that a solution similar to what was requested by Linux maintainers for that system will be used. In that approach, kernel (be it Linux or Xen) is first started using normal UEFI entry point (so not MB2 in case of Xen), allowed to get everything it needs from boot services, and then jumps to Slaunch stub implemented and exposed by GRUB.
This required changes both in GRUB as well as in Xen. Because chainloader is
used instead of multiboot2 command, it also entailed modifications to
anti-evil-maid package, which is what is responsible for adding AEM entries in
grub.cfg. All of the changes can be found in following PRs:
-
GRUB:
-
MLE size reported in OS to SINIT data was being aligned to PMR size (2 MiB). If this didn’t match the size reported in MLE header, some ACMs treated it as an error.
-
#28: Enable booting of Slaunch-enabled EFI binaries via
chainloadercommandThis is the main GRUB implementation PR of current phase. It contains bulk of the changes required for making TrenchBoot work with
chainloadercommand. -
We’ve noticed that PCR values changed between boots. After some debugging, this is what we came up with to make the measurements more reliable.
-
#30: Fix AEM for Intel TXT on UEFI platforms
First round of testing exposed some errors in implementation for TXT, this PR fixes them.
-
-
Xen:
-
#21: Slaunch support for Xen.efi
This is the main Xen implementation PR of current phase.
-
#23: Fix AEM for Intel TXT on UEFI platforms
Complementary PR for GRUB #30, also fixes problems discovered during tests.
-
When implementing AEM for UEFI, we accidentally broke booting on legacy, this PR restores that functionality.
-
#25: Allow to-be-reserved-mem to be unlisted
During debugging of another problem, various firmware flavours and versions were tested. Some of them exposed a corner case on reserving TXT-related ranges that we haven’t considered earlier.
-
-
Secure Kernel Loader
-
#21: Update sizes and order of SLRT fields
Work on TrenchBoot support for Linux included modifications to SLRT, which had to be reflected in SKL.
-
#23: SKL loader amdsl v11 nopsp
This change (re)enabled booting on older AMD platforms, on which PSP isn’t involved in SKINIT.
-
-
Qubes Anti Evil Maid
-
#13: Boot using Xen.efi on EFI systems
Change to
anti-evil-maidpackage that modifies how entries ingrub.cfgfor AEM are created. Previously,multiboot2command was used to load Xen, the script has been changed to usechainloaderinstead.
-
Xen changes are already being upstreamed, newest set as of writing this blog post can be found here. GRUB changes were also sent as part of series for implementation of TrenchBoot in Linux, but that effort was put on hold until Linux counterpart gets merged.
You can find an overview of the upstream progress in the GitHub issues:
Testing
Each time new code is added, it should be tested. On top of that, we wanted to make sure legacy boot still works after adding support for UEFI. Everything had to be done for both Intel and AMD platforms, for TPM 1.2 and 2.0. This already gives 8 distinctive configurations, which already is beyond what could be tested manually in a reasonable amount of time, so automated tests had to be created.
Qubes OS is tested with openQA, so this is what
is used to test AEM. We even reuse existing test that installs the system, to
make sure each of the follow-up steps are started from the same state. Hardware
setup was described in earlier post,
it was extended to cover more platforms. Some of the steps are specific to
platform, those are described in our fork of openqa-tests-qubesos repository.
Since tests are run on platforms that aren’t dedicated just for AEM, their initial state may change between invocations - different OSes may be installed, which sometimes changes the boot order. To handle this, installation test was modified to choose proper boot medium automatically, regardless of the default one.
Writing tests for openQA takes some getting used to, it also requires at least basic understanding of Perl, because this is the language which openQA uses. Usually the flow of implementing new test (or part of it) consists of:
- running the test manually, noting every interaction (each key press, mouse movement, delay, visual verification of what is displayed)
- writing the notes in test module using openQA test API
- key presses become
send_keyor one of the more advanced subroutines liketype_string,enter_cmd,script_runor evenassert_script_run, depending on expected outcome - for raw mouse operations,
mouse_set,mouse_clicketc. can be used - delays use standard Perl
sleep, but it is rarely needed - video output can be checked by multiple subroutines, most common ones are
assert_screen,check_screenandassert_and_click- each of those take tag as an argument, it must be unique for what it represents, which in most cases means a new one has to be used; the screen will be compared against so-called needles, they will be created later
- key presses become
- starting the new test using command from one of subdirectories of
generalhw,
command for each platform uses different
FLAVOR- one way is to copy new file directly to the worker - not recommended, especially if multiple persons can work on tests simultaneously
- another option is to push it to GitHub repository and start the test with
CASEDIRandNEEDLES_DIRset accordingly (remember to use double%inNEEDLES_DIR, otherwise their preview won’t work!) - that way fresh tests are cloned to directory specific to given platform instead of common one
- open test in web UI and enable developer mode
- wait until it fails on an expected needle, and use the web UI to define it
- repeat for each new needle
- test can be continued after the needle is created
- copy new needles (both PNG and JSON files) and commit to the repository
- rerun the test without enabling developer mode to check if it passes
The above process was repeated for each of the defined configurations. In some cases needles could be reused (e.g. boot selection menu on the same platform looks identical, regardless of TPM family), but in others they had to be created from scratch. After gaining some fluency with test API, the first two steps can be merged together and performed as one.
Encountered problems
At first, none of the existing needles for Qubes OS matched the output. It was
caused by wrong order of channels (BGR instead of RGB) due to
a TC358743 bug. Previously
it was handled by a patch to ustreamer, but since version 6.8 of that program
it is possible to pass --format-swap-rgb flag to produce output in correct
format. It seems that the newer version is also more stable, old one required
some tests to be restarted to get a valid output.
Trying to run multiple tests simultaneously showed that our initial idea of extracting ISO and starting the installer over the network didn’t work as expected. With simultaneous execution and bad timing, newer tests overwrote Kickstart config file before earlier ones were able to consume it. This was resolved by starting the installation from storage mounted by PiKVM, separately for each platform. It also made installation slightly faster.
Unfortunately, SeaBIOS doesn’t handle multifunction USB devices too well - it iterates over all functions, but the loop stops after finding first supported class (keyboard, mouse or storage). Luckily, the first one exposed by PiKVM is keyboard, or we would get stuck much earlier. To work around that, as of now platforms running Dasharo must use regular USB stick with the installer. HP t630 running its original BIOS doesn’t have this problem.
Testing also exposed more issues, both in AEM implementation as well as in Dasharo, some of them are already fixed:
- AEM not booting on Intel legacy boot
- UEFI AEM PCR values change between boots
- AEM for UEFI v0.5.0-rc2 doesn’t boot on Intel
- Improve TPM event log for AEM
- AEM doesn’t work on Dell Optiplex 7010 in UEFI mode
- Firmware preparation instructions
- Intel TXT doesn’t work on VP4670
- Hangs during microcode update
Viewing the results
We’ve created our own instance of openQA at openqa.3mdeb.com:
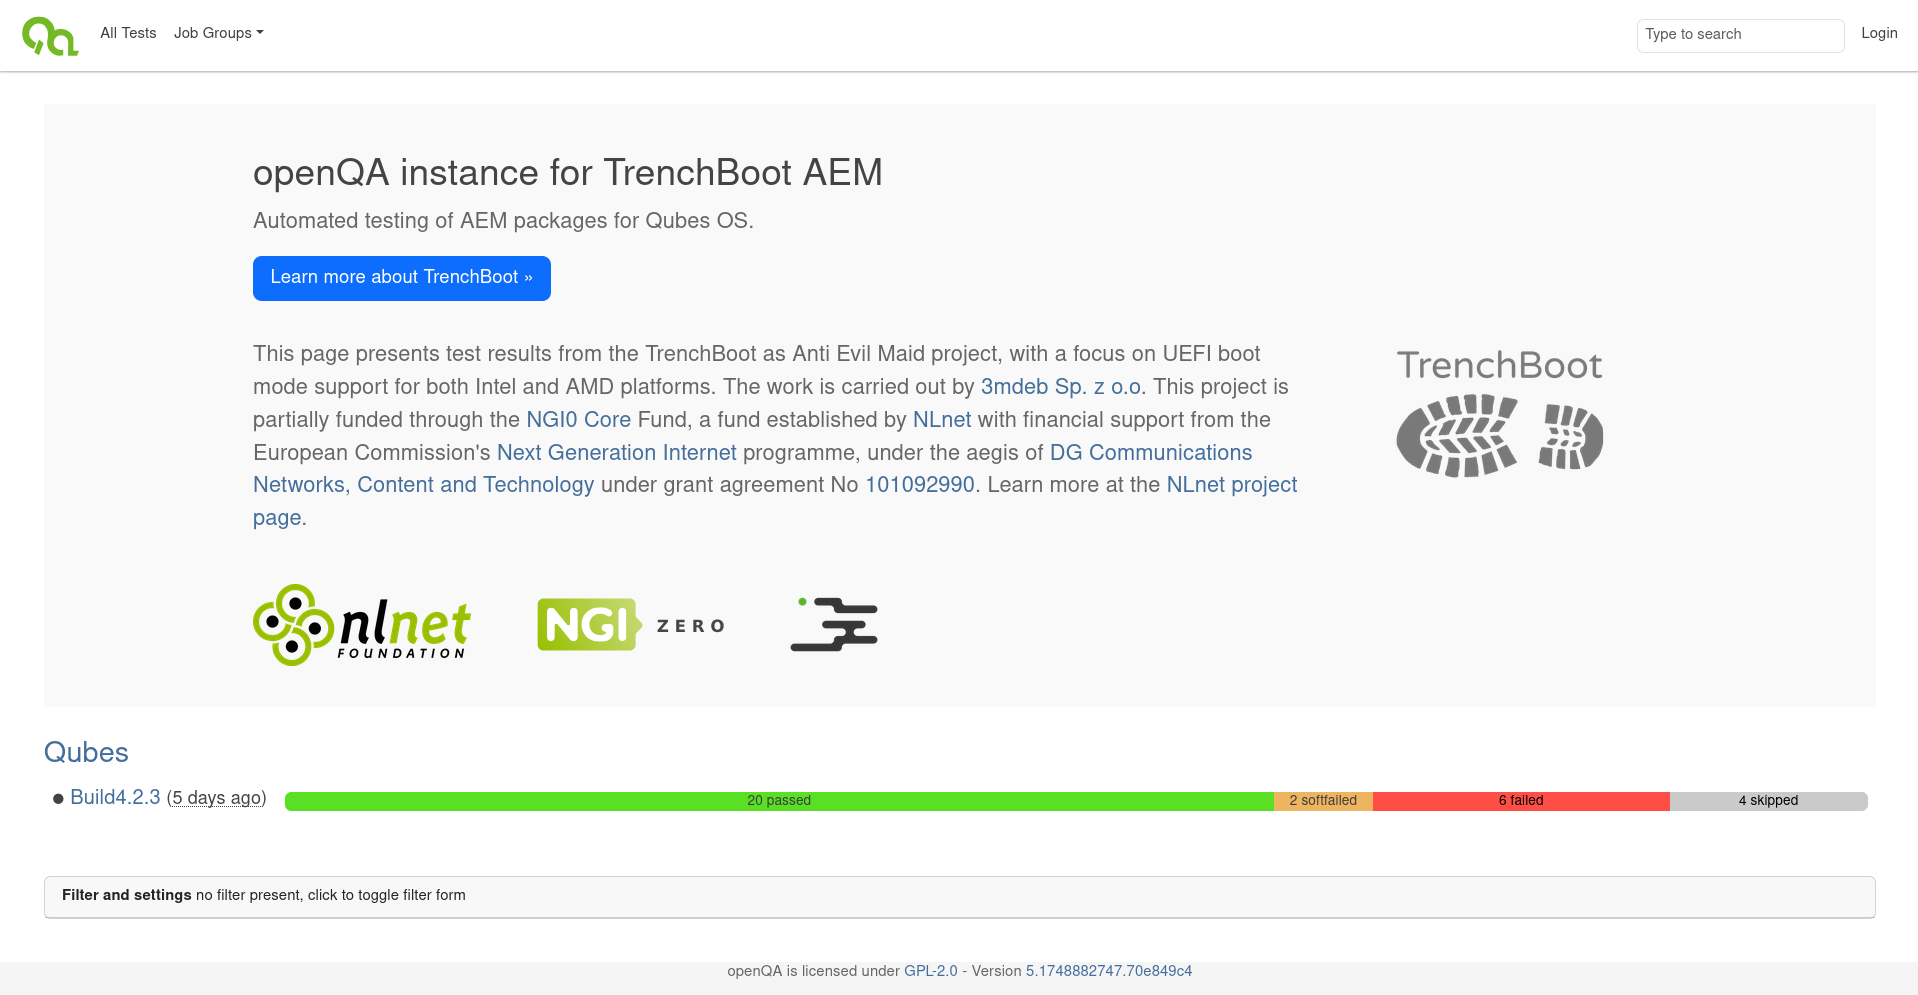
The results are public and can be browsed by anyone, but new tests can only be started by few of 3mdeb developers, as it uses platforms in our lab that may be required in other projects. Navigation through the openQA panel shouldn’t be difficult, but to better understand some of the more hidden features, we’ve prepared user intro documentation.
Installation instructions
If you’re reading this post some time after its publication, the instructions may be outdated due to newer package versions. In that case follow steps from the official TrenchBoot documentation.
AEM is installed in a very similar way to previous phases, but some versions are different, and one of the steps is executed in legacy mode only. Because of that, only raw instructions are listed below, for explanation of the steps please refer to the previous blog post. All of the steps are run as root in dom0.
-
Create
/etc/yum.repos.d/aem.repowith the following content:1 2 3 4 5 6[aem] name = Anti Evil Maid based on TrenchBoot baseurl = https://dl.3mdeb.com/rpm/QubesOS/r4.2/current/dom0/fc37 gpgcheck = 1 gpgkey = https://dl.3mdeb.com/rpm/QubesOS/r4.2/current/dom0/fc37/RPM-GPG-KEY-tb-aem enabled = 1 -
Download and import signing key:
1 2qvm-run --pass-io sys-net 'curl -L https://dl.3mdeb.com/rpm/QubesOS/r4.2/current/dom0/fc37/RPM-GPG-KEY-tb-aem' > RPM-GPG-KEY-tb-aem rpm --import RPM-GPG-KEY-tb-aem -
Intel only, download official package from Intel and extract ACM appropriate for your platform to
/boot/. -
Install prerequisite packages:
1 2 3 4 5 6 7qubes-dom0-update --enablerepo=qubes-dom0-current-testing \ oathtool \ openssl \ qrencode \ tpm-extra \ trousers-changer \ tpm-tools -
Prepare list of AEM packages:
1 2 3 4 5 6 7 8 9 10 11 12 13packages=( "anti-evil-maid-4.2.1-1.fc37.x86_64" "grub2-common-2.13-1.fc37.noarch" "grub2-tools-2.13-1.fc37.x86_64" "grub2-tools-extra-2.13-1.fc37.x86_64" "grub2-tools-minimal-2.13-1.fc37.x86_64" "python3-xen-4.17.5-7.fc37.x86_64" "xen-4.17.5-7.fc37.x86_64" "xen-hypervisor-4.17.5-7.fc37.x86_64" "xen-libs-4.17.5-7.fc37.x86_64" "xen-licenses-4.17.5-7.fc37.x86_64" "xen-runtime-4.17.5-7.fc37.x86_64" )For legacy only:
1 2 3 4packages+=( "grub2-pc-2.13-1.fc37.x86_64" "grub2-pc-modules-2.13-1.fc37.noarch" )For UEFI only:
1 2 3 4packages+=( "grub2-efi-x64-2.13-1.fc37.x86_64" "grub2-efi-x64-modules-2.13-1.fc37.noarch" )For AMD only:
1 2 3packages+=( "secure-kernel-loader-0+224af56470eff64f2cc1f74c1e1099d3f170636f-1.fc37.x86_64" ) -
Install the packages (first command reinstalls existing packages in case the same version numbers exist on official Qubes repositories, second one only adds new packages):
1
2
qubes-dom0-update --disablerepo="*" --enablerepo=aem --action=reinstall -y ${packages[@]} qubes-dom0-update --disablerepo="*" --enablerepo=aem --action=install -y ${packages[@]} -
Legacy only, update GRUB (change
sdxto your disk!):1grub2-install /dev/sdx -
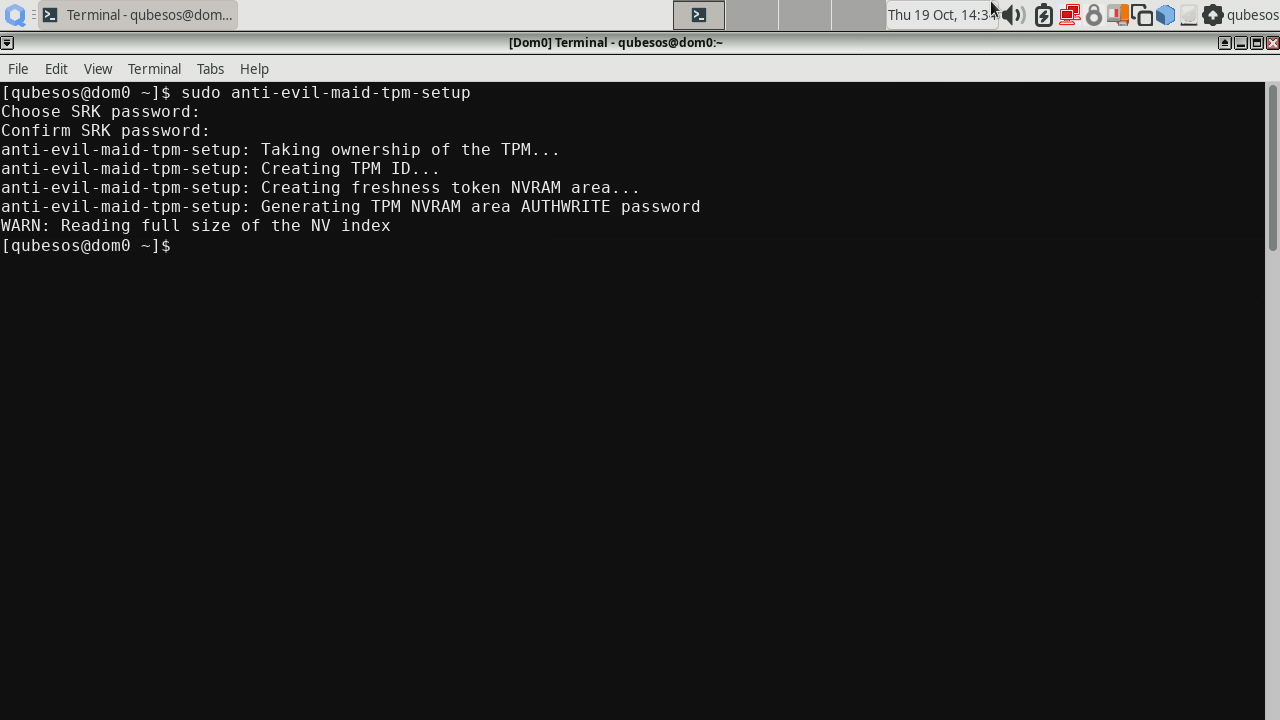
Set up the TPM:
1anti-evil-maid-tpm-setup -zThe result should be:
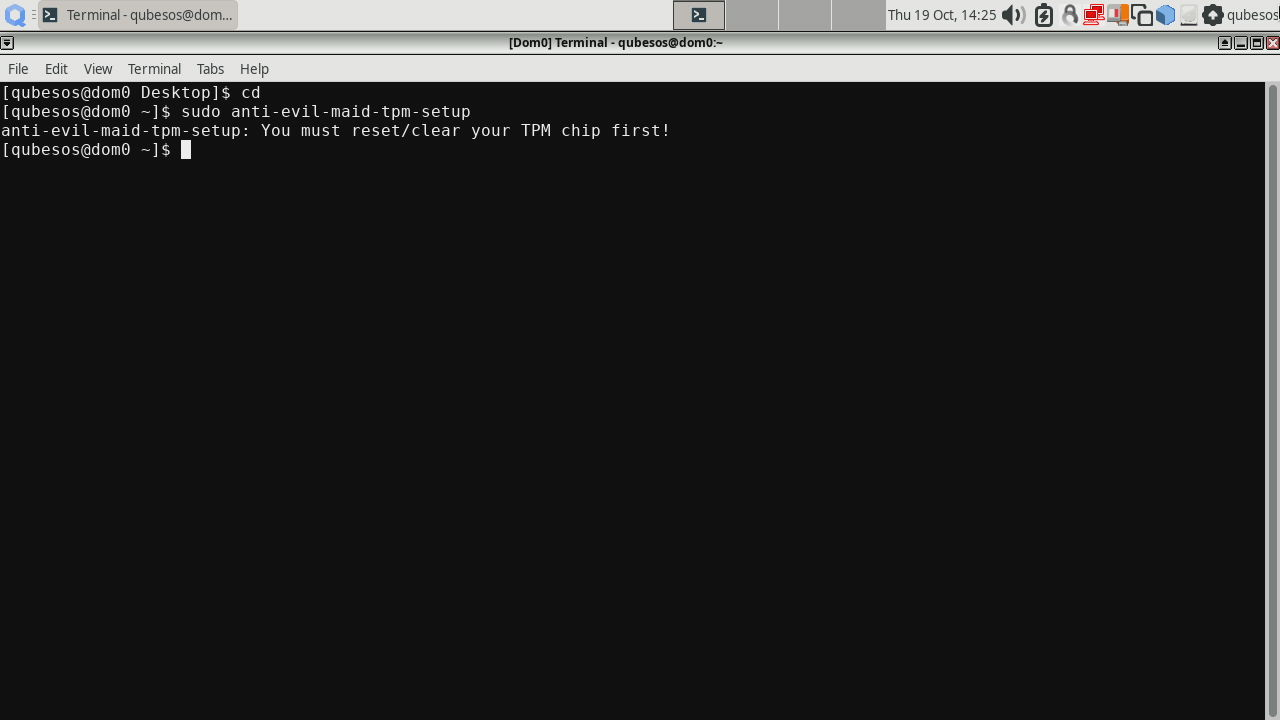
If it complains that the TPM needs to be reset first like in the screenshot below, reboot, enter BIOS setup, search for option to reset the TPM, do it (e.g. for Dasharo with UEFI and TPM 2.0 it looks like this), boot to system and rerun this command.
-
Install AEM on boot partition (change
sdxNto your boot partition!):1anti-evil-maid-install /dev/sdxNBoot partition can be obtained with
df --output=source /boot. -
Store the secret to be printed by AEM (change it to something only you know):
1echo "really big secret" > /var/lib/anti-evil-maid/aem/secret.txt -
Reboot twice and enjoy working AEM.
Summary
This sums up the work on implementation and testing of AEM on UEFI systems. We hope that it will be useful to others. It was tested on limited number of configurations, so there may be issues on other platforms that we weren’t able to catch. In case of any problems, don’t hesitate to contact us in dedicated room on Matrix.
Unlock the full potential of your hardware and secure your firmware with the
experts at 3mdeb! If you’re looking to boost your product’s performance and
protect it from potential security threats, our team is here to help. Schedule
a call with
us or
drop us an email at contact<at>3mdeb<dot>com to start unlocking the hidden
benefits of your hardware. And if you want to stay up-to-date on all things
firmware security and optimization, be sure to sign up for our newsletter: