This post is about testing Qubes OS on hardware via openQA. It’s not the first such setup because it was done before by Qubes OS upstream, but this one is sufficiently different to present different challenges. The original setup has been covered in this post (its video version) and touched upon in another conference talk. Additionally, you can read about one more hardware setup employed by openSUSE here.
We’ll start by looking at how openQA and PiKVM are structured as that defines testing setup and should help understand it.
UPDATE 2024-01-18: removed dead link for os-autoinst after PR was merged
upstream.
openQA overview
openQA test run is essentially a sequence of waiting until screen of a system under test (SUT) matches some predefined screenshot (“needle”) followed by sending that system mouse or keyboard events to make it advance to the next expected screenshot. In addition to the screen, matching can also be done on console’s output.
Matching of the screen is mostly done only on parts of needles so that the rest of the screen can change without affecting the test. You can also define areas of needles as clickable or request text recognition.
Tests are written in Perl and are largely a sequence of API calls provided by os-autoinst which is responsible for processing them.
os-autoinst is executed by an openQA worker. How exactly screen is collected
or input is sent is determined by backend configured for the worker.
generalhw backend was added for the purposes of testing Qubes OS and other
systems without the use of some BMC.
There can be multiple workers, local or remote, all of which are managed by openQA server which also serves a Web interface along with a REST API.
PiKVM overview
PiKVM is based on Arch Linux, so you can install various software as needed. However, do remember that Arch Linux doesn’t support partial updates and if installation results in updating anything already installed you better update every other installed package or things can stop working.
PiKVM’s core is its kvmd service combined with auxiliary ones like kvmd-otg,
kvmd-janus, kvmd-nginx, kvmd-vnc and ustreamer (not necessarily an
exhaustive list).
kvmd launches ustreamer to capture video stream, encode it (MJPEG
or H.264) and publish it to shared memory. ustreamer includes a plugin for
Janus which turns ustreamer’s data into a stream source to Janus for
displaying it in Web interface over WebRTC.
PiKVM also supports VNC (disabled by default) that uses the same data published
by ustreamer.
Overview of the setup
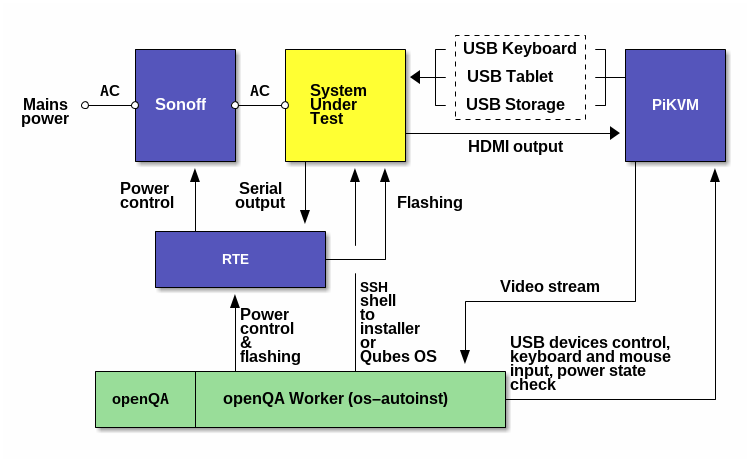
Legend:
- yellow - hardware on which Qubes OS is being installed and run (SUT)
- green - openQA server and worker installed on the same openSUSE system
- blue - extra hardware used to control the SUT
System Under Test (SUT)
In this case it’s an MSI PRO Z690-A DDR5 board running open-source Dasharo firmware.
Sonoff
Sonoff power switch is used to cut off power of the board, making it possible to flash BIOS via an external programmer (RTE in this case, see below).
RTE
RTE is connected to SUT’s flash chip, its power control pins and serial output pins. There is only serial output without input as that’s what the board exposes.
openQA server and worker
Both parts of openQA are installed on the same openSUSE Tumbleweed system in this setup. You can read about example installation here.
PiKVM
PiKVM was initially thought to provide VNC for openQA worker but that didn’t work out (more on that below).
In the absence of serial input PiKVM provides a way to use these MSI boards (Z690-A and Z790-P) remotely for humans and testing automatically by means other than openQA (Robot framework in case of OSFV). Mentioning this here because it affects the setup by requiring to effectively switch some of PiKVM services off while openQA is doing its work. Otherwise, it would be possible to install openSUSE on Raspberry Pi and put the worker there.
Typical test execution flow
Now that components of the setup are known, let’s go through an example of openQA log with comments about what’s going on and where. Every test run uses all components and calls every script there is, so this should be a nice way to talk about operation of all of them. Both large and small parts of the log were cut out because it contains thousands of lines of output most of which are of no real interest unless test failure occurs.
For better readability, IP addresses were changed to indicate what device they
belong to but they still look like addresses, for example: 192.168.kvm.ip.
|
|
Soon after launch OpenQA starts encoding video stream collected while the
test is being run. This is worth a note to avoid confusion with the video
stream generalhw backend receives from the SUT.
|
|
The SUT (DUT is “Device Under Test” in the log) is about to be flashed with a drive image and it should be turned off for that. In this particular case it is on and a helper script (more on that later) requests RTE to turn it off and then waits until SUT reaches the target state. This does not switch Sonoff, SUT just gets to S5 ACPI power state.
|
|
The verb “flash” should be interpreted loosely here. It can be any kind of data writing operation meant to prepare SUT for the test. In this setup it means:
- Setup of USB OTG to provide input and storage via
gadget-controlscript (done on PiKVM) - Flashing of BIOS (done on RTE)
- Testing that
gadget-controlscript is listening for commands
Input is set up here only because gadget-control manages both input and
storage.
Testing of input is done just to catch some possible issue. Flashing BIOS
takes at least a minute, so if gadget-control is still not up, something must
have gone wrong.
The BIOS is flashed in order to make sure it’s a working one and with settings necessary to automatically start Qubes OS installer (SUT is mainly used for testing of Dasharo firmware, so it’s not necessarily in a working state before the test has started). The image specific to the SUT is stored on RTE connected to it, it was obtained by making necessary adjustments and reading the flash (its “bios” region to be specific; done this way because flashing script writes just this region by default and the rest can be assumed to be OK).
|
|
Second power off in a row needs an explanation. For some reason starting “VM”
(which is real hardware in this case) in generalhw backend involves a
restart. This is why it’s important to be able to tell SUT’s poweron state or
have power on/off commands that don’t act as a toggle of the state (which is
how a power button usually works).
|
|
Powering the SUT has a number of prerequisites:
- Video input of the PiKVM must be initialized with an appropriate EDID to force use of 1024x768 resolution expected by needles in test suite of Qubes OS
- DV (digital video) timings must be set in order for video capturing to work;
not doing this will result in
ffmpegreportingioctl(VIDIOC_G_PARM): Inappropriate ioctl for deviceand then waiting for video data indefinitely kvmd-otgandkvmd-janusservices need to be stoppedgadget-controlneeds to be started
Steps 3 and 4 are done by the flash script.
Steps 1 and 2 are always done on power on/off because querying the state of the
SUT is done by attempting to receive a video stream which won’t work if you
won’t set timings and you want to set EDID to the right value before setting
timings. Such a weird way of testing power state of a device was used in the
absence of anything better in a given hardware setup.
If the system is up, it’s video output is up and
sends data, so it actually works provided that you take some precautions (more
details in the section on the power script). As a reminder, knowing current
state is required because attempting to power off a system that’s powered off
will likely turn it on (and if you send several requests in a row, only the
first one might affect the state and others will be ignored because transition
is in progress, thus making final result a mystery).
A better and more reliable way of checking power state would be monitoring power LED state (thanks to marmarek for mentioning this). The power script can be simplified once hardware setup is updated accordingly.
By the way, terminology used by openQA can be surprising and its use is not very consistent. Just know that test suites like the one linked above are called “distributions” and shortened to “distri”.
|
|
generalhw thinks that /dev/video0 is where openQA worker is running and
attempts to query its DV timings. Thus this error doesn’t indicate any issue.
|
|
This is when generalhw starts receiving frames from the SUT.
|
|
There is no corresponding log line but GENERAL_HW_INPUT_CMD is invoked here.
|
|
Not really obvious but it’s os-autoinsts’s way of saying that tests are about
to start executing.
|
|
We’ve just got to part specific to Qubes OS setup. Test suite in addition to
video, mouse and keyboard, also needs access to shells. QEMU-based tests use
virtio consoles, real hardware uses SSH. The catch is that SSH server is off
by default in the installer and installed system. In order to automate working
around that a Kickstart script needs to be supplied to the
installer via kernel parameters.
Original Qubes OS testing setup extracts files from installation ISO and patches
them to achieve this (see the script). That setup also uses
installation over LAN which needs that extraction step anyway (you can see in
the script recreation of ISO as well as some hardware needs an ISO). This setup
however does it simply by interactively editing GRUB’s commands to append
inst.sshd inst.ks=http://192.168.kvm.ip:6789/ks.cfg.
ks.cfg file is served by Nginx bundled with PiKVM. It’s already
installed, always running and might as well perform this task. Kickstart file
can run shell commands before and after installation and also has various
builtin commands.
|
|
This is the first time worker connects to the SUT. It happens during installation process.
|
|
Installer has finished and system is about to be reboot.
|
|
Worker connects to the SUT again after reboot, it’s no longer an installer.
|
|
Tests have finished and SUT is being shut down. There is “Device or resource
busy” error when attempting to access /dev/video0 on PiKVM, which prevented
determining initial SUT’s state. This happened because ffmpeg process there
was still running. On the second probe, DUT’s/SUT’s state was determined to be
off and the script has exited.
Configuration and scripts
/etc/openqa/workers.ini file specifies which workers exist, what kind of
workers they are and their settings. Here’s a possible configuration (if you
change yours, don’t forget to restart corresponding worker to apply the changes):
|
|
GENERAL_HW_VIDEO_CMD_PREFIX here is an extension in a patched version of
os-autoinst to be able to run ffmpeg via SSH. The changes can be found
in an upstream PR, merged on January 16th.
Workers have numeric names. You specify worker’s class, its hostname (which seems to be unused when worker and server are on the same machine), where to find scripts, any other variables and how to invoke the scripts.
The following sections cover the scripts. The description will be primarily about what they do and why rather than how because it’s unlikely to be directly applicable in any other setup.
gadget-control script for PiKVM
It’s a script from Qubes OS test hardware setup. It provides keyboard, mouse and storage. Works fine without modification, although you might find it helpful to comment out these lines if you’ll get an error from them (uncomment them back after a successful run).
The script can take commands on standard input or listen to a Unix socket. The latter method is used during test runs.
An interesting thing is that after stopping kvmd-otg and starting
gadget-control, keyboard works in PiKVM’s Web-UI as before (but not the
mouse; if you go through materials mentioned at the top, you’ll know that
gadget-control provides a tablet gadget instead of a mouse). I didn’t check
it but device id probably ends up being the same, which would explain this
behavior.
generalhw script for PiKVM
This is a helper for PiKVM which switches between gadget-control and PiKVM.
The most interesting bit about it is cleanup of USB gadgets from configfs.
gadget-control creates /sys/kernel/config/usb_gadget/kbd and kvmd-otg
creates /sys/kernel/config/usb_gadget/kbd. Two gadgets can’t be both
functional at the same time and if either wasn’t cleaned up the other won’t be
created. generalhw script does cleanup via
|
|
rm -rf won’t do as it stops the traversal after hitting an error while
find -delete treats every deletion independently and does the job. There is
also a write of empty line to .../UDC file inside of gadget’s directory to
disable it.
flash script for openQA worker
SSH as used here and in several other places requires extra options. The command looks like this:
|
|
Devices aren’t available on the Internet, so no need to distribute keys and can
use password authentication via sshpass. Trust in target hosts is also
implicit, so avoiding a failure with StrictHostKeyChecking=no and disabling
printing warnings with -q. UserKnownHostsFile=/dev/null is necessary
because of $HOME directory (/var/lib/empty) is read-only for openQA worker.
Of course this can be made more secure but you might not want to complicate
things at least at first.
You can read this in man ssh_config in relation to UserKnownHostsFile:
A value of none causes ssh(1) to ignore any user-specific known hosts files.
However, setting UserKnownHostsFile=none somehow results in authorization
failure in this case while UserKnownHostsFile=/dev/null works fine.
In addition to flashing the script is also responsible for starting
gadget-control in background on PiKVM. There are several pitfalls to watch
out for when trying to launch background process remotely. The correct command
has the following form:
|
|
In short (also see):
- do not drop quotes and accidentally redirect on the client side
- don’t bother with
nohupas no pseudo-terminal is allocated - don’t bother with
setsidordetach - don’t bother with starting terminal multiplexer unless you actually need it
- make sure that no SSH descriptors are kept open by the command or calling
side will wait for them (input isn’t redirected above which works fine, but
it won’t always work, so use
</dev/nullor-noption if unsure)
input script for openQA worker
A simple one, just runs this command on PiKVM over SSH:
|
|
/tmp/gadget-control is a Unix socket on which gadget-control script receives
its commands.
power script for openQA worker
As mentioned earlier, video capturing is used for checking SUT’s state. And video requires EDID and DV timings to be set.
EDID is set via
|
|
Documentation says you can use - for file name and pass its contents via
stdin, but this results in checksum failure even when using path to file with
the same content works. EDID file is stored on PiKVM. It’s original EDID read
via v4l2-ctl --get-edid and then updated to use 1024x768 resolution by default.
Setting timings doesn’t require any files, but values need to correspond to EDID:
|
|
See respective sections below for more information.
sol script for openQA worker
This is just another application of socat, this time without SSH:
|
|
RTE makes serial connection available over the network via ser2net, so just
need to read from it (do not open the same device via minicom on RTE, there
can be only one client).
Serving ks.cfg via Nginx
Installer needs to download this file from somewhere and PiKVM is a good choice
for the task. The file doesn’t have to be static and can be modified before
starting the installation if it’s necessary to change IP address, for example.
http section of /etc/kvmd/nginx/nginx.conf should be extended with lines
like these:
|
|
Then put /etc/kvmd/nginx/ks.cfg:
|
|
The file is based on ks.cfg.jinja with some changes:
- Use of password instead of a key for SSH user account of the installer
- Allowing password login over SSH in the installer
- Explicitly setting IP address to enable network
- Dropping partitions from the previous installation
- Removing parts related to
is_tcp_serial
openQA configuration and posting a job
Configuration of openQA has install-iso-hw flavor associated with msi
machine in job groups like so (there might be a prettier way; also not showing
other lines for brevity):
|
|
And msi machine has in its configuration:
|
|
openQA matches WORKER_CLASS value of machines against the same variable in
/etc/openqa/workers.ini to figure out which worker should handle a task.
Example command-line for posting a job:
|
|
generalhw backend passes GENERAL_HW_FLASH_CMD script only HDD_* variables
on invocation, so if you want to use isos, you need to duplicate its value in
HDD_1 and make it available in /var/lib/openqa/share/factory/hdd (symlink
works).
Background information
EDID
EDID communicates supported capabilities of a video sink (display or a something like HDMI input in this case). By default, the highest supported resolution is picked which might be larger than what openQA expects to work with (1024x768).
As a workaround one can start with the original EDID and adjust suggested resolution in it.
Viewing and checking checksum correctness can be done online via
http://www.edidreader.com/ that supports pasting EDID in a hex dump form.
Default resolution is in Block 0/Standard Timing Information/Descriptor 1.
This site won’t help with editing though.
Another helpful site is https://thyge.github.io/edid-editor/. It’s less
convenient for viewing as you have to select a local file with .bin or .txt
extension to view (there is no error if extension is wrong, UI will just act
weird), but there is editing support. UX isn’t great and needs an explanation:
-
Click “Browse…”
-
Click “EDIT”
-
I remember unselecting 1280x1024@75 in “Established Timings”, but that might not be necessary
-
More important is to edit display descriptor:
- Remove the top one first to be able to add a new one
- Press “CREATE TIMING”
- Set “Horizontal/Vertical Pixels”
- Click “Add”
-
Click “DOWNLOAD FILE” which will be named
test.bin -
Convert binary data to textual format expected by
v4l2-ctl --set-edid ...:1hexdump --format '16/1 "%02x " "\n"' test.bin
While editing, EDID also appears in the top-right corner and it’s possible to copy&paste that as text but in a different format.
DV timings
In addition to EDID, there is also video format and timings. Setting video format didn’t help, but timings did make the difference. If timings are off, some portion of the screen might be filled with green, so they need to align with EDID, for example:
|
|
I initially missed reduced-blanking and total width and height were off in
the output of v4l2-ctl --get-dv-timings compared to same output when PiKVM was
capturing the video. I still got partially green screen (like
here) and spent some time trying to match PiKVM’s settings with
commands like:
|
|
But in the end that turned out to be unnecessary, green areas are visible in PiKVM Web-UI as well and are apparently expected for the first frame or two.
Setting video format with --set-fmt-video wasn’t necessary probably because
default worked fine, but do know that it might be needed.
Video hangs
Getting ffmpeg to start capturing video doesn’t guarantee that it won’t stop
doing that. In particular it seems to happen whenever SUT resets or changes
video settings. generalhw backend works around that by verifying output of
v4l2-ctl --get-dv-timings every 3 seconds and restarting ffmpeg when change
is detected.
However, that’s doesn’t seem to be enough (video hangs still occur), so ffmpeg
invocation is prefixed with timeout 4s which causes generalhw to restart it
regularly (it handles death of the process). SSH connection is
multiplexed with control master keeping unused connection alive
for 60 seconds to avoid unnecessary delays due to reconnections.
Video capturing
After figuring out EDID and DV timings, the next step is to get video streaming
going. A variety of approaches were looked at here, because generalhw backend
really assumes it works on the same machine that captures the video and I needed
to stream the data over the network.
PiKVM’s VNC
This was the original idea. In addition to video, VNC was expected to provide
keyboard (after mapping key names) and mouse (maybe not, generalhw might
depend on mouse being presented as a tablet to specify absolute coordinates).
After openQA started to fail during VNC login, turned out that generalhw needs
to specify PiKVM’s password and PiKVM needs to enable VNCAuth security type.
Unfortunately PiKVM’s VNC still wouldn’t work with openQA because of mismatched
formats. openQA supports only raw and ZRLE encodings, while PiKVM provides
Tight JPEG and H.264. Tight JPEG seems to be just: 1 byte of compression type,
1-3 bytes of data length, JPEG file of that length. os-autoinst has a Perl
extension that is written in C++ and uses OpenCV which should do just fine with
parsing JPEG. So in principle one could add its support to openQA (there were
also some zlib streams, which I didn’t get, but it shouldn’t complicate things
too much).
cat /dev/video0 over SSH
You can find a suggestion to do ssh host cat /dev/video0 | ffmpeg ... but that
doesn’t actually work. In addition to getting stream of bytes from
/dev/video0, there is also a bunch of ioctl() calls needed to interpret
them or configure the device.
Encode stream and send over SSH
You could use a similar approach and move ffmpeg to PiKVM and send encoded
data over SSH to then consume it. In most cases, this resulted in PiKVM
running out of memory and rebooting.
There are a bunch of parameters you can play with or ffmpeg version with
Raspberry Pi optimizations, but it didn’t seem like a working solution.
Also tried gstreamer but it didn’t behave noticeably better.
WebRTC
I was almost certain that WebRTC was created to make video streaming
easy, turned out it’s basically a subset of browser’s API which is not generally
usable. It doesn’t provide a way to publish or consume an arbitrary stream
and works only between specific client and specific server that were meant to
work together. Which is why my idea of using WebRTC stream provided by Janus as
for generalhw backend was doomed to fail.
RTMP
Video streaming isn’t something new, so it was natural to look up existing protocols. Things seem more complicated than I expected (many solutions assume many-to-many broadcasting with transcoding and other stuff that’s unnecessary here), but because I found Nginx module for RTMP I gave it a try.
Using ffmpeg to publish the stream worked, but the delay was about 30 seconds
or even more. Latency eventually improved but only down to about 10 seconds.
That seems like a common problem, some people manage to combat it, but others
get stuck even when using the same settings.
Modifying plugin of ustreamer to send RTMP stream after packing H.264 into
FLV worked partially: server received the stream, but didn’t provide it to
clients. Something must have been wrong, but not sure what. The point was to
eliminate ffmpeg and possibly reduce the latency.
Running ffmpeg on PiKVM
Eventually running ffmpeg over SSH turned out to work, but not the way it was
tried initially: with 2 frames per second and “encoding” into PPM.
The various attempts wouldn’t be necessary if it was known how little openQA needs, but that part seems to not be documented.
More alternatives
There is also SRS, but it had issues with authentication.
One more possibility is using v4l2rtspserver which isn’t packaged for Raspberry Pi and might have delay issues like RTMP approach.
These were looked at as less resource-hungry alternatives to ffmpeg which also
requires a server (there used to be ffserver, but it got removed).
Limitations
The most noticeable is that OpenQA supports grabbing resulting HDD image (via
script set in GENERAL_HW_IMAGE_CMD variable) and sharing it between tests.
Upstream’s setup abuses LVM snapshots for this (in openqa-flash
script). This setup doesn’t handle image sharing or downloading at the moment.
Stability
Tests don’t always succeed when they should. There are many moving parts and sometimes they misbehave with failed test passing on second try. Some of this might be hard to address, but other issues should be ironed out once the reason behind occasional failures is known (debugging a setup spanning multiple devices is not exactly easy).
Summary
The post provided another example of using openQA to test Qubes OS on hardware, this time with opeQA worker being local to the openQA server and remote relative to PiKVM.
In general, unless you’re reproducing an existing working setup exactly, you’ll have to deal with challenges like those covered in this post. It was written to document issues, solutions, and possible alternatives to consider if there will be another need to do something similar in the future to make it easier. As practice has demonstrated, setups like these are rare and hard to get working, so extra help won’t hurt.
And if you’re looking for hardware that supports open-source development and is designed with transparency in mind, explore the modules and devices available in our open-source hardware category in the online shop.