Introduction
Docker is an open-source tool used for creating, deploying, and running applications using containers. It performs operating-system-level virtualization, also known as “containerization”. A container is a standard unit of code with libraries, dependencies and other configuration and binaries needed to run it.
Containers allow applications to run independently of the system they are running on. It is handy when creating an application that runs on our computer but not on another programmer’s computer. A program that uses many dependencies and libraries may not run on another computer due to incorrect versions. In this case, we only need to define necessary dependencies and pack our application in a container. Regardless of the operating system, it should run on each computer with an installed Docker.
Another great advantage is that the containers are isolated from the environment so it is very unlikely that we could destroy our environment or other containers. You can read more about Docker basics here.
Why Docker
We could create virtual machines for testing embedded systems, but such a solution would have many disadventages. One of the biggest advantage of Docker is its portability and performance. A virtual machine acts as a physical computer and uses the physical resources of the device it is operating on to replicate the environment of a physical device. A fully virtualized system has its own resources. Containers are lightweight because they don’t boot a separate operating system per virtual machine. They also share a kernel and common layers across images.
Let’s say that we have a hundred of tests that need a database, and each test needs the same copy of a database. In case each test modifies a database we need to reset a database after each test. With Docker we can create the image of our database and run one instance per test. Additionally, the simplicity of creating images using Dockerfile makes it much easier to transfer them to another computer. But there are pros and cons. Fully virtualized systems are more isolated than containers but for embedded testing, we don’t need this advantage.
But there are other ways to create virtual environments, for example, using Python virtualenv so why not use it? Of course we can, with the difference that virtualenv only encapsulates Python dependencies. A container encapsulates an entire operating system and gives much more power. We can even run virtualenv on Ubuntu, Debian or Linux Mint inside Docker container.
Project description and execution
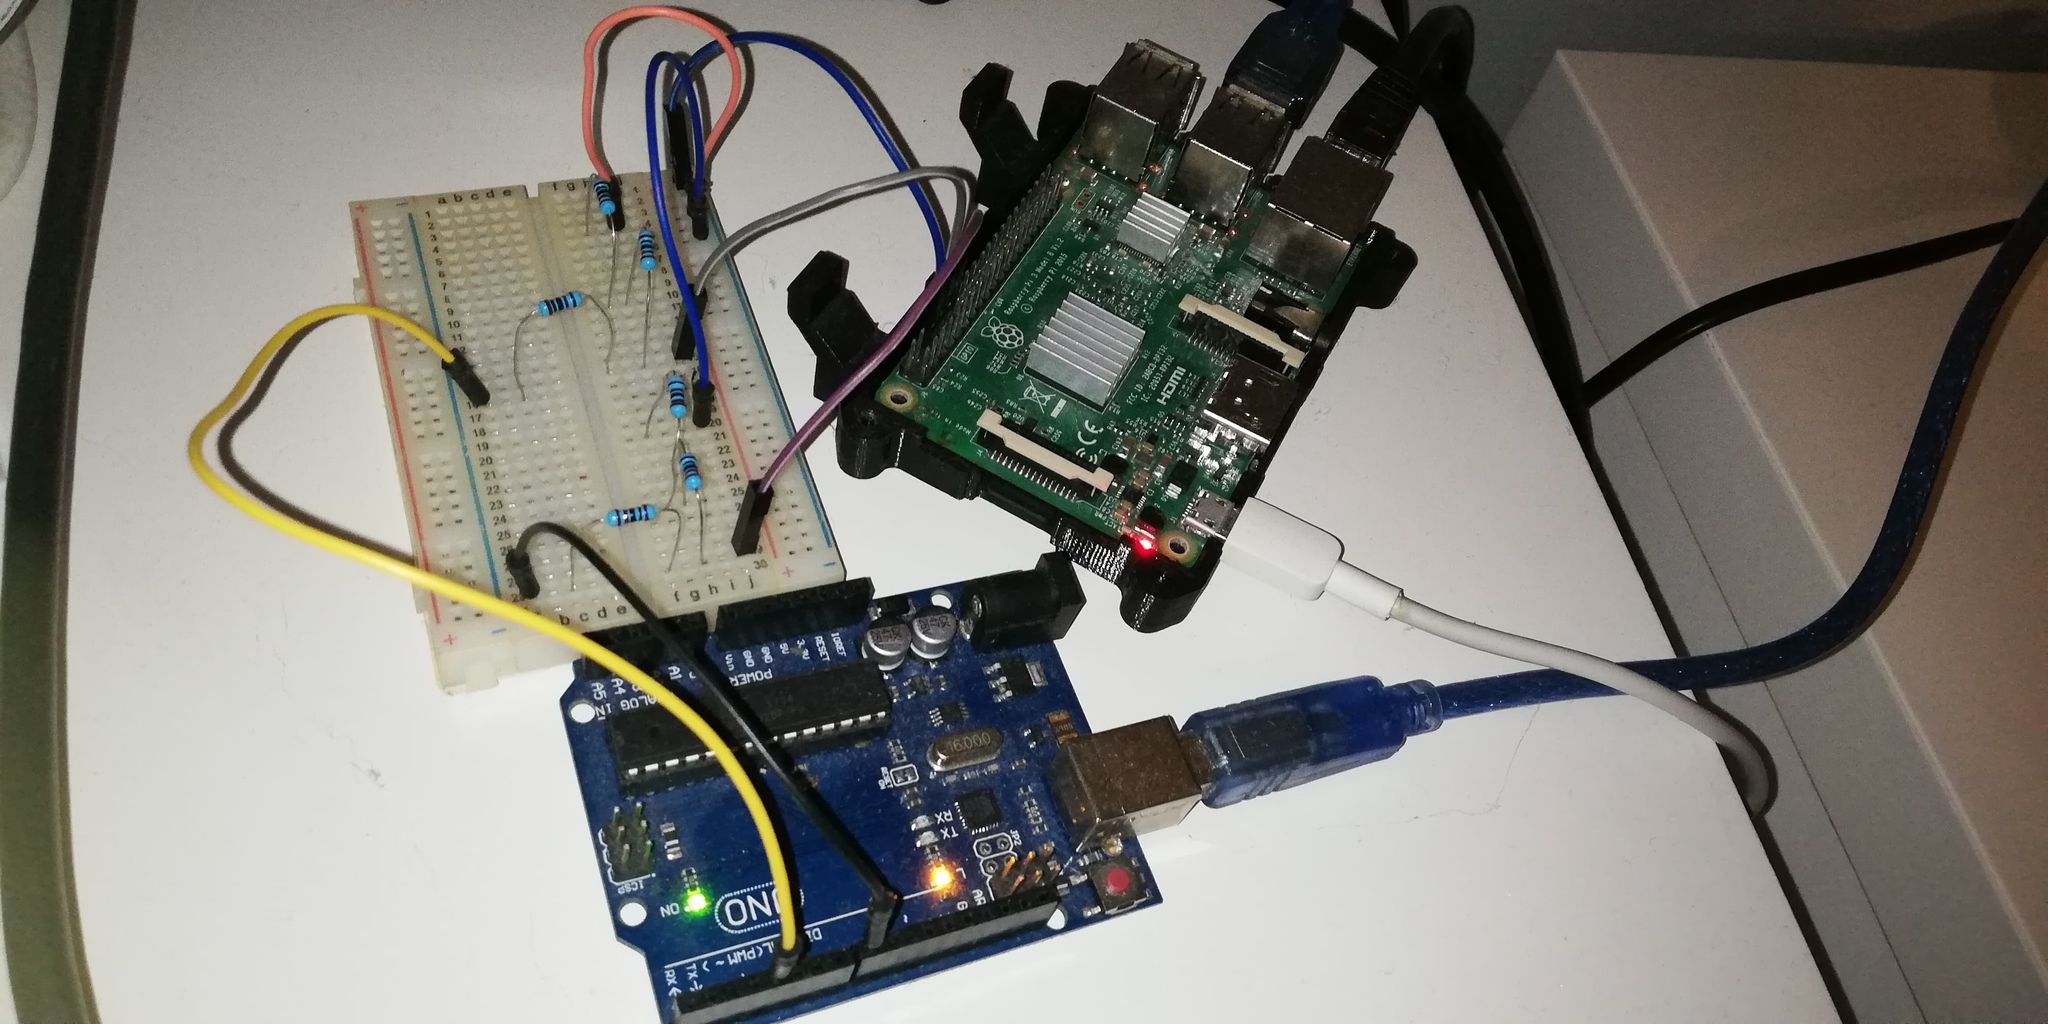
Let’s assume that we produce firmware for microcontrollers with 2 GPIO pins and allowing for serial data exchange. Our goal is to write automatic tests that check whether we are able to correctly change the state of these two pins and whether data is correctly sent through the serial port. In our case, we write tests that anyone, regardless of the operating system, could run on their computer with Docker installed.
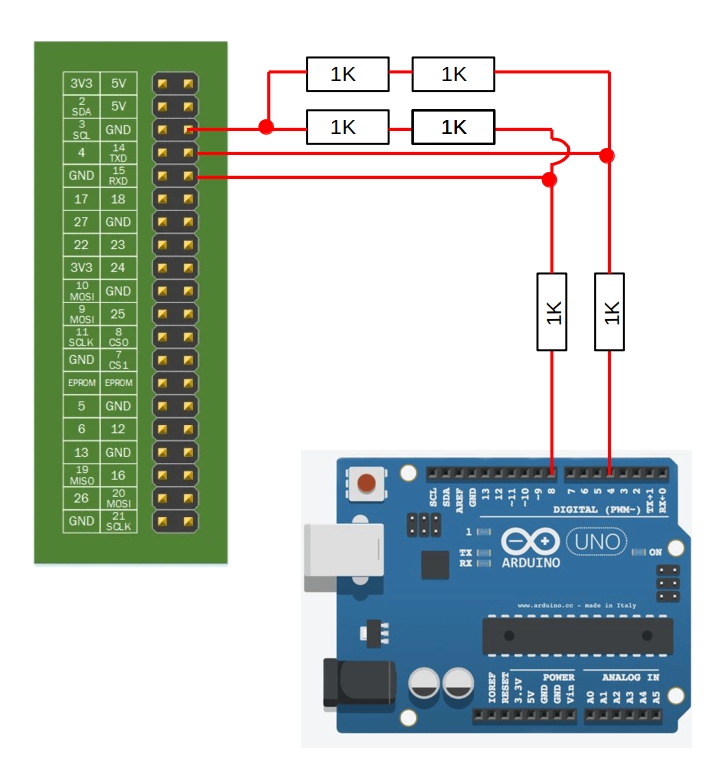
To simulate our case, we use an Arduino UNO, which serves as the device under test (DUT), and Raspberry Pi, which tests our DUT. On the Arduino we check 4th and 8th pin. Unfortunately, the Raspberry can only read voltage not exceeding 3.3V. The range of GPIO pins of the Arduino is 0-5V so we have to use here a level shifter or voltage divider. In our case, we use six 1K resistors connected in the following way:
We need to know how to program Arduino. Usually, the Arduino IDE is used for
this purpose, but in our case, we need to learn how to program Arduino from the
command line so that it can be used in automatic tests. One solution is to
compile Arduino sketches using Makefile. To do that we use package arduino-mk
which allows us to compile the code and upload it to the Arduino. On Linux based
system we can download this package by typing:
|
|
After downloading, typing:
|
|
will show the location of arduino-mk file set that we downloaded. The most
important file in this folder is Arduino.mk. To be able to compile a program
that we are going to write, we need to reference this file, so it’s important to
know where that file is located.
Our tests use 5 files that are uploaded to the Arduino:
- pin 4 on/off
- pin 8 on/off
- serial connection
pin4_off.ino
|
|
pin4_on.ino
|
|
serial.ino
|
|
The pin8_<on/off>.ino files look similar to the pin4_<on/off>.ino files with
the difference that we change the digit 4 to 8. Each created file is in separate
folder and for each file we create Makefile that references to the downloaded
from arduino-mk Makefile:
Makefile
|
|
where ARDUINO_PORT specifies the Arduino device file that appears after
connecting to the Raspberry via USB A/B cable and BOARD_TAG is a type of
Arduino board. On Linux based system Arudino always shows up as ACM0 or ACM1
depending on how many devices we have connected so this works only if we have
one Arduino connected to RPi.
To convert our code into the files that can be uploaded to Arduino we go to a
specific folder and type make. This creates a new folder that contains all the
necessary files. We can upload them by typing make upload. If we also want to
remove this folder after uploading files to Arduino, we can simply add
make upload clean.
Now we have all the necessary files for our DUT. It’s time to write automatic
tests. To do that we use RobotFramework which is
a great tool for writing tests. To download it, we also need Python installed.
We can download RobotFramework by typing pip install robotframework.
arduino.robot
|
|
To run the ARD1.0 test, we also need to download on RPi the screen program:
|
|
The file structure on our PC should be as follows:
|
|
Before running the tests, we need to export pins 14 and 15 and set their
direction to in:
|
|
To run the tests, we enter in the terminal in blog_rf directory:
robot -L TRACE arduino.robot
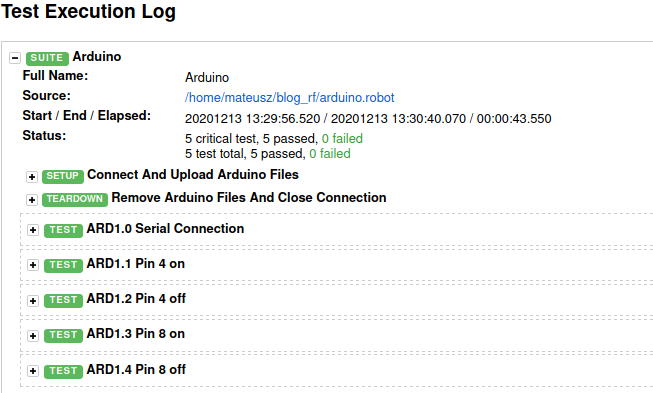
After running this command, in blog_rf directory we should have file
log.html, which gives a detailed description of our tests:
As mentioned before, we need robotframework and python to run these tests.
My version of python is 3.8.5 and robotframework is 3.2.2. Depending on the
version of the robotframework, the code may differ. This is a great
opportunity to use Docker. We can create a Dockerfile that will contain all the
necessary information about the version of the programs that our code uses.
Thanks to this, everyone will be able to run it regardless of whether they use
python 2 or 3 on their computer. Dockerfile might look like this:
Dockerfile
|
|
- the first line specifies the parent image from which we are building our image. More python image names can be found here
RUNruns given commands in a shell inside the containerENTRYPOINTspecifies a command that will always be executed when the container starts
In the same directory where Dockerfile is located, let’s enter:
|
|
When we type docker images we should see our image:
|
|
Now we can run the tests again but this time from the container.
|
|
As we can see, the test results are the same except that now anyone can run our tests.
Summary
Thanks for getting here, If you have found Docker handy and worthy to use, check this source of docker containers maintained by our team or forked from Open Source projects with additional useful adjustments.
If you think we can help in improving the security of your firmware or you
looking for someone who can boost your product by leveraging advanced features
of used hardware platform, feel free to book a call with
us or
drop us email to contact<at>3mdeb<dot>com. And if you want to stay up-to-date
on all things firmware security and optimization, be sure to sign up for our
newsletter: