Table of contents
- Introduction and Background
- Why Are We Interested in Windows HLK
- Windows HLK Overview
- Setup and Environment Configuration
- Integration with Open Source Firmware Validation
- Test Results
- Summary and Future Outlook
Introduction and Background
The Windows Hardware Lab Kit is the latest iteration of a test automation framework developed at Microsoft, used to certify devices. The certification tools suite has existed since the times of Windows 2000 and its name has been changing multiple times since then:
- Hardware Compatibility Test - Windows 2000, XP
- Driver Test Manager - Windows Vista
- Windows Logo Kit / Windows Hardware Certification Kit - Windows 7, 8, 8.1
- Windows Hardware Lab Kit - Windows 10, 11
Whenever we see a Windows sticker on a laptop, a printer or even a game controller, Windows HLK was used to test it.

It contains at least 4659 unique test cases according to the currently available test lists.
Checked by searching for unique test IDs among those listed in the certification test lists:
|
|
The tests cover functionality like:
- Audio, Video, Ethernet, Wi-Fi, Bluetooth
- GPIO, I2C, USB, NFC, PWM, SPI, UART, SATA, NVMe
- Drivers
- TPM, Secure Boot, disk encryption, TXT DMA Protection Ranges, Windows specific security features
They can be used to certify products like:
- Devices
- Desktop computers, laptops, phones
- Game controllers, keyboards, mice
- GPUs, audio, network cards, hard drives
- Proximity, IR, motion sensors, cameras, microphones
- Displays, projectors, scanners, paper and 3D printers
- Network routers, switches
- Software
- File systems, antivirus software
- Media players
Fun fact: Microsoft defines device designation called Secured Core PC, which identifies devices that meet high hardware security requirements. It seems reasonable that WHLK would be used to certify such devices, but no direct indication was found to support that claim in the public sources.
These numbers and coverage show that HLK is a very comprehensive and potentially valuable tool for testing Dasharo devices under Windows.
Why Are We Interested in Windows HLK
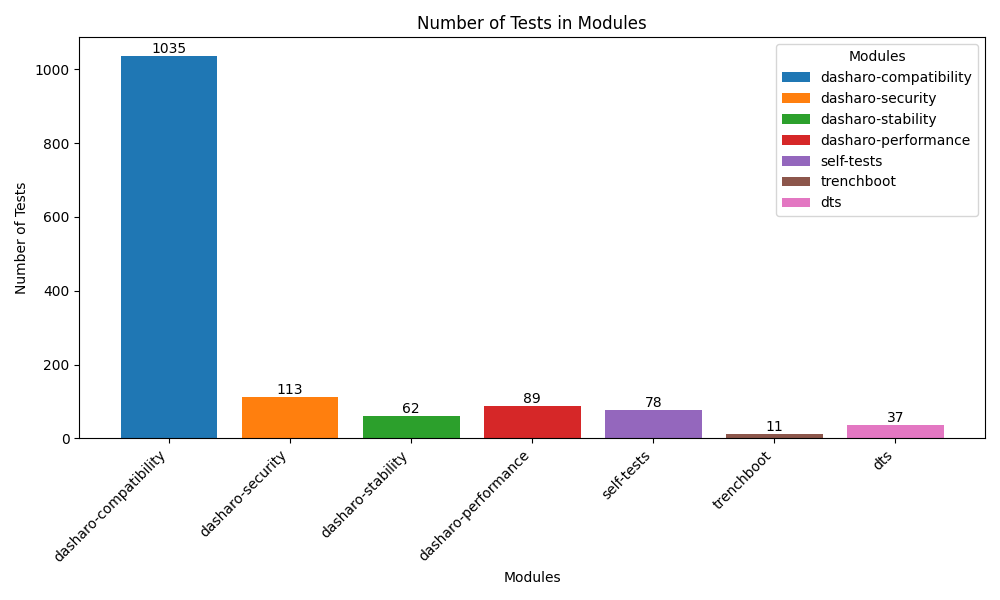
As of writing this post, the Dasharo Hardware Certification program includes 1425 test cases available in Open Source Firmware Validation as well as 78 self-tests to validate the OSFV itself. While it’s an impressive number, it’s far less than the vast amount of nearly 5000 tests available in HLK, which was being built since at least the year 2000.
It’s only natural that the idea of using this huge collection of test cases to aid Dasharo developers and the community in finding places for improvement, as well as proving where Dasharo works well already, is very tempting. Especially considering that new Windows issues not covered by OSFV do spring up like mushrooms.
- Immediate BSOD trying to boot Windows
- Error when enabling BitLocker
- Windows Device Manager shows errors even after updates
- Error while installing Windows 11 via USB drive
- USB mouse not working in Windows installer (USB pen drive installation)
- Windows SPM 2x suspend fails
The thing that reels us in the most currently is the
Device.TrustedPlatformModule
category including tests for TPM 2.0 functionality, cryptographic operations,
storage, reliability, and even some stress tests. While the tests would only
be run on Windows, as that’s the purpose of Windows HLK, their results could
tell us a lot about the TPM functionality in Dasharo Firmware as a whole.
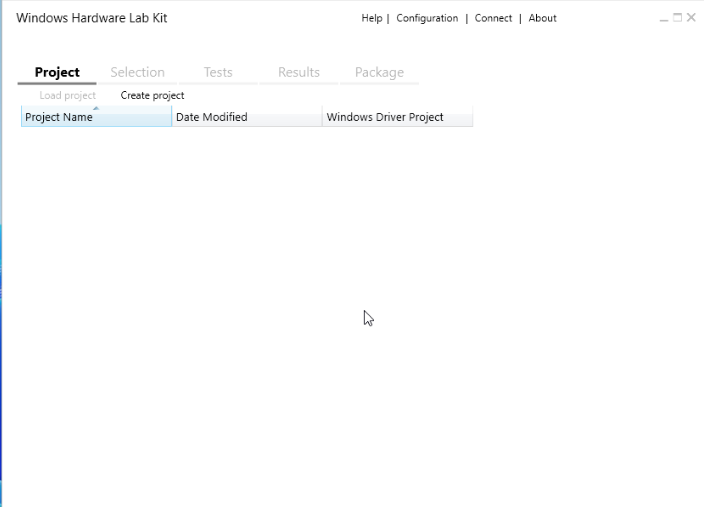
Windows HLK Overview
HLK Components
A minimal Windows HLK setup is constructed of 3 components:
HLK Client
The HLK Client is installed on a Device Under Test. The software allows remote control by other HLK components to perform the tests.
HLK Client can scan for information about the device needed to determine which tests are compatible with it. With that information, the set of tests that need to be passed to get the Windows Logo certification will change to fit the specific device’s capabilities.
Automatic Test Scope
The capability scanning is a fascinating mechanism of HLK. When multiple test scopes have to be maintained, like in the case of Dasharo releases for different platforms, making sure every test for every feature is covered is a difficult task. Especially when complicated relations between the features / tests exist, a few examples:
- (exclusions)
- suites PXE and CNB are mutually exclusive
- (single feature - multiple tests)
- having functional HDMI ports should trigger DSP suite (display), but also some AUD suite tests (Audio over HDMI)
- (single test - multiple features)
- SBO (Secure Boot) requires Secure Boot support, but it also needs for a
- serial port connection to be available, and the device to be running EDK2
Reliably determining the hardware capabilities is a common problem when it comes to validation, attestation and certification.
- Security Assessment on ARM Platforms by Stuart Yoder
- Enhancing OS Avareness of Fardware Security Capabilities in Qubes OS by Piotr Król
While the amount of devices tested using the Dasharo Hardware Certification program is not nearly as huge as when it comes to Windows HLK, such mechanisms should definitely be taken into consideration.
HLK Controller
The test server that manages the access to HLK Clients, connects to them, runs tests, and gathers the results.
One controller can manage up to about 150 HLK Clients, according to Microsoft. The exact number is not a hardcoded limit, but a sane amount of computation that a single machine can handle, so it depends on the hardware.
One HLK Client can only be managed by a single HLK Controller.
HLK Studio
A frontend for managing Windows HLK controllers. It can be used to explore the available tests, ongoing runs, the results, etc.
It can be installed on the same machine as the HLK Controller if there is only a single one, but for larger labs with multiple controllers, HLK Studio should run on a separate device.
HLK Lab diagram
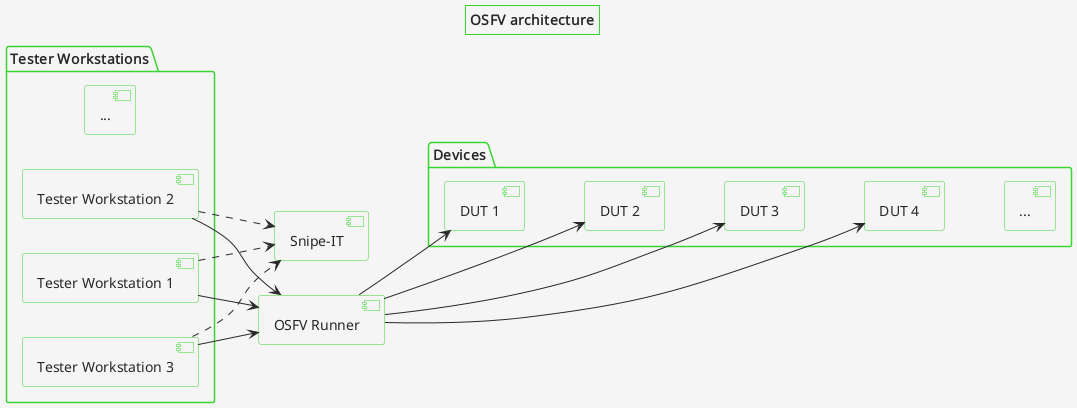
Windows HLK manages the test execution workflow and the tested devices differently from OSFV using Robot Framework.
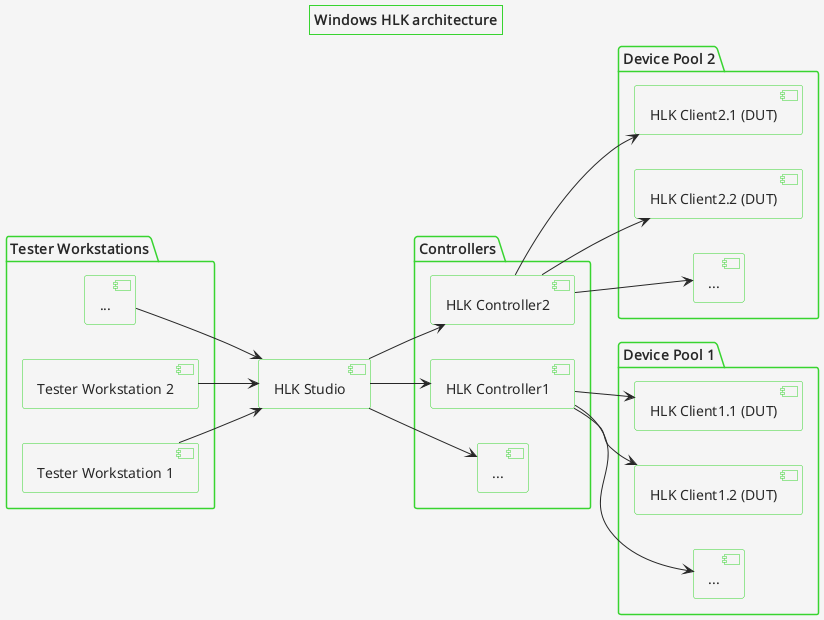
This architecture is more centralized than OSFV, where every tester runs
their tests independently of each other. The single point of synchronization is
the Snipe-IT instance that allows managing access to the Devices Under Test
(DUTs), so the testers don’t interfere with each other. It can be easily skipped
if not required though.
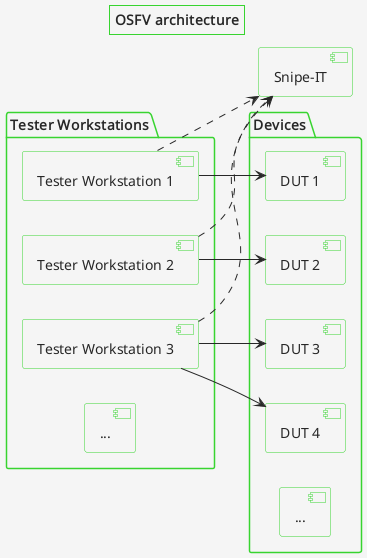
With this approach there is no significant single point of failure in the Dasharo Hardware Certification Lab architecture. The only real point of failure are the DUTs themselves. Should the Snipe-IT server break, the tests that were started before can run unaffected as long as the network connection between the tester’s workstation and the DUT is intact.
On the other hand, the centralised nature of HLK allows for complex coordination of the tests on a set of devices managed by a single HLK Controller. The controller can decide itself on which devices to run which tests, it can connect the devices for tests that require multiple DUTs to work together, or parallelise the execution of tests on multiple devices of the same project. Achieving similar behaviors using decentralised architecture, while absolutely possible, would be much more difficult.
A more centralised approach is possible in OSFV through the use of a centralized runner. It is beneficial when the tests are supposed to run for a night or longer, and the tester doesn’t want to leave their device on for that long, or when it’s a laptop that due to mobility can’t maintain a network connection stable enough.
Setup and Environment Configuration
Windows HLK can only be set up on devices running Windows Server.
We didn’t need a Windows Server machine before at the Dasharo Hardware Certification Lab and the expected load in the near future won’t be high, as the number of devices tested at the same time does not exceed just a couple.
This resulted in the decision to set up the HLK server on a Proxmox Virtual Machine, which, as we will find in the later sections, might need to be revisited due to performance limitations.
Windows HLK Server - Proxmox
The installation on a virtual machine was pretty straightforward, but there were a couple of caveats encountered that required addressing.
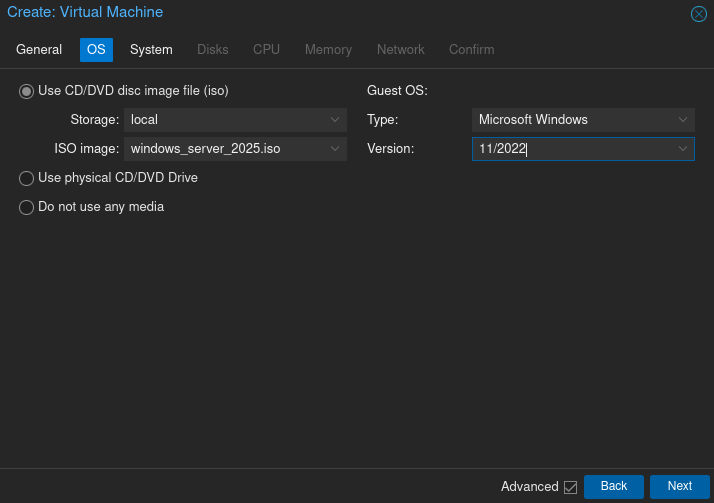
OS
In the OS section, we can choose an installer ISO image for the Windows Server.
The Guest OS Type should be set to Microsoft Windows.
Disks
Microsoft recommends a drive of at least 32 GiB. After installing HLK, only just about 4 GiB of free space is left on the VMs drive.
We recommend allocating more space if resizing in the future won’t be possible. The packaged test results can take more than 100MiB each.
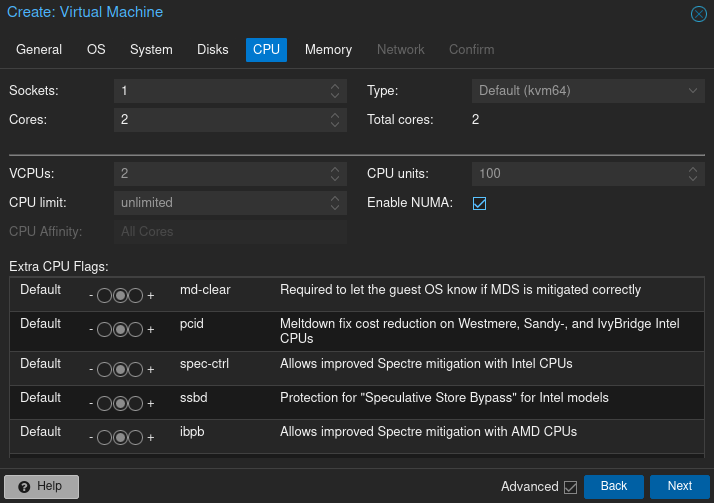
CPU
In the CPU section, it is essential to give the VM at least two CPU cores
and enable NUMA. Otherwise, the installer won’t be able to boot.
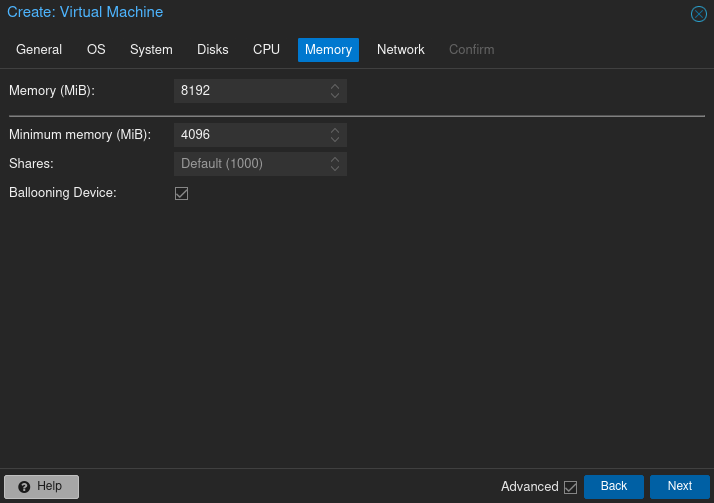
Memory
In the Memory section, we need to give the VM at least 8192 MiB of RAM. Otherwise, the RAM usage will be topped out constantly, and the machine will be nearly unusable. The memory can be configured to be dynamic if it is not a resource we are willing to reserve only for this VM.
We can now skip past the remaining sections and create the VM.
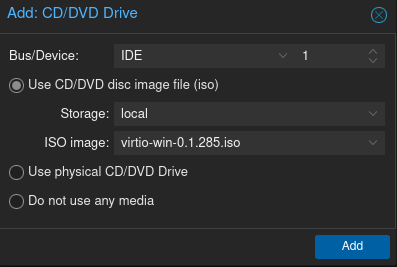
VirtIO Drivers
One last thing to remember is that Windows does not come bundled with VirtIO drivers - the VM won’t be able to access its virtual hard drive and install the OS.
To help with that, we need to attach a second iso image alongside the installer that will contain VirtIO drivers.
In the Hardware tab of the newly created VM, we add a CD/DVD Drive and attach
an ISO with the Windows VirtIO drivers by Red Hat.
Windows HLK Server Setup
To set up the HLK server on a VM, we need to:
- Install Windows Server on a VM
- Install VirtIO drivers in the OS
- Note HLK Controller Device Name
- Install Windows HLK Controller and Studio
- Set up Network Discovery and Shares
Installer Setup
During the installer setup, there’s only one thing different from installing on a hardware device to remember. When presented with this screen:
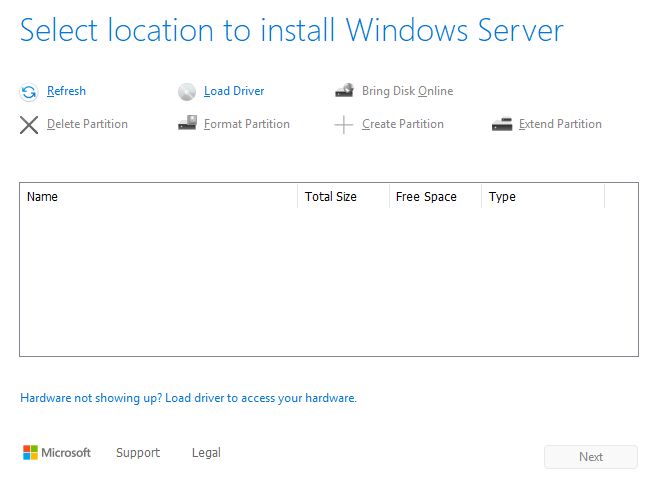
There’s nothing wrong. Just press Load Driver and locate the VirtIO drive
we’ve attached before in Proxmox. The installer will load the drivers, and it
will be possible to choose the virtual drive as an installation destination.
The installation should continue without further hiccups.
Installing VirtIO drivers
The Windows installer has installed the VirtIO disk drivers, but after logging in to the desktop, there will be no way of accessing the network.
For efficient network connection, Proxmox attaches a VirtIO network card to the VM by default, and there are no drivers for such things on Windows.
We can install the rest of the VirtIO drivers and VM Guest tools. The Guest Tools would allow us, for example, to display the IP address of the VM in Proxmox and dynamically change the display resolution. To do so, we need to locate the drive with the VirtIO drivers and install them.
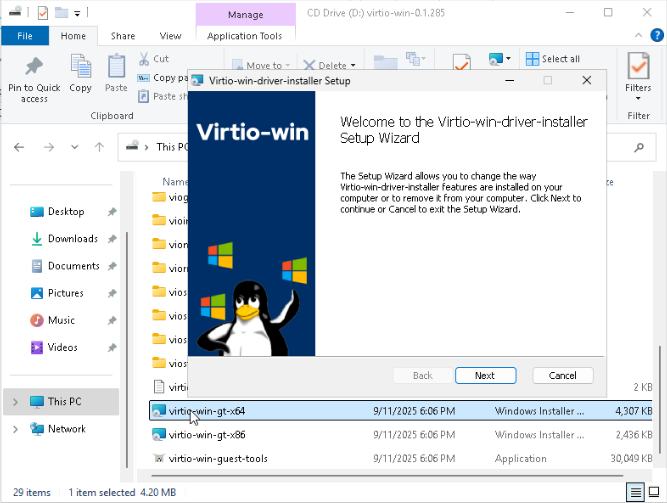
Run the virtio-win-gt-x64.msi installer and follow the instructions from the
wizard. The OS should detect the network card afterwards.
Device Name
To identify the HLK Controller server later, we will need to note down
the device name or assign a friendly name to the server ourselves.
Both options are available in:
Settings App > System > About.
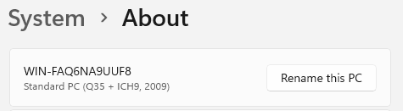
It’s important to change the device name (and reboot if so) before we set up HLK. Otherwise, the HLK Controller and Studio would need to be reinstalled to update the device names.
Installing HLK Server
With the network accessible in the VM, we download a version suitable for
the Windows version we want to certify for at
learn.microsoft HLK docs
and run the .exe installer, which will lead us through the installation.
When prompted, we chose to install both the HLK Controller and HLK Studio on
the same machine, as that’s enough for less than about a hundred DUTs.
In our case, we’ve downloaded the Windows HLK for Windows 11, version 25H2
version to certify for Windows 11, version 25H2.
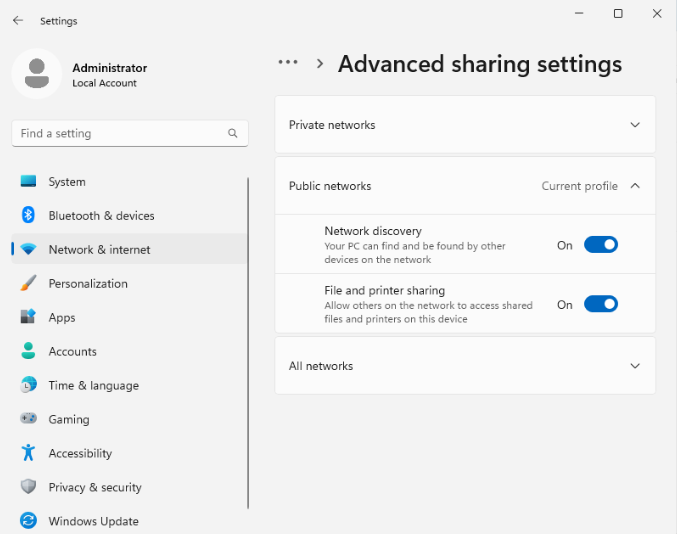
Network Discovery and Shares
At this point, it’s worth verifying whether Network Discovery and file sharing are enabled on the server. Without Network Discovery enabled, the server and client devices won’t see each other, and without File sharing, we won’t be able to install the HLK client on a DUT.
To ensure the two settings are enabled, open the Settings app and navigate
to Network & internet > Advanced sharing settings and make sure both
Network discovery and File and printer sharing are enabled.
Windows HLK Client Setup
For the client setup, we will assume that Windows 11 is already installed on the DUT and only focus on the post-installation steps required to allow running HLK tests.
Network Discovery
The step is mostly the same as for the HLK server.
Open the Settings app, navigate
to Network & internet > Advanced sharing settings, and make sure both
Network discovery and File and printer sharing are enabled.
Installing HLK Client
Interestingly, there is no HLK Client installer available on the web. To avoid incompatibility issues, the installer executable is being hosted by the HLK Controller. By running the installer from a selected controller, the client device will be automatically associated with the HLK Controller, and the HLK versions will always be compatible.
To install HLK Client:
- via command prompt
- run
\\<HLK_Controller_Device_Name>\HLKInstall\Client\Setup.cmd /qn ICFAGREE=Yes- Despite it being documented on MS Learn, it might not work as no prompt for password appears when running from CMD.
- run
- via the GUI
- Open File Manager
- Go to the
Networktab underThis PC - Select the HLK Controller using the Device Name noted before
- A prompt will appear asking to enter credentials for the HLK Server
- Go to
HLKInstall\Clientand runSetup.cmd
An installation wizard will lead us through the installation.
Tests setup
Now that our HLK Server and HLK Client are installed on the devices, the last thing to do is to run some tests.
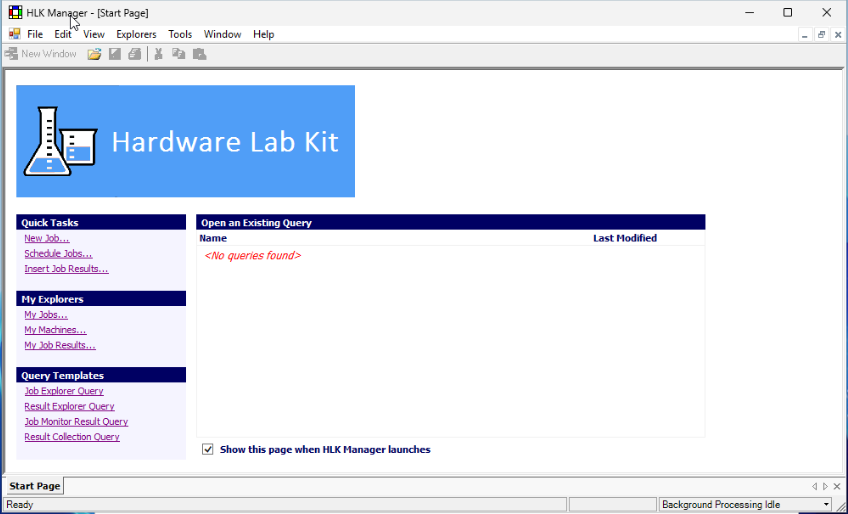
For that, we’ll use the HLK Studio app, which is a new (~15 y.o.) GUI for the HLK Controller, which is supposed to simplify the process of managing tests as opposed to the older, more complicated, but more capable HLK Manager.
Configuration
The first thing we need to do is to create a Machine Pool. A Machine Pool will be used to run a single set of tests in order to certify a device. We can have as many identical devices in a single Machine Pool as we want. As long as the HLK Server is powerful enough, the tests will be run in parallel on all of them.
To create a Machine Pool:
- Click
Configurationin the top right corner- The Machines with the HLK Client installed before should be visible in the list
- Right-click on
$ (Root)Machine Pool on theMachine Poolslist - Select
Create Machine Pool - Type in a name and press Enter
- The Machines on the right side should disappear as they are a part of the
$ (Root)Machine Pool by default
- The Machines on the right side should disappear as they are a part of the
- Go back to the
$ (Root)Machine Pool by left-clicking it to bring back the - Drag and drop the machine from the list onto the newly created Machine Pool
- Go back to the main screen by pressing the back arrow in the top-left corner
Adding a project
Tests in HLK are categorized into projects. In a given project, there is a single result of a test on any machine in the project.
When the configuration changes (like a new revision, model, or it’s an entirely different device) or there is any other reason to re-run a test without invalidating previous results, a new project should be created.
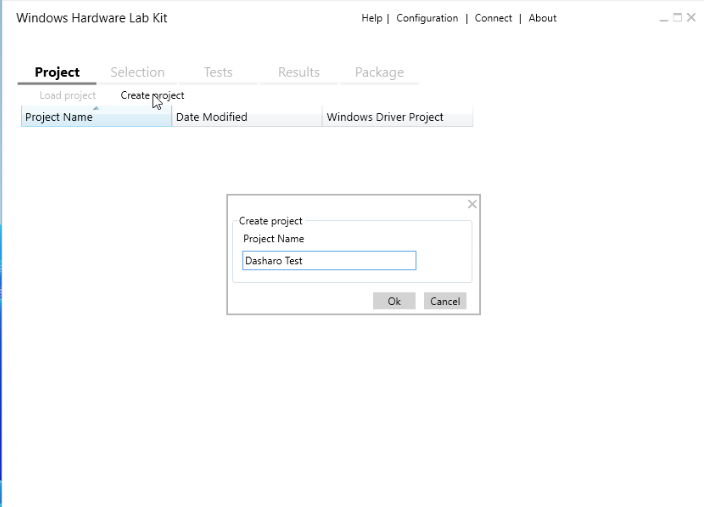
Multiple projects can be merged to create a single test results package sent to Microsoft for verification, so a single device could be separated into multiple projects to organise different components.
When the project is created, double-click it on the list to select the project as active.
HLK Project vs Dasharo
When it comes to Dasharo Firmware, the correct way to organise the projects
would be to create a new project for every release on a single firmware release.
That is a single version, on a single group of compatible devices, like
Dasharo (coreboot+UEFI) v1.0.1 for NovaCustom V540TNx Laptops.
A single project will use a test scope automatically detected using the capabilities of tested devices, but the tests won’t be re-run on all of them. HLK will use the available devices to run tests that require multiple devices to cooperate (like Bluetooth connections), or parallelise tests to reduce the total runtime.
Creating projects like Dasharo v1.0.1 would not make sense, because
a single Dasharo version is being released for multiple independent devices
in independent time frames. Every single device has to be tested, and the
results can not be joined to package as the results of a single product called
Dasharo v1.0.1.
Device Selection
With the project created, we can go to the Selection tab to select the devices
we want to test in the project.
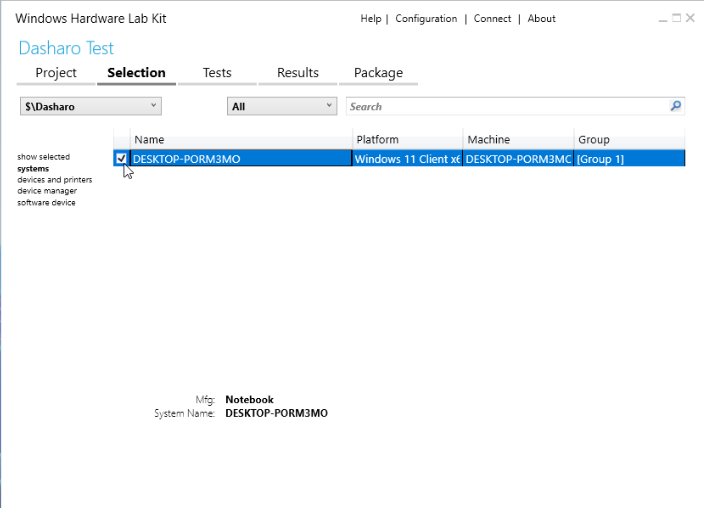
A project can use any subset of devices from any subset of available pools. Two projects can use the same device. The HLK Controller will handle that, but only a single test can be run on a single device at the same time, so that might be suboptimal.
Upon checking the checkbox for a device, HLK Controller will scan it for compatible tests that can be run on it.
Test selection
In the test tab, we can select the tests to run from a list of compatible
test cases and schedule them to run at any time by pressing Run Selected.
The tests can very well be scheduled and canceled while other tests are
already running.
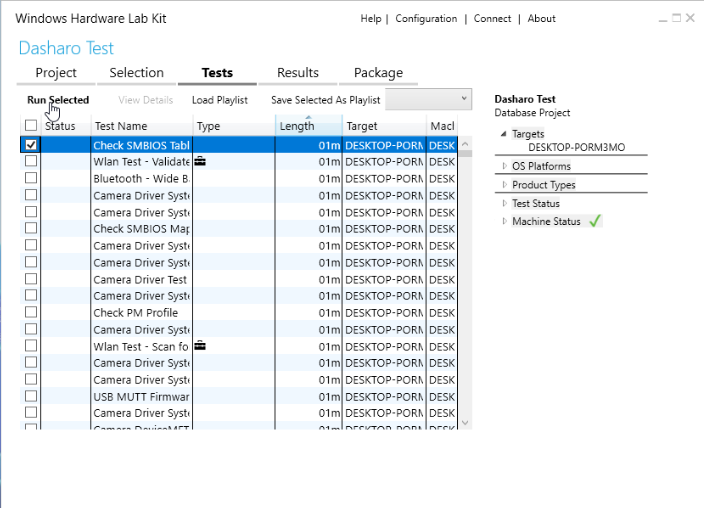
The test selection can be exported using Save Selected As Playlist or imported
using Load Playlist.
Results Tab
The Tests tab already shows the status of every test, including whether they
have passed or failed. The Results tab contains more details about the
execution in the form of an expandable list for every test run.
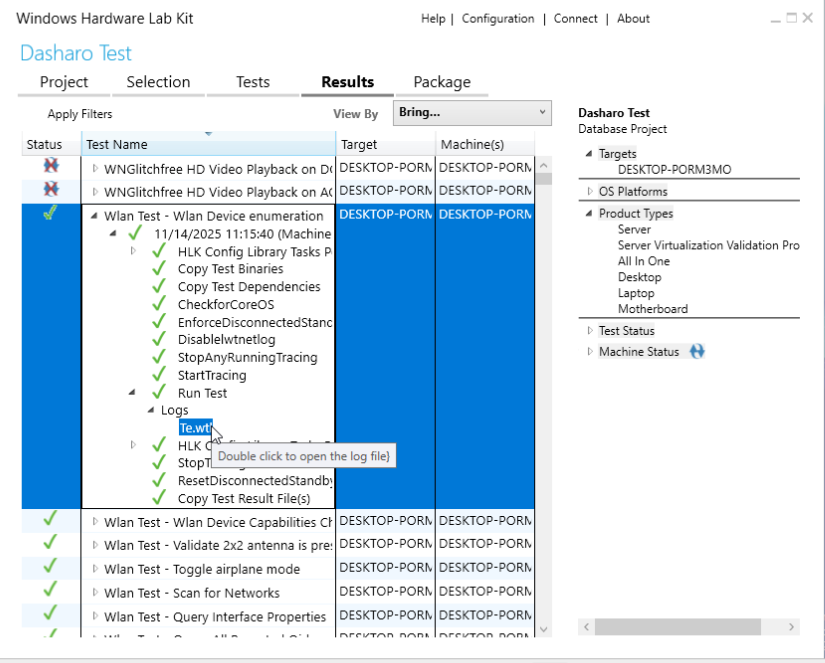
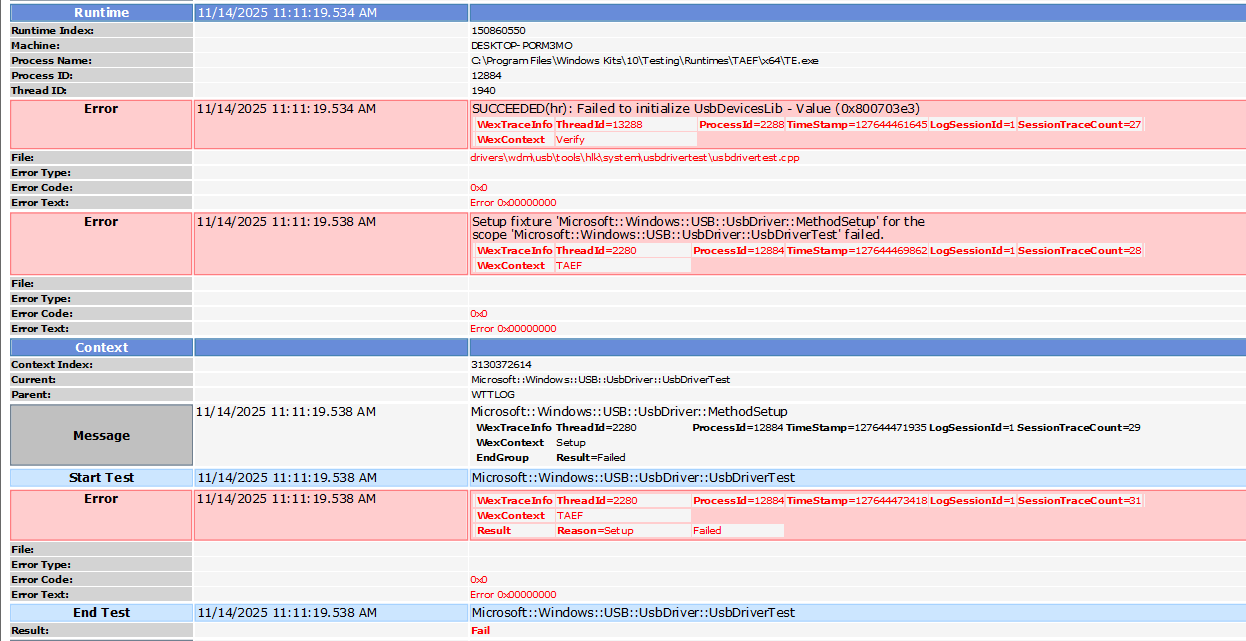
A single test can produce multiple files with logs in XML format, which HLK Manager will neatly render into a table after a double click.

Because the tests in HLK are in binary format (DLLs) and their sources are not openly available, extracting useful information about what exactly happened and how to fix the issues causing fails is difficult or sometimes impossible to based only on the log files. It all depends on the specific test step and how much useful logging is implemented in it.
Package Tab
The Package tab is where the test results can be packaged alongside driver
files and other supplementary files. The Package can be signed using either
an RSA or DSA key (only these two supported
as of 4.12.2025) if a valid certificate issued by a Microsoft CA for our keys
is installed to the local certificate store. The signed package can then be sent
to certify our hardware (or a driver), or to share the results.
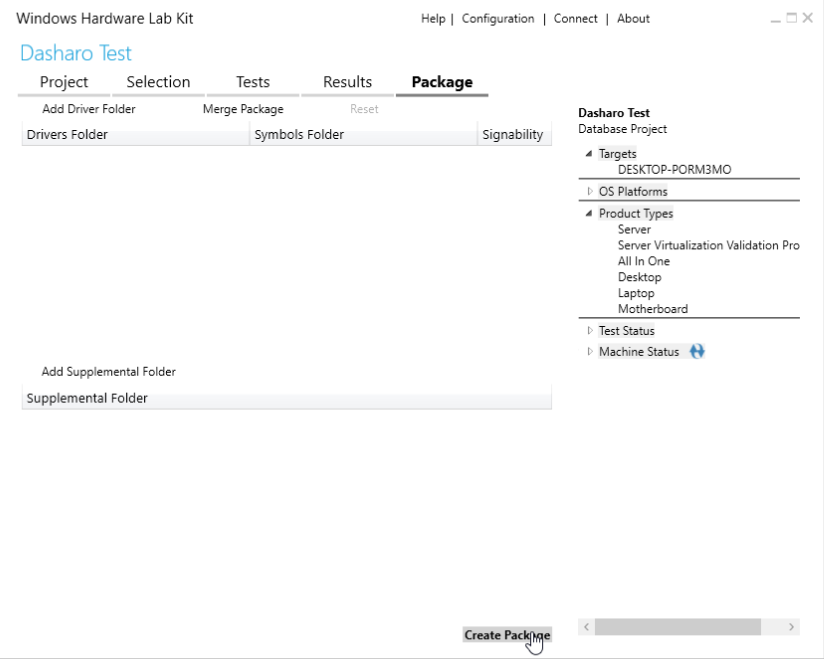
With a package containing passed tests created, the journey of a project ends.
Integration with Open Source Firmware Validation
An important subject of running Windows HLK tests in our Dasharo Hardware Certification Lab is how to integrate the tests with our current testing framework.
We’ve decided that the HLK tests won’t be integrated into OSFV and instead be treated as a separate source of validation due to a couple of technical reasons explained in the sections below:
Environment Scope
Windows HLK tests exclusively target Windows, which represents just one slice of Dasharo’s validation coverage. In contrast, OSFV tests of the DHC validate firmware functionality across a diverse range of operating systems and environments:
- Linux distributions: Ubuntu, Fedora, Zarhus, OpenWRT
- BSD variants: FreeBSD, pfSense, opnSense
- Virtualization platforms: XCP-NG
- Firmware interfaces: UEFI/BIOS setup menus, UEFI shell, HEADS
- Windows: As one environment among many
Integrating HLK into OSFV’s test structure would make results presentation severely skewed. Thousands of Windows tests alongside tens of tests for other environments. This could potentially be misleading the readers about firmware quality when the difference reflects testing depth rather than actual issues.
Test and Result formats
Windows HLK and DHC take fundamentally different approaches:
- Test transparency: The tests are in the form of DLL binaries making it unfeasible to analyze the steps, unlike the open source human-readable Robot Framework tests of OSFV.
- Results format: The results are in a binary format only readable by Windows tools connecting to an HLK database, unlike human-readable OSFV results and OSFV results created from them.
While these differences might sound like flaws, the tests being binary and unreadable can actually be a feature that improves results reliability. It significantly reduces the risk of “teaching to the test”—where instead of implementing a feature completely, it could (purposely or not) be made to only fit the tests, making them ineffective as described in Goodhart’s law.
Communication
OSFV operates using interactive terminals via SSH and serial connections. Windows HLK, on the other hand, is mainly operated using a GUI, although there’s an API with a developer guide that allows to operate it remotely.
The API, though, operates on .NET and requires running either PowerShell or a .NET application in a Windows environment to communicate with the HLK Controller using WMI/CIM objects.
Even analysing the test results without using the API would be difficult. The directory containing the XML logs is well known, but the logs themselves are held in a structure of directories with UUIDs as names and no way of reliably navigating them without interfacing with the Controller’s database.
Showing results
Up until the total number of test cases available in HLK was identified (~4x the amount in OSFV), we had an idea to wrap HLK tests in the OSFV test ID convention and present them alongside OSFV results.
We’ve come to a realization that creating a test ID, name, and maybe creating test cases in OSFV that schedule the tests would be an immense amount of work, that doesn’t really bring any value to the test results themselves.
Test Results
To test the setup and get a hang of the state of validation in the eyes of
Microsoft for a NovaCustom NV41PZ laptop with Dasharo v1.7.2 release, we’ve
scheduled all the tests detected as compatible with the machine and left
Windows HLK for a weekend to do its thing.
It was set up so that the shortest tests run first. There were about 150 tests that should take about 1 minute, and just as many tests that take 3–5 minutes, then around 360 tests that take 15 minutes each.
At the very end, there were about 60 tests scheduled that take 30–60 minutes, and there are a few that take several hours, or even one that takes 24 hours.
Test Runtime
After about 60 hours of runtime, 150/764 tests have finished running.
It was only the tests that were supposed to take 1 minute each, so it should
have taken about two and a half hours to complete them, but in reality, it
took 60 hours.
If we were to interpolate the runtime, while keeping the velocity of 30 minutes per 1-minute test, all the 764 tests could take a whopping 250 DAYS to complete on a single client device.
HLK Controller needs to run on a fast device to meet the expected runtimes. In our case, it is run on two cores of a server CPU that is long past its prime. The layer of virtualization does not help either.
Increasing the number of cores reserved to the VM from 2 to 4 and raising the max RAM allocation to 12 GiB has improved the run times, and overall GUI responsiveness. The improvement was not significant though and did not solve the issue completely.
Results
Accessing the results from a package file requires using the HLK API on Windows. To parse the results more easily, we can:
- Left-click on the first test on the results list
- Shift+left-click on the last test on the results list to select every test
- Press Ctrl+C
A brief text representation of the list contents will be copied to the clipboard
and can be pasted into a text file, which we’ll be able to download and parse
on Linux.
To access the Network Share of our server, we can mount it using the CIFS
protocol:
|
|
The results were saved as results.tsv and parsed to remove any tests
skipped or canceled after the 60 hours of runtime, as well as remove unnecessary
info like the Windows name of the client machine:
|
|
The results shown here are for the 145 1-minute-long test cases out of the total 764 tests supported by the device. The whole test scope was not performed due to current performance limitations.
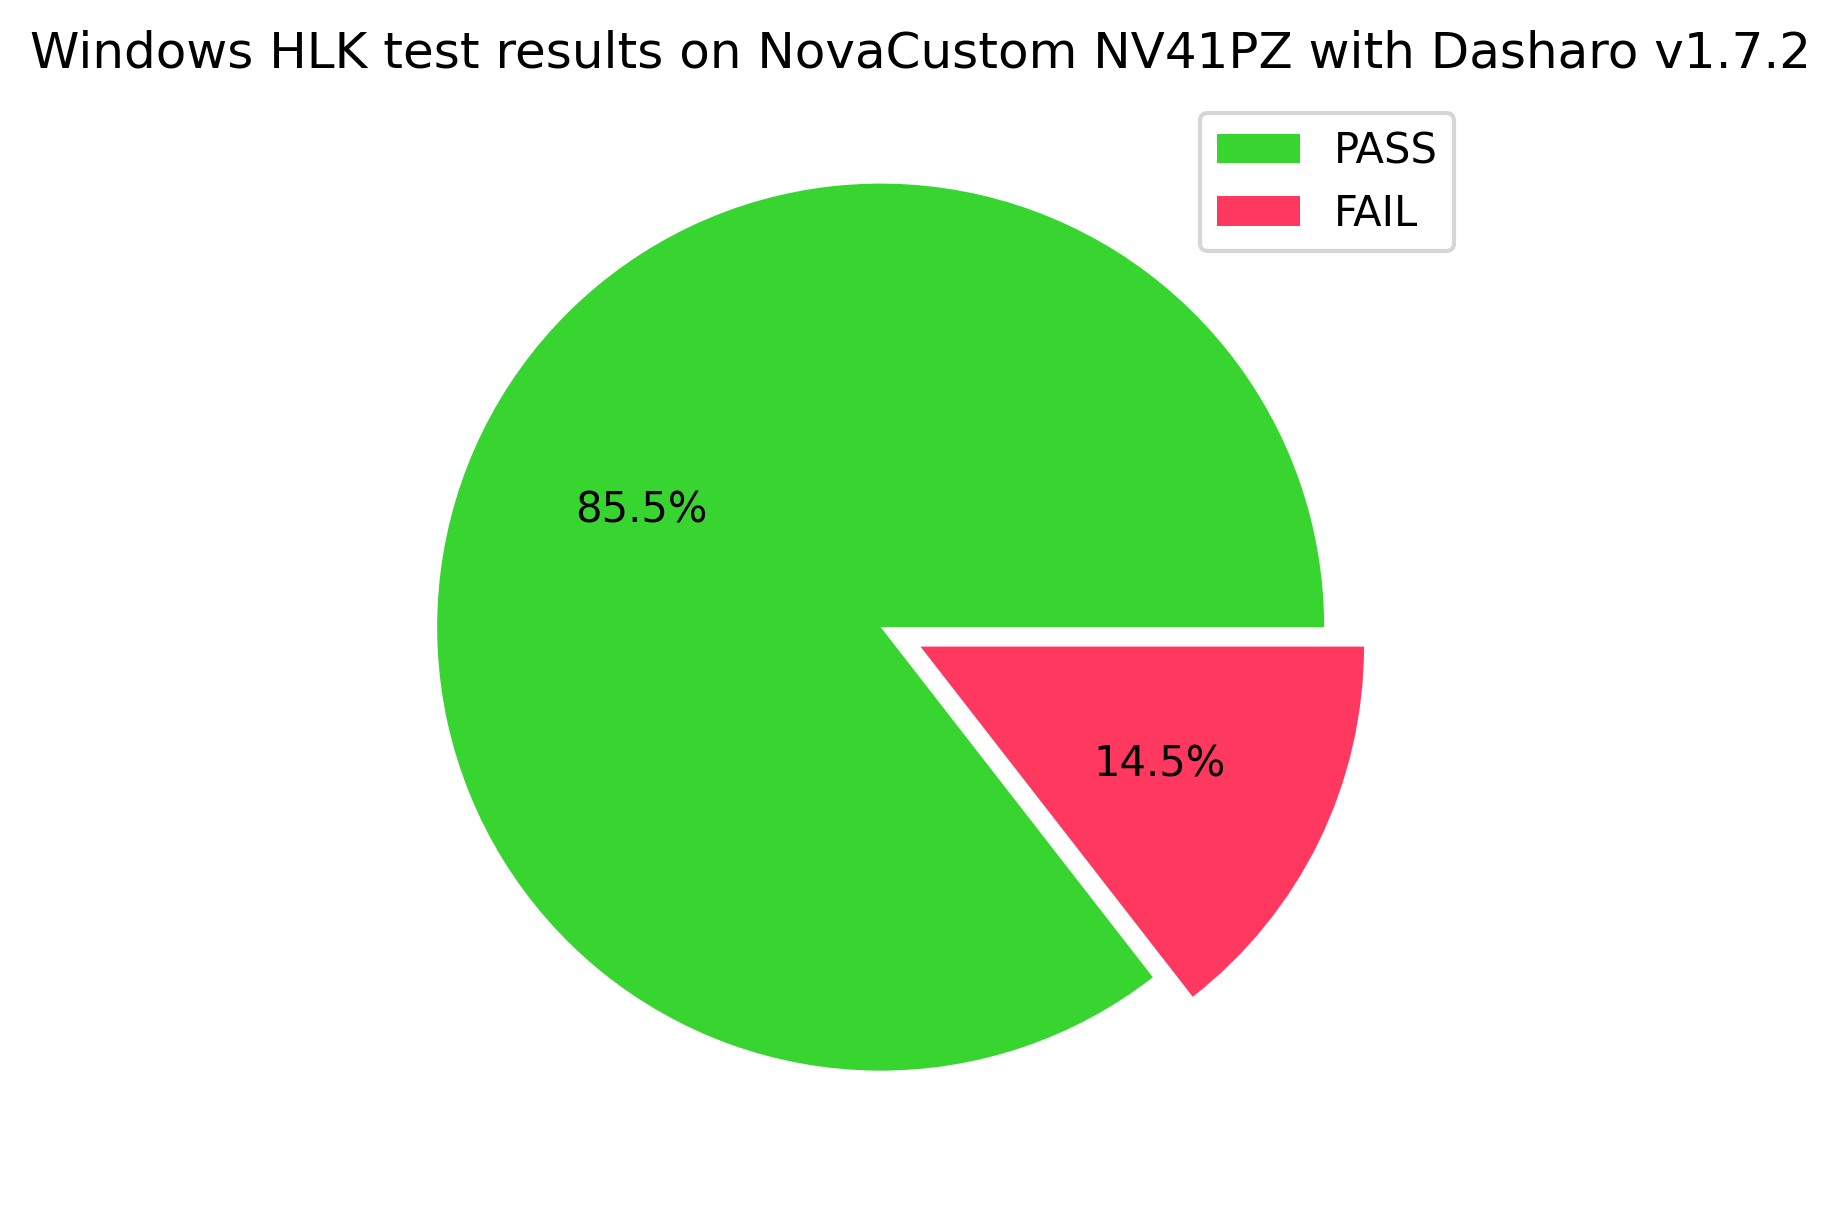
You can access the full test results here: Test results on NovaCustom NV41PZ with Dasharo v1.7.2 release
Summary & Future Outlook
Windows HLK offers nearly 5000 test cases, almost four times the coverage of Open Source Firmware Validation used in Dasharo Hardware Certification. This independent validation could significantly strengthen Dasharo’s reliability and catch both Windows-specific issues and be used to cross-validate the features already covered by OSFV.
Integrating Windows HLK with the regular test routine for Dasharo releases would require more work in the aspects of:
- Automatic deployment
- Installing Windows HLK Server and HLK Clients takes some time and should be performed automatically, ideally using https://github.com/dasharo/preseeds
- Run time
- On the current setup, the full supported scope could take as much as 250 days for a single device
- Deploying the HLK Server on a more powerful virtual, or better, a physical machine could prove necessary
- Run automation
- Running the tests from a HLK Studio GUI via RDP is highly suboptimal
- There is an exciting organization on GitHub HCK-CI that has created a range of FOSS Linux tools for managing Windows HLK
- Their Ruby gem rtoolsHCK was briefly tried out for accessing the test results, but not without some issues. Probably due to some HLK Server misconfiguration, the tool was failing.
- Running the tests from a HLK Studio GUI via RDP is highly suboptimal
- Results publishing
- The test results created by HLK Studio are in a binary format that is only readable by another HLK Studio instance, which is not great for making the results public and freely available, like the OSFV Results
- Retrieving the results in a human-readable format is quirky
- Tools like https://github.com/HCK-CI/rtoolsHCK could greatly help in that regard
With improvements in automated deployment, faster infrastructure, noninteractive execution, and easier result publishing, HLK integration could significantly expand the test coverage and the reliability of Dasharo Hardware Certification Lab validations while allowing the community to compare their own machines and their own firmware to the official Dasharo releases created by 3mdeb.
Get Involved
Run DHC on Your Hardware If you are interested in running Dasharo Hardware Certification tests on your own hardware, or on your own firmware, check out Open Source Firmware Validation. Some tests require using hardware like an RTE Board to allow serial connection, flashing the firmware and controlling the power to the device remotely, but a lot of the tests, especially for NovaCustom laptops, can be performed via SSH without any additional resources!
Try out WHLK If you are interested in finding out how good your devices are according to Microsoft, try the HLK setup instructions above and share your results!
Join our Bug Bounty Program If all that seems fun, check out our Bug Bounty Program . You can help the open source firmware community to grow, build up your open source contributions portfolio and earn a compensation at the same time!