Introduction
Virtualization traditionally relies on high-end architectures with hardware support, but what about low-cost, power-efficient MCUs? Can devices like that use the benefits of virtualization? The CROSSCON Hypervisor tackles this challenge by enabling virtualization on ARM MCUs. In this post, we’ll explore how CROSSCON runs a Zephyr application inside its virtual machine and what makes this approach possible.
The CROSSCON Hypervisor
The CROSSCON Hypervisor is a static partitioning hypervisor that originated as a fork of the Bao Hypervisor. Over time, CROSSCON has grown into an independent project with its own features and direction, while keeping the same core principles of simplicity and minimalism that Bao is known for.
Like other hypervisors, CROSSCON implements three key aspects of virtualization:
- Context separation – either through static assignment of CPU cores to virtual machines or, on single-core platforms, through a scheduler.
- Memory separation – each virtual machine is isolated in its own memory region, with optional shared regions defined for communication.
- Interrupt separation – interrupts are delivered only to the virtual machine assigned to handle them.
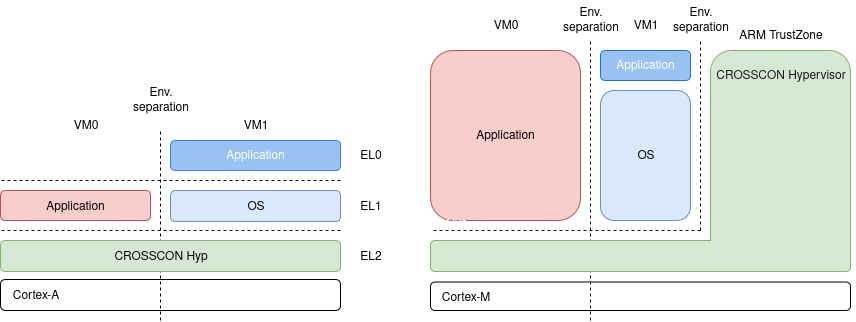
This blog post demonstrates CROSSCON running on the LPCXpresso55S69 board, which features an ARM Cortex-M33 core and a secondary Cortex-M33 co-processor. While the co-processor is present, it lacks critical features such as an MPU, FPU, DSP, ETM, and TrustZone, so CROSSCON relies only on the primary core.
For a hypervisor, features like an MPU or TrustZone are crucial because they provide hardware-based memory protection and isolation, while an FPU or DSP can boost performance for specific workloads. Since these are not available on the co-processor, CROSSCON leverages the primary Cortex-M33 core and uses its own scheduler to run multiple virtual machines. Unlike high-end architectures that include an MMU or GIC, CROSSCON instead depends on the TrustZone-related SAU and IDAU units of ARMv8-M to enforce memory and interrupt separation.
For the curious ones, check the ARMv8-M TrustZone documentation. But let’s focus on the demo now.
The demo goal
Here is the demo architecture:
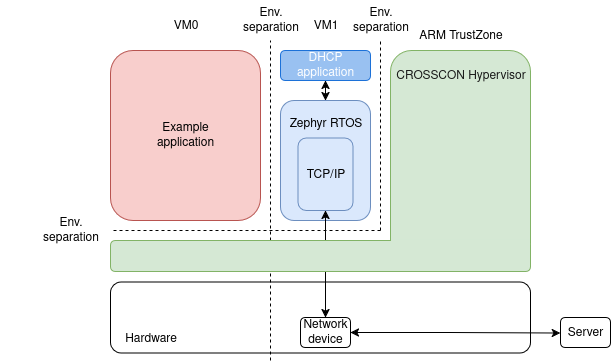
The demo had two goals:
- Run a Zephyr RTOS application with network device access inside a CROSSCON
Hypervisor virtual machine on LPCXpresso55S69 (
VM1in the diagram). - Run two CROSSCON virtual machines side-by-side on LPCXpresso55S69, where one
VM runs a bare-metal application (
VM0) and the other runs the Zephyr application from goal 1.
To achieve this demo, we used:
- LPCXpresso55S69 board with additional UART converters
- MIKROE-2542 Wi-FI module
- Zephyr RTOS DHCP client demo
- Basic Zephyr RTOS development experience
This post is not a step-by-step guide, but rather a walkthrough of how the demo was built and the lessons learned along the way. If you’d like to reproduce the setup, check out the demo repository.
Implementation
The CROSSCON Hypervisor is a static partitioning hypervisor that receives the configuration during the compilation process via C language structures defined in a specific configuration file. Hence, launching an application in the CROSSCON Hypervisor virtual machine consists of the following steps:
- Set the application entry and load addresses.
- Assign memory to the virtual machine in which the application will be running.
- Assign memory and interrupts to the memory-mapped peripherals.
In theory, providing this information and compiling the final image should be enough to launch any application. In practice, it’s not that straightforward. If something is misconfigured, the hypervisor does not provide clear error feedback, so diagnosing issues often requires deeper insight. Let’s take a closer look.
Attempt 1: Just copy the application and see what happens
The initial plan was simple: build the DHCP client application, configure its
entry point and memory in the hypervisor, and try to boot it. We didn’t expect
it to run flawlessly on the first attempt; the assumption was that it would at
least reach the main function and then fail due to unassigned network
peripherals. The idea was to fix such issues step by step with GDB. What we
didn’t anticipate was that the first obstacles would come from the hypervisor
itself rather than the application. But let’s start from the beginning, this is
how we’ve done it.
To launch a Zephyr application inside CROSSCON, the hypervisor needs to know two things:
- Where execution should begin (the entry address).
- How the application’s memory is laid out (RAM and FLASH regions).
The entry point can be extracted from the Zephyr ELF file:
|
|
On ARM Cortex-M architectures, function addresses use the least significant bit
to indicate Thumb mode. This means the actual entry address in the hypervisor’s
configuration must be the extracted value with that bit cleared (hence the -1).
|
|
Next, the RAM and FLASH layout must match what Zephyr expects. These regions are
described in the application’s devicetree, so the .regions structure in the
hypervisor configuration needs to be updated accordingly (e.g., regions[0] for
SRAM, regions[1] for FLASH).
|
|
But after every boot, the hypervisor jumped to the fault exception handler during the virtual machine initialization:
|
|
…and the debugging with three context layers present (the hypervisor, Zephyr RTOS, and the application) was too complicated to continue with this path. As stated earlier, the hypervisor does not provide any feedback about a configuration mismatch. We needed good-known configuration, thus we did the following…
Attempt 2: Turning “Hello world” into the Wi-Fi application
Another approach was to start from a known working configuration demo and
gradually adapt it. We used a simple Hello world application as a template and
then added the target application piece by piece.
The first step was to enable the necessary device drivers in the Zephyr configuration, even if they were not immediately used. Doing this allowed us to verify correct device assignment and initialization before tackling the more complex DHCP application logic. The aim was simple, and it was all about “booting” anything.
In Zephyr, each application defines its configuration in a prj.conf file,
which is a Kconfig fragment that enables drivers and features. These settings
are merged with other defaults to produce the final build configuration. While
the Hello world application could run with an empty prj.conf, the Wi-Fi demo
required additional drivers, which were added incrementally to the
configuration.
|
|
The first step of the new strategy was to simply copy those settings into
Hello world’s prj.conf and build it. This was enough to trigger a build
error:
|
|
After the first step, the Wi-Fi application produced a flash memory overflow.
The root cause was that the original DHCP demo was configured without the
hypervisor’s memory limits, using upstream Zephyr with a
larger allowed flash size. In contrast, the fork used for the
Hello world template enforces stricter flash limits to fit the memory
allocated to the virtual machine.
To reduce memory usage, we first disabled unnecessary features, such as
CONFIG_NET_SHELL, which provides network commands that were not needed. This
made it possible to build the application, but runtime exceptions persisted,
indicating that some drivers were failing to initialize the hardware. The next
step was to enable drivers in prj.conf incrementally, identifying and fixing
the ones causing the issues.
The first configuration option - CONFIG_NETWORKING=y - was enough to cause a
hypervisor exception. The question is why? After comparing configuration files
from before and after enabling CONFIG_NETWORKING, some interesting
dependencies that were automatically added to the configuration image showed up:
|
|
Zephyr RTOS networking module requires access to the random number generator (RNG), which was not initially available to the virtual machine.
Hardware access needs to be configured in the hypervisor config file. In
CROSSCON, a virtual machine is granted access to a device by adding a
corresponding entry to the devs field using a vm_dev_region structure:
|
|
The memory map of the board can be found in the board user manual. The address of the RNG that was found in the manual is shown below.

A quick look at the Zephyr RTOS device tree showed that the size of RNG’s memory
region is 0x1000:
|
|
Access was granted by modifying the previously mentioned hypervisor configuration:
|
|
This, however, did not initially work. The program terminated with an error:
|
|
After discussing the issue with the CROSSCON Hypervisor maintainers,
we discovered that the number of SAU entries for TrustZone had exceeded.
Each vm_dev_region in the hypervisor configuration consumes one or more SAU
entries, and the original setup had more regions than the hardware could handle.
The solution was to merge some of the vm_dev_region structures into larger
contiguous regions, reducing the total number of SAU entries while still
covering the same devices and memory areas:
|
|
This adjustment brought the configuration within the SAU limit, allowing the virtual machine to access all required devices properly. Without this change, the hypervisor could not map all devices, which would have caused hardware access failures in the VM.
During testing, the DHCP application failed to run correctly, even after the
previous configuration fixes. The root cause was a conflict on the UART used by
the Wi-Fi module: the same UART had previously been assigned for serial
communication between the virtual machine and the host PC, leading to crashes.
Additionally, enabling CONFIG_NET_LOG and CONFIG_LOG triggered logging over
that same UART, which exacerbated the problem.
The solution was straightforward: disable the conflicting options. After turning
off CONFIG_NET_LOG and CONFIG_LOG, the modified Hello world application,
now using the full prj.conf from the DHCP application, booted successfully.
With this setup working correctly, it was finally time to run the DHCP
application itself.
Back to the DHCP application
Unfortunately, running the DHCP application after the corrections in the
previous chapter caused another jump to fault_exception_handler. A quick
debugging with GDB pointed out a problem with memset the function:
|
|
Further debugging allowed us to track the addresses that the memset was using:
|
|
The addresses were correctly passed to the Zephyr RTOS Devicetree. The problem
was elsewhere - the second entry in regions defines FLASH memory addresses
available to the virtual machine:
|
|
The address used by the memset was 0x0005082a, which lay outside the virtual
machine’s assigned memory range. The issue was fixed by increasing the VM’s
RAM allocation to 0x20000, ensuring that the memory accessed by the
application fell within the allowed range.
With this updated configuration, no exceptions were thrown. This, however, was not the end of the problems.
The hypervisor refused to run code inside VM1 while VM0 was
running correctly. Since the hypervisor executed successfully, yet only one of
the VMs provided output, we suspected the issue might be related to the
scheduler. The whole case of how we verified that is described later in this
section; for now, let’s focus on the theory. The system uses the TrustZone
system clock that generates periodic SysTick interrupts inside TrustZone.
These interrupts trigger the hypervisor’s scheduler. This is a classical
implementation of the Round Robin scheduling policy, which makes sure that every
virtual machine gets its slice of the CPU time periodically. The scheduler’s
dispatcher might be another problem here. Without it working correctly, the
next-to-execute virtual machine context can be restored incorrectly.
First things first - a breakpoint inside the SysTick handler was set to verify
that both the scheduling policy and the dispatcher are working correctly:
|
|
After examining the ARMv8-M Architectural Reference Manual, it turned out that
ID 15 corresponds to the SysTick interrupt. It means that the context
switch between virtual machines was actually happening. A breakpoint just before
switching to the virtual machine context was set to confirm this:
|
|
Code from Zephyr RTOS was being executed, which confirmed that the switch was
happening. For some reason, however, Zephyr RTOS executed the idle task
instead of the DHCP application’s task.
The problem was caused by a conflict in the UART interfaces configuration - the same UART was once again set up to be used for both the serial console and the Wi-Fi module, which caused initialization failure in the DHCP application’s task. This time, the logs from the DHCP application were needed. Therefore, the Devicetree was modified so that two different interfaces were used.
|
|
Now the main thread was executed. However, the Wi-Fi module was not being correctly initialized:
|
|
Further diagnosis showed an interesting bug: The elapsed time within Zephyr RTOS, was 16 times slower than real time:
|
|
The timer was divided by the hypervisor depending on the number of virtual machines (by two in this case). Additionally, within Zephyr RTOS it ran 8 times slower. The CROSSCON Hypervisor issue was fixed by its maintainers. Zephyr’s time division was easy to correct with a proper system timer configuration, though we did not investigate why the slowdown was exactly by this factor.
|
|
The final problem was again related to UART - the RX callback was not being triggered. It was suggested by the hypervisor maintainers that instead of looking for the solution within the Bao Hypervisor, it is better to switch to the CROSSCON Hypervisor, where the issue no longer appeared. The CROSSCON hypervisor configuration followed a slightly different format. It was modified to use a single virtual machine with the Zephyr RTOS DHCP demo application.
|
|
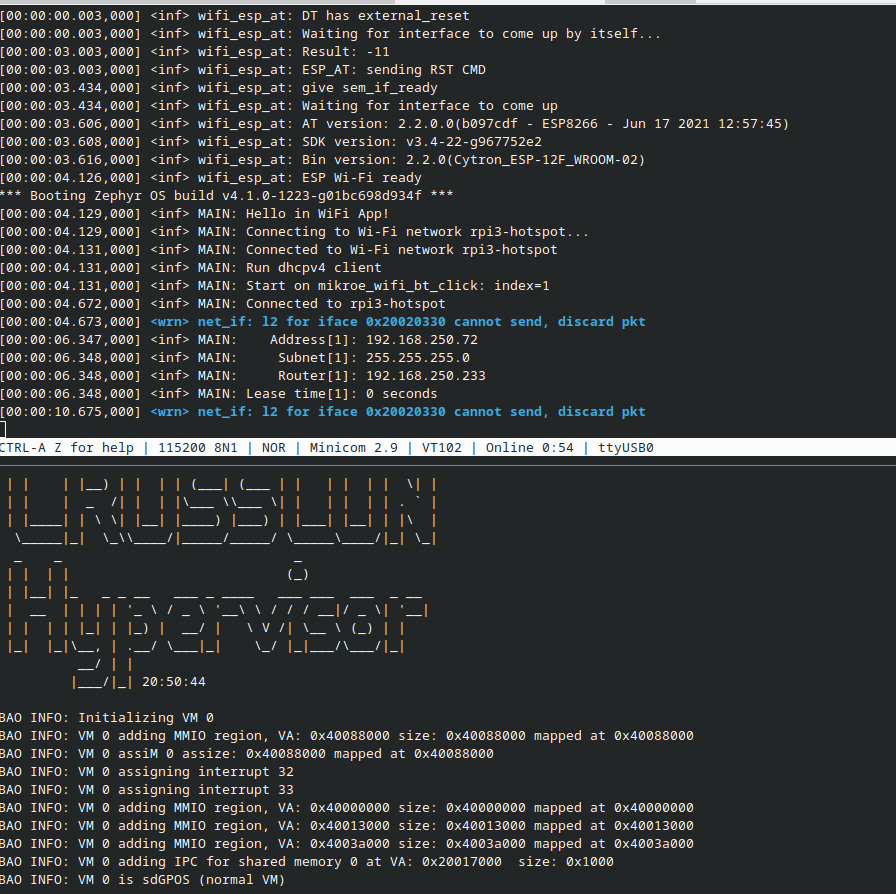
This was the final step required to get the DHCP application to work. The Wi-Fi module was initialized correctly, and the board managed to establish a connection with the Wi-Fi access point:
Summary
Running a Zephyr application on top of the CROSSCON Hypervisor is a task that comes with many challenges. Despite having a working application, many issues arose along the way, from enabling devices used internally by libraries to fixing hypervisor bugs.
For any questions or feedback, feel free to contact us at contact@3mdeb.com or hop on our community channels: