Introduction
In this post, I’ll describe a couple of features that have been implemented or are planned to be implemented in meta-zarhus related to system security. Some of those features are:
- Creating a UKI EFI image which allows us to boot directly from UEFI BIOS
- Adding security modules and configuration to the Linux kernel (Lockdown, module signing)
- Rootfs encryption and decryption with TPM
- A/B updates
Some of these features are located in separate sublayers in meta-zarhus-features, while others, such as UKI generation, are defined in the x86-64 BSP sublayer. Changes needed for a combination of different features are contained in a dynamic layer that’s inside the feature sublayer.
Unified Kernel Image (UKI)
When we started adding support for the x86-64 platform, we decided to skip the
bootloader and build an image with only one
UKI file,
which can be booted directly by BIOS. This decision was based on the need to add
support for UEFI Secure Boot (SB). With the UKI file, we only need to sign and
verify that one file, which lowers attack surface which could be used to get
around UEFI Secure Boot, e.g. if we used GRUB as bootloader then we would also
need to add shim and sign and verify every file used by GRUB including
grub.cfg which unverified could be used for
BootHole attack types
or similar.
As of now, the file structure on the boot (EFI) partition looks like this:
|
|
Where bootx64.efi is our UKI file. It’s located under the default path, which
the BIOS searches for boot files.
Generating UKI
UKI files can be generated with the ukify command. In Yocto, we can either
do it by:
- Writing our own task. This approach is useful if you want to control precisely what happens, or if other existing approaches don’t accommodate your use case. That was the case for me in meta-dts, where I created a second UKI containing rootfs in place of initramfs.
- Using existing
ukiBitBake class. This approach is much easier, and it’s how we did it for Zarhus OS.
Your custom task could look like this:
|
|
Most of this code is fairly standard:
- Add task dependencies to
DEPENDS. - Define task - this is where we use the
ukifycommand to create UKI. do_uki[depends]- Those are inter-task dependencies. We need to add them, because to create UKI, we require artifacts to be deployed by those tasks.- Make sure the
ukitask is executed in the correct order. In this case, we can add it just before the image is created.
Generating a UKI in task boils down to one ukify build command and
correct task preparation (adding dependencies and using correct variables). A
UKI file generated this way will contain:
- Linux EFI boot stub
- Linux kernel
- initramfs
- os-release information
After generating this file, we need to add it to the boot partition. How we’ll
do it depends on the used bootloader and Wic
plugin, which prepares the
boot partition. In case of no separate bootloader and bootimg-partition Wic
plugin, we only need to add.
|
|
In place where it’ll be picked up by Wic task, e.g. in image recipe,
local.conf, machine .conf file, distro .conf file…
We can also generate our file by using the already written BitBake class.
There is uki.bbclass in poky
layer
but only in Walnascar and newer versions. I had to copy this file to the
meta-zarhus layer because it uses the Scarthgap layer versions. I also had
to add a couple of minor fixes to make sure it builds:
|
|
After that, using this class is very easy, just add to your image recipe:
|
|
Of course, this class can be configured in many more ways. If you want to know
more, it’s best to read the comments and check which variables use the ?=
operator.
System hardening
System hardening involves several significant changes aimed at securing our system. Some of those changes are:
- create user account and force password change on first boot
- lock root account
- additional kernel configuration
Kernel configuration that’s related to SB:
-
Module signing - enable and force module signature verification (don’t allow unverified modules to load), sign all built modules
1 2 3 4 5 6 7 8CONFIG_MODULE_SIG_FORMAT=y CONFIG_MODULE_SIG=y CONFIG_MODULE_SIG_FORCE=y CONFIG_MODULE_SIG_ALL=y CONFIG_MODULE_SIG_SHA256=y CONFIG_MODULE_SIG_HASH="sha256" CONFIG_MODULE_SIG_KEY="certs/signing_key.pem" CONFIG_MODULE_SIG_KEY_TYPE_RSA=y -
Enable kernel lockdown security module and run in the most secure mode by default.
1 2 3 4 5CONFIG_SECURITY_LOCKDOWN_LSM=y CONFIG_SECURITY_LOCKDOWN_LSM_EARLY=y # CONFIG_LOCK_DOWN_KERNEL_FORCE_NONE is not set # CONFIG_LOCK_DOWN_KERNEL_FORCE_INTEGRITY is not set CONFIG_LOCK_DOWN_KERNEL_FORCE_CONFIDENTIALITY=y
Verifying those changes is relatively easy. To verify kernel lockdown, we can
check dmesg logs and/or try to get access that’s disallowed by lockdown, e.g.,
by trying to read memory via /dev/mem:
|
|
Testing module signature verification is also similarly easy:
-
Check which modules are loaded by default after system start and choose one, e.g.
1 2 3genericx86-64:~$ lsmod | grep 8021 8021q 32768 0 cfg80211 434176 0 -
Remove module signature. I had to mount Zarhus' rootfs partition on the host (tests were performed in QEMU) because Zarhus doesn’t include the necessary tools for this test.
-
Check
modinfooutput to make sure module is signed1 2 3 4 5 6 7 8 9 10 11 12 13 14 15 16 17$ modinfo mnt/usr/lib/modules/6.6.21-yocto-standard/kernel/net/8021q/8021q.ko filename: (...)/8021q.ko version: 1.8 license: GPL alias: rtnl-link-vlan srcversion: FB6625A1875AB5959A530C9 depends: retpoline: Y intree: Y name: 8021q vermagic: 6.6.21-yocto-standard SMP preempt mod_unload sig_id: PKCS#7 signer: Build time autogenerated kernel key sig_key: 7D:60:BF:D3:22:3C:69:19:C2:8F:A5:F4:E3:FC:CB:DB:CE:CF:14:DE sig_hashalgo: sha256 signature: (...) -
Remove signature from module
1strip -g mnt/usr/lib/modules/6.6.21-yocto-standard/kernel/net/8021q/8021q.ko -
Make sure signature was removed
1 2 3 4 5 6 7 8 9 10 11 12$ modinfo mnt/usr/lib/modules/6.6.21-yocto-standard/kernel/net/8021q/8021q.ko filename: (...)/8021q.ko version: 1.8 license: GPL alias: rtnl-link-vlan srcversion: FB6625A1875AB5959A530C9 depends: retpoline: Y intree: Y name: 8021q vermagic: 6.6.21-yocto-standard SMP preempt mod_unload
-
-
Boot into Zarhus OS again and check if the module has loaded successfully and if
dmesginforms us of failed signature verification:1 2 3 4 5genericx86-64:~$ lsmod | grep 8021 cfg80211 434176 0 genericx86-64:~$ dmesg | grep -i module (...) [ 3.145446] Loading of unsigned module is rejected
Encryption
The next feature that was implemented was rootfs encryption. High-level boot flow looks like this:
In reality, there is much more happening under the hood. Zarhus OS initramfs
uses
initramfs-framework.
Adding our script, which initramfs will start, is as easy as adding it to the
/init.d folder inside initramfs with the correct name, as the script run order
is determined alphabetically. That’s why script filenames are in 00-<name>
format. I decided to add
07-encrypt_decrypt
script, which should run before anything else requiring filesystem access. The
commands below are used to encrypt the root file system partition without losing
data. Those steps are done in the encrypt_device function, but to make them
easier to follow, I replaced variables with values and removed checks and
redirections:
-
Lower filesystem size so our new LUKS header can fit inside the partition
1 2 3device_size="$(lsblk -nbo SIZE "/dev/disk/by-partlabel/rootfs")" e2fsck -fp "/dev/disk/by-partlabel/rootfs" resize2fs -f "/dev/disk/by-partlabel/rootfs" "$(($device_size/1024/1024-32))M" -
Encrypt with temporary key
1 2 3 4dd if=/dev/urandom of="temp-key" bs=512 count=4 cryptsetup reencrypt \ --encrypt --type luks2 --key-file "temp-key" \ --reduce-device-size 32M "/dev/disk/by-partlabel/rootfs" -
Enroll recovery password and TPM2 while wiping temporary key.
1 2 3 4systemd-cryptenroll --recovery-key --unlock-key-file="temp-key" \ "/dev/disk/by-partlabel/rootfs" systemd-cryptenroll --wipe-slot=password --unlock-key-file="temp-key" \ --tpm2-device=auto --tpm2-pcrs="7" "/dev/disk/by-partlabel/rootfs" -
Decrypt partition, check and expand filesystem so we use the rest of the available space on the partition
1 2 3cryptsetup open "/dev/disk/by-partlabel/rootfs" luks_rootfs e2fsck -f -p "/dev/mapper/luks_rootfs" resize2fs "/dev/mapper/luks_rootfs"
We are planning small changes to this feature, which involve moving TPM2
enrollment to a systemd service that starts when the system boots with UEFI
Secure Boot enabled. Enrolling PCR 7 before enabling and/or provisioning SB
would result in needing to update those PCRs in the LUKS header anyway. Another
change related to that will be allowing users to define an encryption password
as a recovery password generated by systemd-cryptenroll, which isn’t easy to
write without mistakes. Currently, the password is generated in the following
format:
|
|
The implemented script also allows us to encrypt/decrypt multiple partitions
depending on the command-line arguments passed to the kernel. This option is
used with the following feature, A/B update, which also adds
rwoverlay partition and a second rootfs, both of which need to be encrypted.
A/B update
An A/B update allows us to perform reliable updates that won’t brick our device, even if the update fails. It works by updating inactive partitions, B in the case of using A, or A in the case of using B. After the update, we can boot into the newly updated partition. If the update fails and the system cannot boot, then on the next boot, we will revert to the previous, working system.
A/B slot structure in case of Zarhus OS looks like this:
If we print the disk/image layout, it would look like this (with encryption feature):
|
|
There are other configurations possible, e.g., one boot partition, in which case we would update only singular files (e.g., kernel A or B), or configurations with more slots than just A and B.
In the beginning, both slots are nearly identical, with the only changes between partitions being:
- On the boot partition, the only difference is the
.cmdlinesection in the UKI file to make sure it mounts the correctrootfs - On rootfs partition, the only change is in
/etc/fstabto make sure systemd mounts the correctbootpartition
There is also a fifth partition, rwoverlay, which is used as overlayfs,
which is mounted on /. An overlay is needed so we can keep configuration
changes between updates/slots, e.g., to keep the user password we changed on
first boot. This partition is created on first boot and uses all remaining disk
space.
A/B booting and update flow:
First boot:
- Boot from default partition (
boot_a). - Add
Zarhus AandZarhus Bwithefibootmgr. SetZarhus Aas the default/first booting option andZarhus Bas the second
Normal/next boot:
- Boot from the default partition,
Zarhus AorZarhus B, which depends onBootOrderorBootNextUEFI variables - After booting into OS, confirm that OS booted correctly with
otab confirm. This command does nothing unless an update is in progress.
Update:
- Set variables that are used to check if an update is in progress. We must set
those in a way that’ll persist between reboots. Currently, we are using EFI
NVRAM, but as we are not using those variables outside of OS (e.g., in
initramfs), then we could’ve done it via a file somewhere on the
rootfs(overlayfs) partition - Update inactive partitions
- Set
BootNextto inactive boot partition - Reboot
After that, continue with Normal boot steps. We should boot from the slot
defined in BootNext. If, for some reason, the system fails to boot, we will
attempt to boot based on BootOrder, which has not changed. If we manage to
boot into OS, then otab confirm will detect update in progress and swap
Zarhus A and Zarhus B BootOrder to make the updated slot the default one.
SWUpdate
Under the hood, we are using SWUpdate to update our system. To use it, we need to build a cpio archive in the correct format:
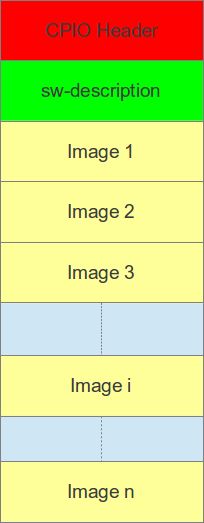
Zarhus OS update image contains:
|
|
sw-desctiption is a configuration file used by SWUpdate to know what to update
and how. In the case of Zarhus OS, it contains:
|
|
Our sw-description contains two slots, A and B, with the following sections
defined:
scripts- additionalotab-shellscript that’s called after successful update. All we are doing there is settingBootNextviaefibootmgr.images- list of images to install for selected slot containing e.g.- image
filenamein cpio archive device(partition) which will be updated- handler
type, raw handler writes image directly into device installed-directly- streaming update, no need to unpack image first
- image
bootenv- list of bootloader variables to set and to what value after successful update. The way those variables can be modified is configurable either in thesw-descriptoritself or duringswupdatecompilation by setting supported and default bootloader interface. Zarhus OS keeps those boot variables in EFI NVRAM.
.direct.p<x>.gz files in a cpio archive are partition images:
|
|
They are generated by the do_image task and deployed by a separate task to
enable their use by the zarhus-swu-image target, which generates the .swu
file. Deployment boils down to compressing .direct.p<x> images and copying
them to ${DEPLOY_DIR_IMAGE} folder.
Building a SWU image
Building a SWU image is pretty easy, thanks to
swupdate.bbclass.
Just add the files needed to be included in the .swu file to SWUPDATE_IMAGES
and add all dependencies (e.g., base image) to IMAGE_DEPENDS to build them
before creating the SWU image.
A/B partition differences
Zarhus A and B partitions differ in a small way. On boot partitions, UKI files have a different command-line:
|
|
Creating the second UKI was done by copying the first one and replacing its
.cmdline section with a modified one. It can be done by
objcopy --update-section:
|
|
Fortunately, bootimage-partition has a way to put different files on different
partitions:
|
|
This plugin decides which files to use for the prepared partition based on three different variables, in descending priority:
IMAGE_BOOT_FILES_uuid-<uuid>IMAGE_BOOT_FILES_label-<label>IMAGE_BOOT_FILES
An empty variable is treated as if it weren’t defined.
Modifying /etc/fstab wasn’t as straightforward to implement, at least I
haven’t found an easier way. I choose to write custom Wic
plugin,
which applies sed filter on /etc/fstab during partition preparation. To make
it easier for myself and to not duplicate too much code, I inherited from a
previously used plugin:
|
|
And defined one method, which functionally is identical to prepending
to BitBake task:
|
|
Most of the code is reused from RootfsPlugin (configuration and sanity
checks). Modifying fstab can be done by:
|
|
Variable name containing sed filter can be passed via --sourceparams "sed_filter_var=<VARIABLE>" argument in wks file. After modifying fstab, we
need to change a couple of variables to inform the base class to use our new,
modified copy of fstab:
|
|
A/B update and encryption
Encrypting/decrypting all three partitions (decrypting the inactive partition is
necessary to allow updates) was achieved by modifying the encrypt_decrypt
initramfs script to support specifying multiple partitions, as the initial
version only worked with rootfs. I implemented one difference in how
rwoverlay is encrypted. As in-place encryption without losing data can take a
while, depending on partition size, and rwoverlay is created on first boot, I
decided to use cryptsetup luksFormat command instead of cryptsetup reencrypt:
|
|
It is much faster, regardless of whether the partition size is 50 GB or 1 TB.
Creating an encrypted partition in this way requires recreating the filesystem,
so I also had to add another script, create_overlay_fs, which runs after
encrypt_decrypt.
I also needed to modify the deployed rootfs partitions used by the .swu
file, as during encryption, we are decreasing the filesystem size to make space
for the LUKS header, which results in the update failing with information that
there is not enough space on the device. I used mostly identical commands that
are used during encryption:
|
|
Shutdown hooks
During testing, I noticed that systemd complained about being unable to close
active rootfs and rwoverlay:
|
|
The problem was that to close the encrypted partition, I first had to umount
it (as it was busy otherwise), and I couldn’t umount it because it was in use.
To fix that, I had to go back to initramfs during shutdown and add shutdown
hooks that umount and close everything. I found a way to return to initramfs
by researching how dracut accomplishes this. The initrd Interface of
systemd
says:
If the executable
/run/initramfs/shutdownexists systemd will use it to jump back into the initrd on shutdown. /run/initramfs should be a usable initrd environment to which systemd will pivot back and the “shutdown” executable in it should be able to detach all complex storage that for example was needed to mount the root file system. It’s the job of the initrd to set up this directory and executable in the right way so that this works correctly. The shutdown binary is invoked with the shutdown verb as argv[1], optionally followed (in argv[2], argv[3], …) by systemd’s original command line options, for example –log-level= and similar.
You can also find a more detailed description of what happens during shutdown in dracut-shutdown.service.
So, to return to initramfs on shutdown, I had to:
- unpack original initramfs to
/run/initramfs - add
shutdownscript
To unpack initramfs, I created a similar service to one used by
dracut
and a script that extracts initramfs from the UKI file:
|
|
It’s easy to check whether this works. Simply follow those steps manually and
create a shutdown shell script that starts sh. If you enable verbose
logging, you should see:
|
|
And in the shell, you can check the rootfs mount point with df -h /
|
|
After unmounting /oldroot, this changes to:
|
|
To add a shutdown script, I decided to copy and minimally modify init script to allow usage of shutdown hooks. I had to remove and change some parts, e.g.:
-
Remove filesystem mounting, e.g.,
/dev, as afterpivot_root, those mount points still exist. -
Change
MODULE_DIRto/shutdown.d- that’s where we are keeping our shutdown hooks -
Add
export WATCHDOG_USEC=60000000- it’s set to 0 during shutdown, which results in udevd failing to start, and we need udevd to close LUKS partitions, or rather to keepcryptsetupfrom waiting forever on:1# Udev cookie 0xd4d1796 (semid 3) waiting for zeroI choose a value that’s seen during reboot.
-
Handle failure - In case of failure, I immediately force the requested action (shutdown, halt, reboot, or kexec), skipping the rest of the hooks
After that, adding shutdown hooks is done in the same way as adding init hooks. I created three hooks, called in the described order:
-
umount- unmount/oldrootand everything that’s mounted there. You can do it in one line:1mount | awk '{print $3}' | grep "/oldroot" | sort -r | xargs umountAnd there is a lot to unmount:
1 2 3 4 5 6 7 8 9 10 11 12 13 14 15/oldroot/sys/kernel/security /oldroot/sys/kernel/debug /oldroot/sys/kernel/config /oldroot/sys/fs/fuse/connections /oldroot/sys/fs/cgroup /oldroot/sys/fs/bpf /oldroot/sys/firmware/efi/efivars /oldroot/sys /oldroot/run /oldroot/proc /oldroot/dev/shm /oldroot/dev/pts /oldroot/dev/mqueue /oldroot/dev /oldrootAs initramfs is using BusyBox version of
umount, I can’t useumount -R /oldroot -
luks_close- close all open LUKS devices1 2 3for luks in $(dmsetup ls --target crypt | awk '{print $1}'); do cryptsetup close "$luks" done -
finish- last script, does the action requested by the user and passed to theshutdownscript by systemd1 2 3 4 5 6 7 8 9 10case "$ACTION" in reboot | poweroff | halt) $ACTION -f -n ;; kexec) kexec -e msg "$ACTION failed!" reboot -f -n ;; esac
Testing everything together
It wasn’t easy implementing all those separate functionalities and ensuring they work both independently and together, but it’s mostly complete. Let’s test everything implemented so far:
First boot:
-
Create
rwoverlaypartition and fix backup GPT table1 2 3 4 5 6BdsDxe: loading Boot0001 "UEFI QEMU HARDDISK QM00001 " from PciRoot(0x0)/Pci(0x1F,0x2)/Sata(0x0,0xFFFF,0x0) BdsDxe: starting Boot0001 "UEFI QEMU HARDDISK QM00001 " from PciRoot(0x0)/Pci(0x1F,0x2)/Sata(0x0,0xFFFF,0x0) Starting systemd-udevd version 255.13^ Creating rwoverlay partition GPT PMBR size mismatch (13111329 != 55054369) will be corrected by write. The backup GPT table is not on the end of the device. This problem will be corrected by write. -
Encrypt partitions. After the first encryption, we are asked to save the recovery key
1 2 3 4 5 6 7 8 9 10 11 12 13 14Preparing to encrypt /dev/disk/by-partlabel/rootfs_b resize2fs 1.47.0 (5-Feb-2023) Encrypting /dev/disk/by-partlabel/rootfs_b Finished, time 00m45s, 3056 MiB written, speed 66.7 MiB/s Enrolling recovery key A secret recovery key has been generated for this volume: 🔐 kubnjhkr-jvkrhivr-icbhivjr-cccngibn-ejitjedc-ndbvutnh-lirbgrjb-uedvrbln Please save this secret recovery key at a secure location. It may be used to regain access to the volume if the other configured access credentials have been lost or forgotten. The recovery key may be entered in place of a password whenever authentication is requested. Press Enter to continue...After confirming, enroll TPM and wipe the temporary key:
1 2 3 4 5Enrolling TPM device New TPM2 token enrolled as key slot 2. Wiped slot 0. resize2fs 1.47.0 (5-Feb-2023) Successfully encrypted /dev/disk/by-partlabel/rootfs_bAnd encrypt the rest of the partitions.
rwoverlay:1 2 3 4 5 6 7 8Preparing to encrypt /dev/disk/by-partlabel/rwoverlay Encrypting /dev/disk/by-partlabel/rwoverlay WARNING: Device /dev/disk/by-partlabel/rwoverlay already contains a 'ext4' superblock signature. Enrolling previously generated recovery key Enrolling TPM device New TPM2 token enrolled as key slot 2. Wiped slot 0. Successfully encrypted /dev/disk/by-partlabel/rwoverlayAnd finally
rootfs_a1 2 3 4 5 6 7 8 9 10Preparing to encrypt /dev/disk/by-partlabel/rootfs_a resize2fs 1.47.0 (5-Feb-2023) Encrypting /dev/disk/by-partlabel/rootfs_a Finished, time 00m48s, 3056 MiB written, speed 62.2 MiB/s Enrolling previously generated recovery key Enrolling TPM device New TPM2 token enrolled as key slot 2. Wiped slot 0. resize2fs 1.47.0 (5-Feb-2023) Successfully encrypted /dev/disk/by-partlabel/rootfs_a -
Recreate filesystem on
rwoverlaypartition1Creating rwoverlay ext4 filesystem -
Mount
overlayfson/1Mounting rw filesystem using overlay... -
Change password on first login:
1 2 3 4 5 6 7 8 9genericx86-64 login: user Your password has expired. Choose a new password. Changing password for user Enter the new password (minimum of 5 characters) Please use a combination of upper and lower case letters and numbers. New password: Re-enter new password: passwd: password changed. genericx86-64:~$
After booting, we can verify:
-
A/B slots via
lsblk1 2 3 4 5 6 7 8 9 10 11NAME MAJ:MIN RM SIZE RO TYPE MOUNTPOINTS sda 8:0 0 26.3G 0 disk |-sda1 8:1 0 128M 0 part /boot |-sda2 8:2 0 128M 0 part |-sda3 8:3 0 3G 0 part | `-luks_rootfs_a 252:2 0 3G 0 crypt /media/rfs/ro |-sda4 8:4 0 3G 0 part | `-luks_rootfs_b 252:0 0 3G 0 crypt `-sda5 8:5 0 20G 0 part `-luks_rwoverlay 252:1 0 20G 0 crypt /media/rfs/rw sr0 11:0 1 1024M 0 rom -
That we are using
overlayfs1 2 3 4genericx86-64:~$ findmnt / TARGET SOURCE FSTYPE OPTIONS / overlay overlay rw,relatime,lowerdir=/media/rfs/ro,upperdir=/media/rfs/rw/upperdir,workdir=/media/rfs/rw/work,uuid=on -
And that partitions are correctly encrypted:
1genericx86-64:~$ sudo cryptsetup luksDump /dev/sda31 2 3 4 5 6 7 8 9 10 11 12 13 14 15 16 17 18 19 20 21 22 23 24 25 26 27 28 29 30 31 32 33 34 35LUKS header information Version: 2 Epoch: 391 Metadata area: 16384 [bytes] Keyslots area: 16744448 [bytes] UUID: eee803c3-023d-47e0-88be-820f29c7fa5a Label: luks_rootfs_a Subsystem: (no subsystem) Flags: (no flags) Data segments: 0: crypt offset: 16777216 [bytes] length: (whole device) cipher: aes-xts-plain64 sector: 512 [bytes] Keyslots: 1: luks2 Key: 512 bits Priority: normal Cipher: aes-xts-plain64 Cipher key: 512 bits (...) 2: luks2 Key: 512 bits (...) Tokens: 0: systemd-recovery Keyslot: 1 1: systemd-tpm2 tpm2-hash-pcrs: 7 tpm2-pcr-bank: sha256 (...) Keyslot: 2
To make all those checks easier, I created cukinia tests:
- cukinia.conf
- includes all other tests in
/etc/cukinia/conf.ddirectory - hardening.conf - tests related to the system hardening feature
- encryption.conf
- tests related to encryption feature
- dynamic layer encryption.conf - used if both the encryption and update feature is enabled
- otab.conf - tests related to A/B update feature
Results after running those tests:
|
|
One failure is due to running a debug image, which allows the root account.
To test the update, I copied the .swu image to the running system via scp
and started the update with otab update <file>
|
|
More verbose logs show exactly which config, files, and partitions are used during update:
|
|
After the update, we can check that we booted from the correct partitions:
|
|
Or verify that BootOrder is correct:
|
|
What’s next
There are multiple possibilities, but the next step would be to change the encryption workflow a little:
- encrypt with user-supplied password
- enroll TPM2 if the system booted with SB enabled
The current update implementation could be improved, for example, by creating an
installer or expanding the first boot scripts. This would allow us to create a
slot B during runtime, resulting in much smaller images (half the size without
compression). It should also be possible to use only a single partition image in
the .swu update image and either keep any files that differ between slots as
separate files in the .swu archive or modify them in the otab-shell script
after the inactive partition is updated.
I’m also nearly finished with release CI for meta-zarhus, which will allow us
to create releases for multiple platforms with different features. I hope we
will expand this CI in the future to include public cache upload, which can
lower build time, and possibly add more sophisticated tests, such as DTS E2E
tests.
Those would be very helpful in detecting any problems or regressions.
Comprehensive tests are essential, as we have multiple features and support
various platforms, which makes manually testing all combinations very
time-consuming and prone to error.
You can join Zarhus Developers Meetup if you want to ask any questions or see a demo run on ODROID-H4.
Summary
Unlock the full potential of your hardware and secure your firmware with the
experts at 3mdeb! If you’re looking to boost your product’s performance and
protect it from potential security threats, our team is here to help.
Schedule a call with us
or drop us an email at contact<at>3mdeb<dot>com to start unlocking the hidden
benefits of your hardware. And if you want to stay up-to-date on all things
firmware security and optimization, be sure to sign up for our newsletter: