Introduction - Reclaim your server
BMCs (Baseboard Management Controllers) are the backbone of remote server management. They allow for monitoring platform health, performing recoveries, troubleshooting, and general management of your platform directly from your web browser. But the issue is, is the platform yours when such a crucial component runs unauditable code? Can one trust such a component?
That’s exactly what OpenBMC tries to solve. OpenBMC is an open-source firmware alternative for BMCs. It offers more flexibility and customization, and above all, it’s more secure since its source code can be audited and kept up to date.
In this blog post, I’ll discuss our current effort in porting OpenBMC to the Supermicro x11ssh platform. I’ll go over some caveats of compiling OpenBMC for a not (yet) supported platform, the current state of upstream, how to test the built image under QEMU, and where we are currently at with executing the code on real hardware. This post isn’t about what BMCs are, but if the topic sounds interesting to you, and you want to get up to speed on BMCs, check out this article from the OEM whose firmware we’ll be replacing (oh the irony).
State of the upstream
Before I dive into the caveats of compiling OpenBMC for an unsupported platform, let’s discuss the current state of OpenBMC upstream.
Latest release
As of today (28/04/2025), the newest OpenBMC release is
2.14.0 dated
16/05/2023. This means it has been almost two years since last release, yet
there’s active development happening.
Platform support and CI
The platform I aim to build OpenBMC for is
Supermicro x11ssh-f
for which, there’s no official configuration. I intentionally used
“no configuration” rather than “no support” as in practice, for OpenBMC these
are two different things. It’s easier to explain it in an example. While the
official OpenBMC repository contains configuration for a similar x11spi
platform, saying it is supported would be an overstatement (although
the readme
might have a different opinion). OpenBMC has
public CI, but this platform in
particular is not being tested there. The thing is, if a platform is not
regularly tested in CI, you can’t be certain that it actually works. …and that
was exactly the case but more on that later.
In case you’re wondering, here’s the list of platforms OpenBMC claims to support.
It should be noted that we’re not the first to attempt to run OpenBMC on the x11ssh platform. It was previously done by HardenedVault1, however, I was not aware of that very late in the process. Everything I came up with, not including console redirection, was on my own.
Repository architecture
A thing worth noting about the architecture of OpenBMC repository structure is that all meta-layers are stored directly inside the OpenBMC repository, rather than being configured as submodules. This is quite uncommon for a Yocto-based project. If you’re interested in the topic of setting up yocto project, check out this article we did in the past.
Building OpenBMC for X11SSH
Let’s go through what it took to build OpenBMC for the Supermicro X11SSH platform.
Building (or not) the X11SPI configuration
When starting to work on a project rather than start modifying things blindly, it’s a good practice to build and briefly test the base configuration. As a reminder, the configuration for X11SPI (we target X11SSH) is available in the upstream OpenBMC repo, and assuming it was the closest to my target I decided to build it first. How that went? If you read the previous section, you should already know the answer to that, but let’s go through it in detail.
I decided to attempt to build the image from the master branch as the last release was seriously long ago. I was aware I shouldn’t trust master branches to be bug-free, yet it seemed like the reasonable thing to do, especially if I would have needed help from the developers.
First I attempted to build the image locally. I installed the necessary packages and started the build. The issue was that my development machine with i7-1260P and 16GB of RAM was running out of RAM and the process was either getting killed or the machine simply froze, even if no other applications were running at the moment.
Then I changed the approach to create a build environment in the form of a docker container and attempt to build OpenBMC on much “beefier” machine that we refer to as “The Builder”. After setting up environment properly, and many many minutes of wait time, I was finally able to build the X11SPI configuration. …well, not really.
Remember what I said, what can happen when the configuration is not regularly
tested? The build was failing on one of the last steps: the packaging. The issue
was that the resulting squashfs image was too big to fit within available
flash memory. I didn’t want to spend time debugging what should have been a
working configuration and since now I had a brief idea of the build system, I
switched to making X11SSH configuration.
Baking the X11SSH configuration
To build the OpenBMC for the certain platform we need to create a configuration, or a layer to be exact, for it. I’ve got to say, I had it much easier if I were to create a layer for a totally unsupported configuration. I had the X11SPI I could reference and out-of-date configuration from when we (I wasn’t part of the team yet) attempted to build OpenBMC for the X11SSH in the past2. After a longer while of resolving: not applying patches, deprecated variables, names, or syntax… I ended up at the same point as for the X11SPI layer, which I consider an absolute win.
Too many features
To make the image fit within available flash memory and make the image build
successfully I needed to remove a bunch of functionality that OpenBMC offers. I
created a simple .bbappend file to remove a bunch of features, the content of
the file was as follows.
|
|
With features removed, I managed to successfully build the image.
Running the image
Rather than flashing the image to the board and crossing fingers, it is a much better approach to run as a VM. The X11SSH platform has BMC based on Aspeed AST2400 SoC, which can be emulated under QEMU3. This could be done with one simple command.
|
|
…which unfortunately proved there are issues with the image.
Running ain’t working
While the image technically runs under QEMU, I wouldn’t exactly call it a successful deployment.
|
|
Two issues needed to be resolved, or at that time I thought so.
bmcweb.service issue
The first issue that seemed major, but now I know it probably wasn’t, was the
issue with bmcweb.service.
|
|
The issue here was that the value for WatchdogSec argument was omitted for
some reason. I eventually found out what
the issue was. The variable in
bmcweb.service.in for the WatchdogSec parameter was named WATCHDOG_TIMEOUT
while the rest of the code set up WATCHDOG_TIMEOUT_SECONDS.
|
|
A classic mistake, that can make one cry when figured out. To my knowledge this bug was present upstream for at least 3 weeks, I can’t wrap my head around it that it has not been discovered earlier.
A small anecdote, I initially read:
bmcweb.service:13: Failed to parse WatchdogSec=s, ignoring: Invalid argument
…as if the service failed to start (was ignored), when in reality the systemd simply failed to parse the parameter and ignored the parameter itself. The lesson? Read error messages carefully, although I’m sure it ain’t the last time I trick myself with something similar. In my defense, I could not see if the service was running due to the execution being frozen.
System managers issue
The second issue, was much more serious but a search through the past OpenBMC
issues helped to have it eliminated. The prepared X11SSH configuration inherited
a setup in which both phosphor-state-manager and x86-power-control, despite
being
mutually exclusive
were being installed on the same system.
|
|
Both of the services serve similar purposes and implement interfaces like switching the system on and off.
A simple .bbappend file:
|
|
…resolved the issue.
It’s alive
When the change from the last paragraph was applied the system successfully booted.
|
|
The system booted without any noticeable issues under QEMU, but we have yet to test its functionality. There are other, more important things to do like…
Running the image on HW
I think we can agree that seeing the fruit of your labor running on real hardware is a nice feeling. So since we’ve got a supposedly working replacement image for the BMC, let’s try flashing it.
The flash storage
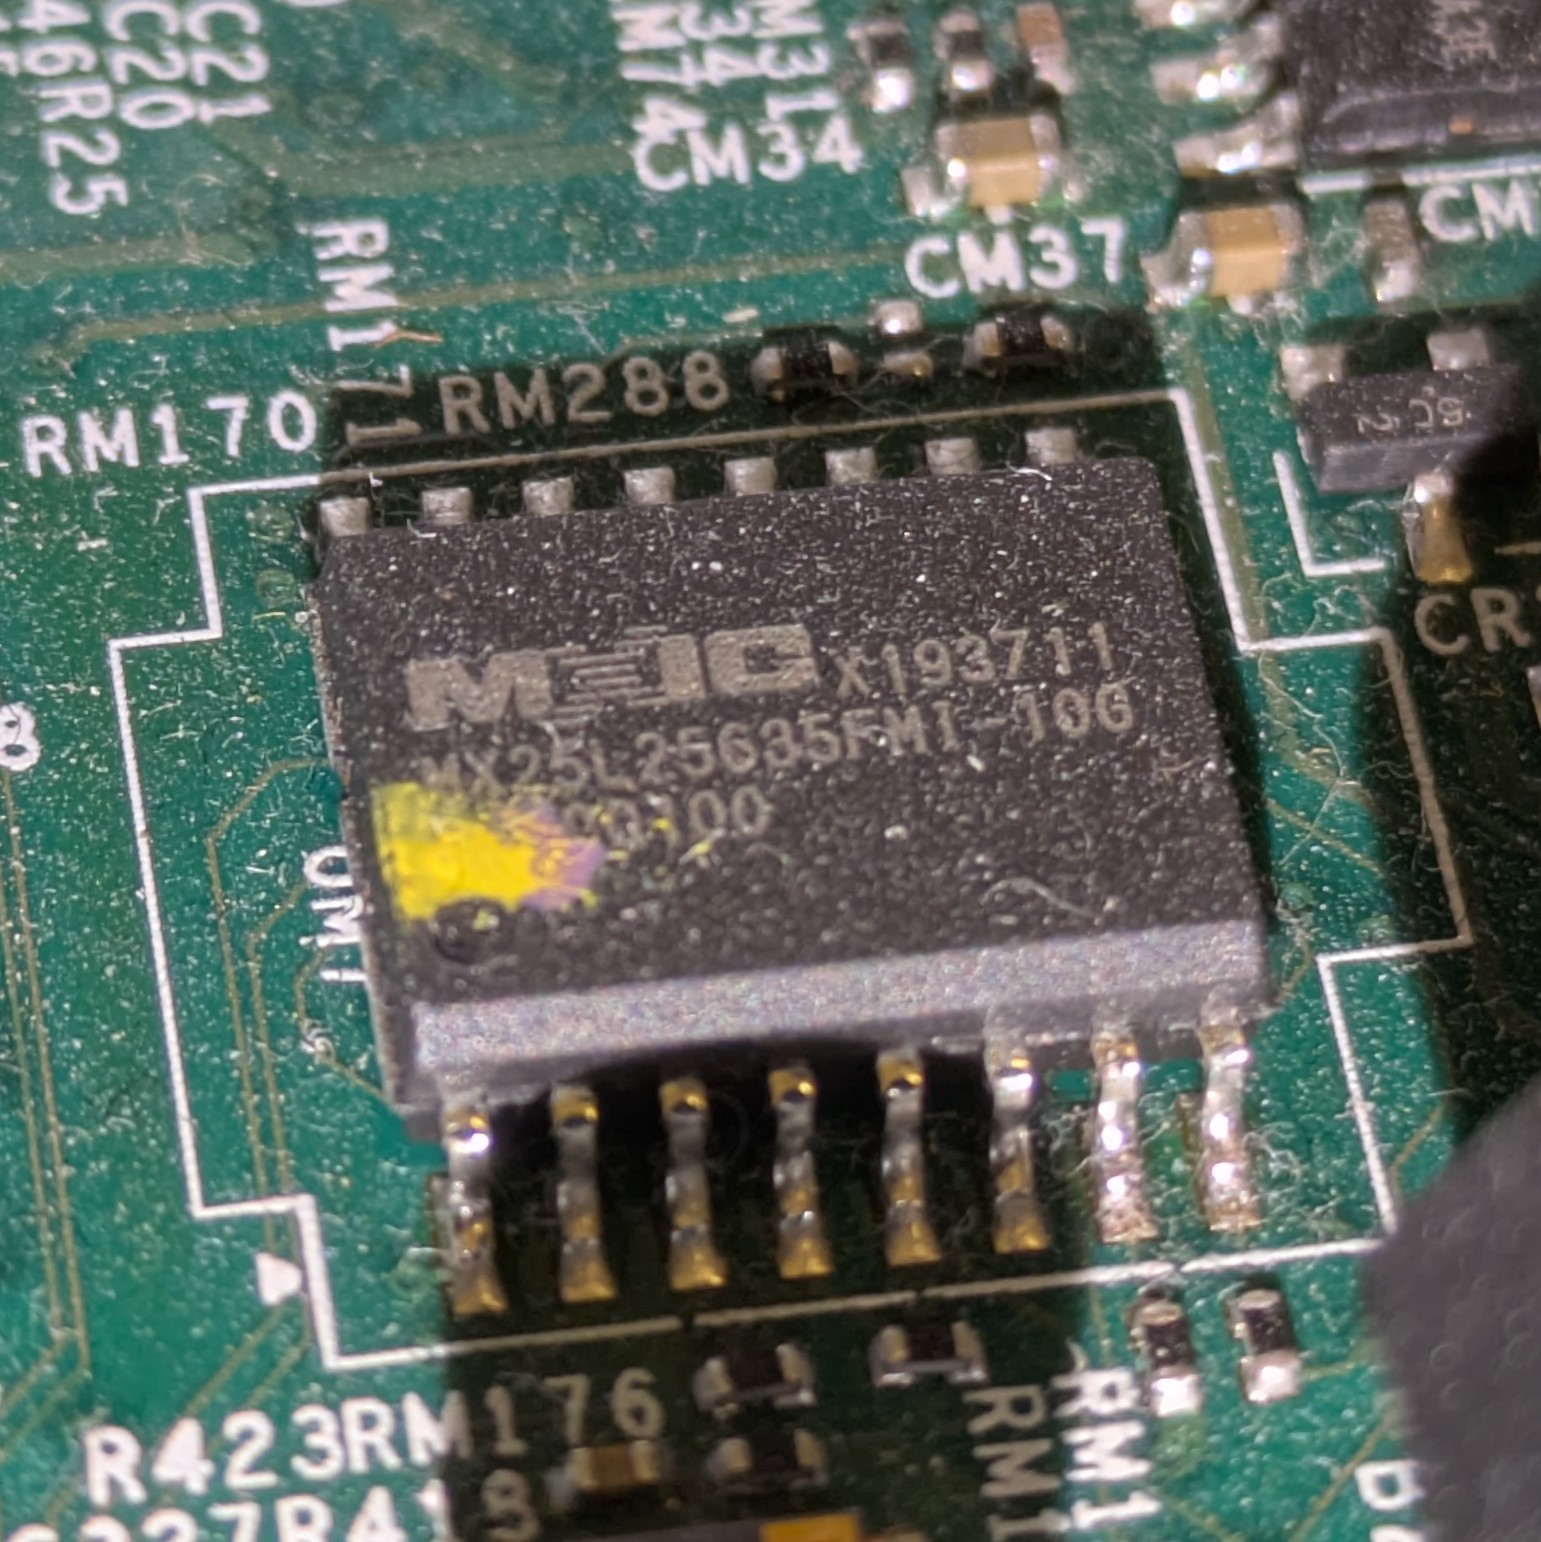
The BMC firmware is stored on Macronix MX25L25635F 32MB flash storage in SOP 16L format. Its safe voltage range is from 2.7V to 3.6V for all operations. The photo of the actual chip is shown below.
Here is the chip location on the board.
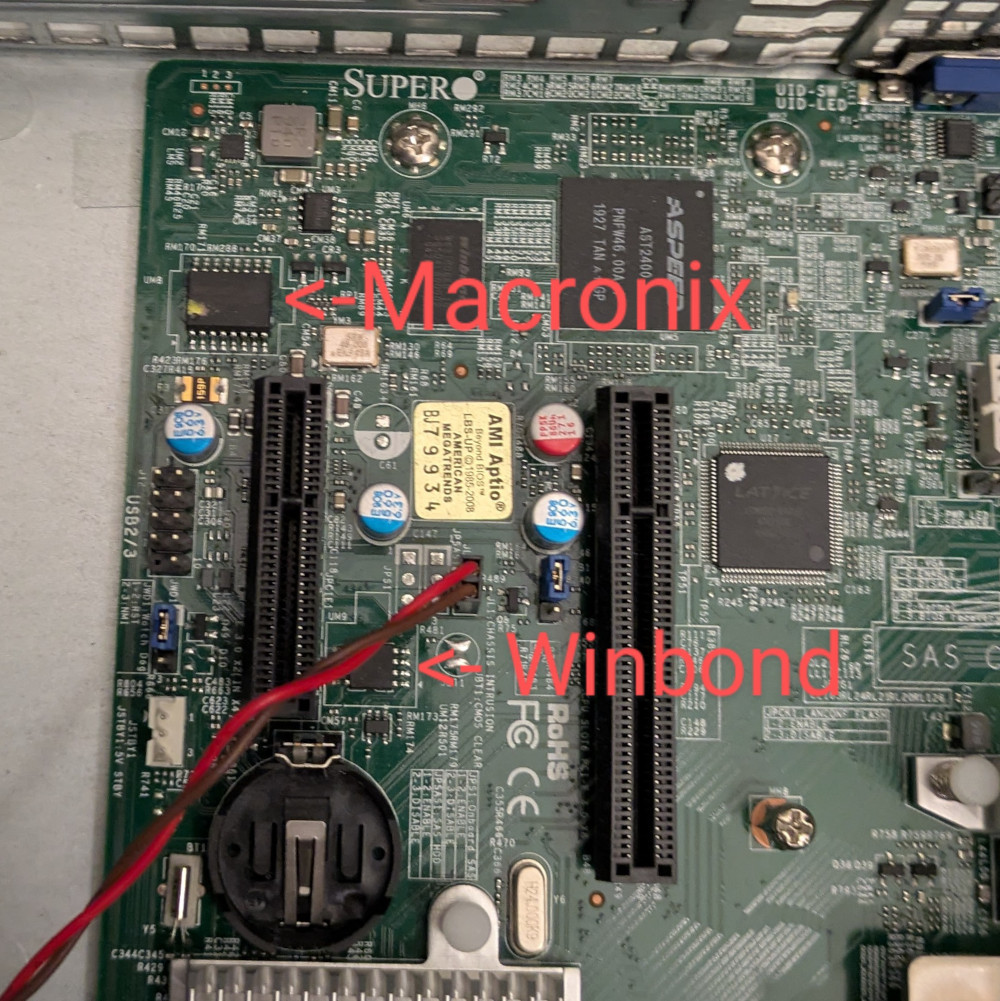
The chip marked as “Winbond” is a flash storage for UEFI/BIOS.
Flashing
For flashing, I used
RTE
our remote testing solution, along with SOIC 16 clip.
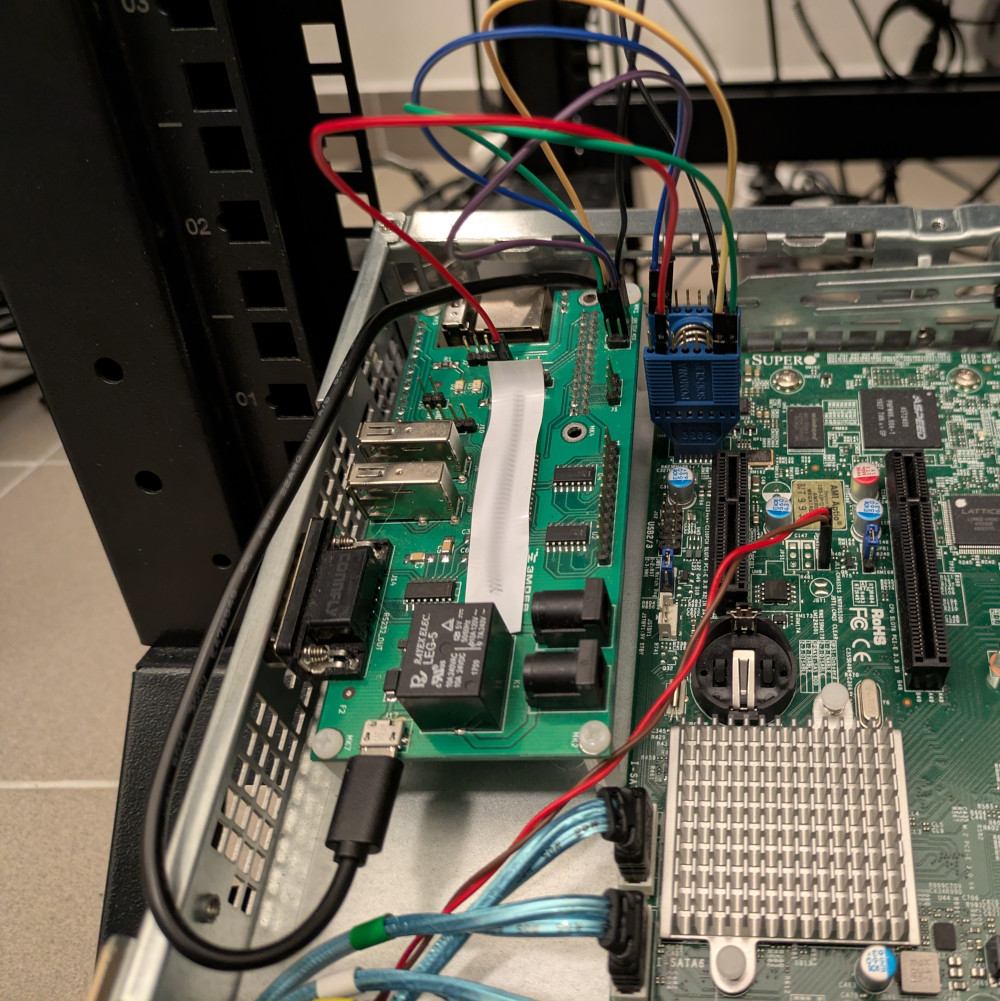
Conveniently, there’s just enough space between the motherboard and the case to fit RTE in, and when the PCI bracket is removed, the ethernet port aligns with the hole.
Before replacing the flash contents with the custom firmware I built, I backed up a stock image in case we needed to revert it. Now, it was a case of flashing up new firmware.
|
|
Verifying
To verify the image is working I needed to gain console access to the running
system. Thankfully, as I was looking for solutions I stumbled upon
this article
in which authors also attempted to run OpenBMC on x11ssh
platform1. They have already figured out console redirection,
which allowed output to be redirected from BMC rather than the platform itself
to the IDC port on the motherboard. After a few hours spent on finding branches
lost in space and time, adjusting the configuration to use an older u-boot
branch, and preparing some patches, we’ve successfully established a connection
with our custom OpenBMC running on the x11ssh platform.
|
|
…although I admit, I did not manage to do it first try.
What’s next and summary
We’ve managed to successfully set up, build, and test open BMC on an unsupported Supermicro X11SSH platform. We are yet to test the functionalities and operability of the build.
What’s the use of a built image? We simply want to expand our expertise in Yocto, and constantly looking for a ways to further integrate our solutions Zarhus and Dasharo.
If you’ve got any questions or want to leave feedback, feel free to catch us at Zarhus Matrix or via email at contact@3mdeb.com.
References and resources
Here are some references and resources if you want to dig into the topic further:
- 3mdeb at Yocto project developer day 2023
- 3mdeb at FOSDEM
- X11SSH Gerber files (Thanks to Tim Ansell)
- OpenBMC developer docs
- Flashing image via SPI
References: