This guide should be considered as a simple walk-through for using APU3 platform
in some generic use-cases. I’m trying to explain how to work with the device and
use it in a generic manner. There is a part about the coreboot firmware, which
could be used as a reference of how to start customizing it for own purposes.
Configuring the hardware
At first, let’s figure out some basic requirements for our new device:
- It will be wireless router with some advenced functionality provided by
OpenWRT.
- In order for it to be wireless, we need to add WiFi network adapters.
- I want it to be dual-band simultaneous connection, so we will need 2 separate
WiFi adapters.
- Operating system will be placed on µSD card.
- There will be an additional storage in the form of mSata disk.
APU3 has 3 mPcie slots. Unfortunately it supports PCI express only on slot
mPCIe 1, so WiFi card has to use it. For the second WiFi card, we could use
mPCIe 2 slot, but we would need USB only type, which are rare. Instead I’m
using some cheap Ralink RT5370 based USB dongle WiFi adapter. mPCIe 3 slot
will be used for mSata drive.
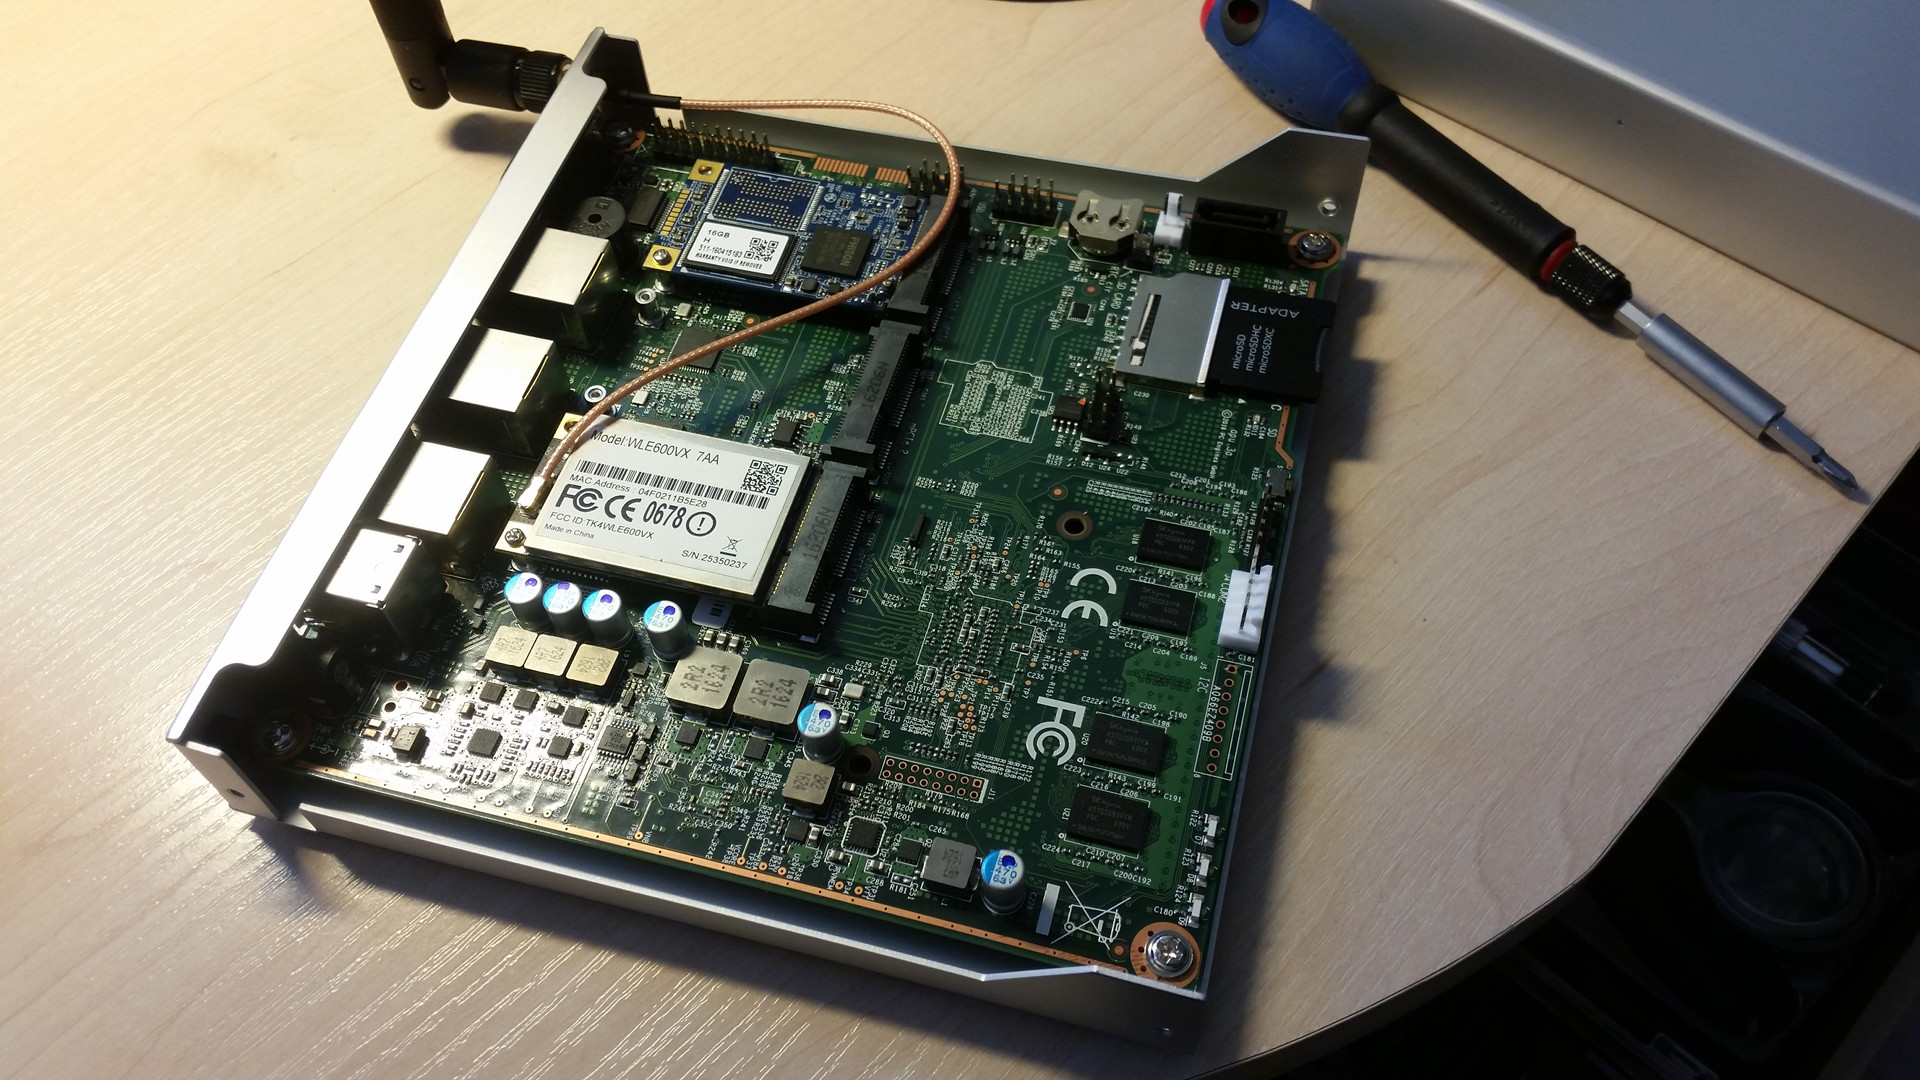
For the OS drive, I’ll use some generic µSD card with adapter.
mPCIe 2 slot could be used in future for GSM modem or some other kind of USB
device in the form of mPcie card.
Getting the sources
We will use latest stable version which is Chaos Calmer, in order to be
compatible with upstream packages. Thanks to that we can just use the opkg to
download new version of packages from the main OpenWRT’s repositories.
The sources we need are located on github.
Let’s clone the needed version:
1
2
3
4
5
6
7
|
$ git clone -b chaos_calmer https://github.com/openwrt/openwrt.git
Cloning into 'openwrt'...
remote: Counting objects: 360802, done.
remote: Compressing objects: 100% (5/5), done.
remote: Total 360802 (delta 4), reused 2 (delta 2), pack-reused 360795
Receiving objects: 100% (360802/360802), 132.94 MiB | 8.24 MiB/s, done.
Resolving deltas: 100% (241401/241401), done.
|
Building
To build our first image we first need to configure the OpenWRT:
1
2
|
cd openwrt
make menuconfig
|
Our target is APU system, which has AMD x86_64 CPU. So let’s use generic
settings:
- Target System > x86
- Subtarget > x86_64
… and then Exit and make.
After compilation our image is in bin/x86 dir. We need a SD card to burn the
image and boot the system on the target platform. On my host system, card is
present under the device file /dev/sde.
Warning! Carefully check the device the card is present on your system. This
is potentially dangerous operation and can lead to lost data, when used wrong
device!
1
2
|
cd bin/x86
sudo dd if=openwrt-x86-64-combined-ext4.img of=/dev/sde bs=4M
|
First boot
Default username after first boot is root and no password. Password should
be set using passwd.
To make the first boot we need some kind of serial adapter (USB to RS232) and
null-modem cable. There is a RS232 port on the back of the APU board. We need to
connect it there.
To make the connection, I’m using screen, but other kind could be used (e.g.
minicom). Default parameters for COM port are 115200 8N1. This is the command
I’m using:
1
|
screen /dev/ttyUSB0 115200
|
Immediately after powering the device, the coreboot welcome string should be
seen and one could enter simple boot menu. Default configuration should be ok
and SD card will have priority over different devices (it can be changed).
First OpenWRT boot will most probably hang on this string:
 1
 2
 3
 4
 5
 6
 7
 8
 9
10
11
12
13
|
...
[    2.424534] bridge: automatic filtering via arp/ip/ip6tables has been deprecated. Update your scripts to load br_netfilter if you need this.
[    2.437154] 8021q: 802.1Q VLAN Support v1.8
[    2.441432] NET: Registered protocol family 40
[    2.447418] rtc_cmos 00:01: setting system clock to 2016-07-25 00:04:49 UTC (1469405089)
[    2.455798] Waiting for root device PARTUUID=6c097903-02...
[    2.659998] usb 3-1: new high-speed USB device number 2 using ehci-pci
[    2.666595] usb 4-1: new high-speed USB device number 2 using ehci-pci
[    2.820863] hub 3-1:1.0: USB hub found
[    2.824725] hub 4-1:1.0: USB hub found
[    2.828501] hub 3-1:1.0: 4 ports detected
[    2.832586] hub 4-1:1.0: 4 ports detected
[    2.950313] Switched to clocksource tsc
|
Problem lies here:
[ 2.455798] Waiting for root device PARTUUID=6c097903-02...
SDHCI controller issue
After short investigation it appears, that we don’t have support for the SDHCI
controller on APU board, so we need to enable it. We need to modify the kernel
configuration, so we use this command:
In the config we need to select those drivers:
- Device Drivers > MMC/SD/SDIO card support:
- MMC block device driver
- Secure Digital Host Controller Interface support
- SDHCI support on PCI bus
Now the system should boot without problems.
Network problems
After booting the systems it appears we don’t have any connectivity (ethernet
nor wifi). When trying ifconfig -a we can see only the lo interface.
Let’s install some additional packages, which should help us investigate
- Base system > busybox > Customize busybox options > Linux System Utilities:
- Base system > wireless-tools
When the image is built and system is booted on target we can use lspci -k to
check which devices have kernel modules assigned to them and which don’t. This
lspci flavour is pretty poor, compared to usual one, supplied with main Linux
distributions, but should be enough for our uses.
Among others, we can find these devices (VID:DID), which look interesting:
1
2
3
4
|
01:00.0 Class 0200: 8086:1539
02:00.0 Class 0200: 8086:1539
03:00.0 Class 0200: 8086:1539
04:00.0 Class 0280: 168c:003c
|
According to this page we’re looking for these
devices:
8086:1539 - this is Intel Ethernet controller (I211 Gigabit Network
Connection)168c:003c - this is Atheros QCA986x/988x 802.11ac Wireless Network Adapter
We need to find drivers for those. It seems, that Intel is using CONFIG_IGB
kernel option for its driver. Module for Atheros card is in OpenWRT. Let’s deal
first with ethernet controllers:
Need to mark this driver:
- Device Drivers > Network device support > Ethernet driver support:
- Intel(R) 82575/82576 PCI-Express Gigabit Ethernet support
As for the rest:
First let’s mark the driver for our wireless card:
- Kernel modules > Wireless Drivers:
And also some packages we’ll need to set up the access-point:
Unfortunately, during my build I got and error. After rerunning make V=s it
appears that kernel hasn’t got the full configuration it wants. I managed get by
this problem checking this option in make kernel_menuconfig:
- Power management and ACPI options:
- ACPI (Advanced Configuration and Power Interface) Support
After successful build and boot. I got:
 1
 2
 3
 4
 5
 6
 7
 8
 9
10
11
12
13
14
15
16
17
18
19
20
21
22
23
24
25
26
27
28
29
30
31
32
33
34
35
36
37
38
39
40
41
42
43
44
45
46
47
48
49
|
root@OpenWrt:/# ifconfig -a
br-lan    Link encap:Ethernet  HWaddr 00:0D:B9:44:11:B8
          inet addr:192.168.1.1  Bcast:192.168.1.255  Mask:255.255.255.0
          inet6 addr: fd0e:a001:d70e::1/60 Scope:Global
          UP BROADCAST MULTICAST  MTU:1500  Metric:1
          RX packets:0 errors:0 dropped:0 overruns:0 frame:0
          TX packets:0 errors:0 dropped:0 overruns:0 carrier:0
          collisions:0 txqueuelen:0
          RX bytes:0 (0.0 B)  TX bytes:0 (0.0 B)

eth0      Link encap:Ethernet  HWaddr 00:0D:B9:44:11:B8
          UP BROADCAST MULTICAST  MTU:1500  Metric:1
          RX packets:0 errors:0 dropped:0 overruns:0 frame:0
          TX packets:0 errors:0 dropped:0 overruns:0 carrier:0
          collisions:0 txqueuelen:1000
          RX bytes:0 (0.0 B)  TX bytes:0 (0.0 B)
          Memory:f7900000-f791ffff

eth1      Link encap:Ethernet  HWaddr 00:0D:B9:44:11:B9
          UP BROADCAST MULTICAST  MTU:1500  Metric:1
          RX packets:0 errors:0 dropped:0 overruns:0 frame:0
          TX packets:0 errors:0 dropped:0 overruns:0 carrier:0
          collisions:0 txqueuelen:1000
          RX bytes:0 (0.0 B)  TX bytes:0 (0.0 B)
          Memory:f7a00000-f7a1ffff

eth2      Link encap:Ethernet  HWaddr 00:0D:B9:44:11:BA
          BROADCAST MULTICAST  MTU:1500  Metric:1
          RX packets:0 errors:0 dropped:0 overruns:0 frame:0
          TX packets:0 errors:0 dropped:0 overruns:0 carrier:0
          collisions:0 txqueuelen:1000
          RX bytes:0 (0.0 B)  TX bytes:0 (0.0 B)
          Memory:f7b00000-f7b1ffff

lo        Link encap:Local Loopback
          inet addr:127.0.0.1  Mask:255.0.0.0
          inet6 addr: ::1/128 Scope:Host
          UP LOOPBACK RUNNING  MTU:65536  Metric:1
          RX packets:240 errors:0 dropped:0 overruns:0 frame:0
          TX packets:240 errors:0 dropped:0 overruns:0 carrier:0
          collisions:0 txqueuelen:0
          RX bytes:16320 (15.9 KiB)  TX bytes:16320 (15.9 KiB)

wlan0     Link encap:Ethernet  HWaddr 04:F0:21:1B:5E:28
          BROADCAST MULTICAST  MTU:1500  Metric:1
          RX packets:0 errors:0 dropped:0 overruns:0 frame:0
          TX packets:0 errors:0 dropped:0 overruns:0 carrier:0
          collisions:0 txqueuelen:1000
          RX bytes:0 (0.0 B)  TX bytes:0 (0.0 B)
|
So I’ve got the network.
Basic configuration
It’s good idea to set the default password using passwd utility. Thanks to
this we can login using the SSH connection.
If you want to add your public key to authorized_keys file, which is usually
placed under .ssh dir in user’s home dir, it has to be placed in
/etc/dropbear/ dir or it will be ignored. Make sure that permissions to the
file are also set right (600).
We can also set some other IP address for the ethernet connection, if our host
computer occupies the one or is using other mask. In my case, my host computer
has static address, which happens to be the same as the default one in OpenWRT.
Here’s short example how to change it:
 1
 2
 3
 4
 5
 6
 7
 8
 9
10
11
12
13
14
15
16
17
18
19
20
21
22
23
24
|
root@OpenWrt:/# uci show network
network.loopback=interface
network.loopback.ifname='lo'
network.loopback.proto='static'
network.loopback.ipaddr='127.0.0.1'
network.loopback.netmask='255.0.0.0'
network.lan=interface
network.lan.ifname='eth0'
network.lan.type='bridge'
network.lan.proto='static'
network.lan.ipaddr='192.168.1.1'
network.lan.netmask='255.255.255.0'
network.lan.ip6assign='60'
network.wan=interface
network.wan.ifname='eth1'
network.wan.proto='dhcp'
network.wan6=interface
network.wan6.ifname='eth1'
network.wan6.proto='dhcpv6'
network.globals=globals
network.globals.ula_prefix='fd0e:a001:d70e::/48'
root@OpenWrt:/# uci set network.lan.ipaddr=192.168.1.254
root@OpenWrt:/# uci commit
root@OpenWrt:/# /etc/init.d/network restart
|
We also want to enable the AP using the wifi adapter:
1
2
3
4
5
6
|
root@OpenWrt:~# uci set wireless.radio0.disabled=0
root@OpenWrt:~# uci set wireless.@wifi-iface[0].encryption='psk2+aes'
root@OpenWrt:~# uci set wireless.@wifi-iface[0].key='key123'
root@OpenWrt:~# uci set wireless.@wifi-iface[0].ssid='YourSSID'
root@OpenWrt:~# uci commit
root@OpenWrt:~# wifi
|
After a while you can establish a connection with SSID YourSSID and password
key123.
Second wireless interface
The second adapter is connected to the USB port on the back of the device. It’s
some cheap Ralink RT5370 based chip, which are popular and in nice form factor
(small footprint and removable antenna).
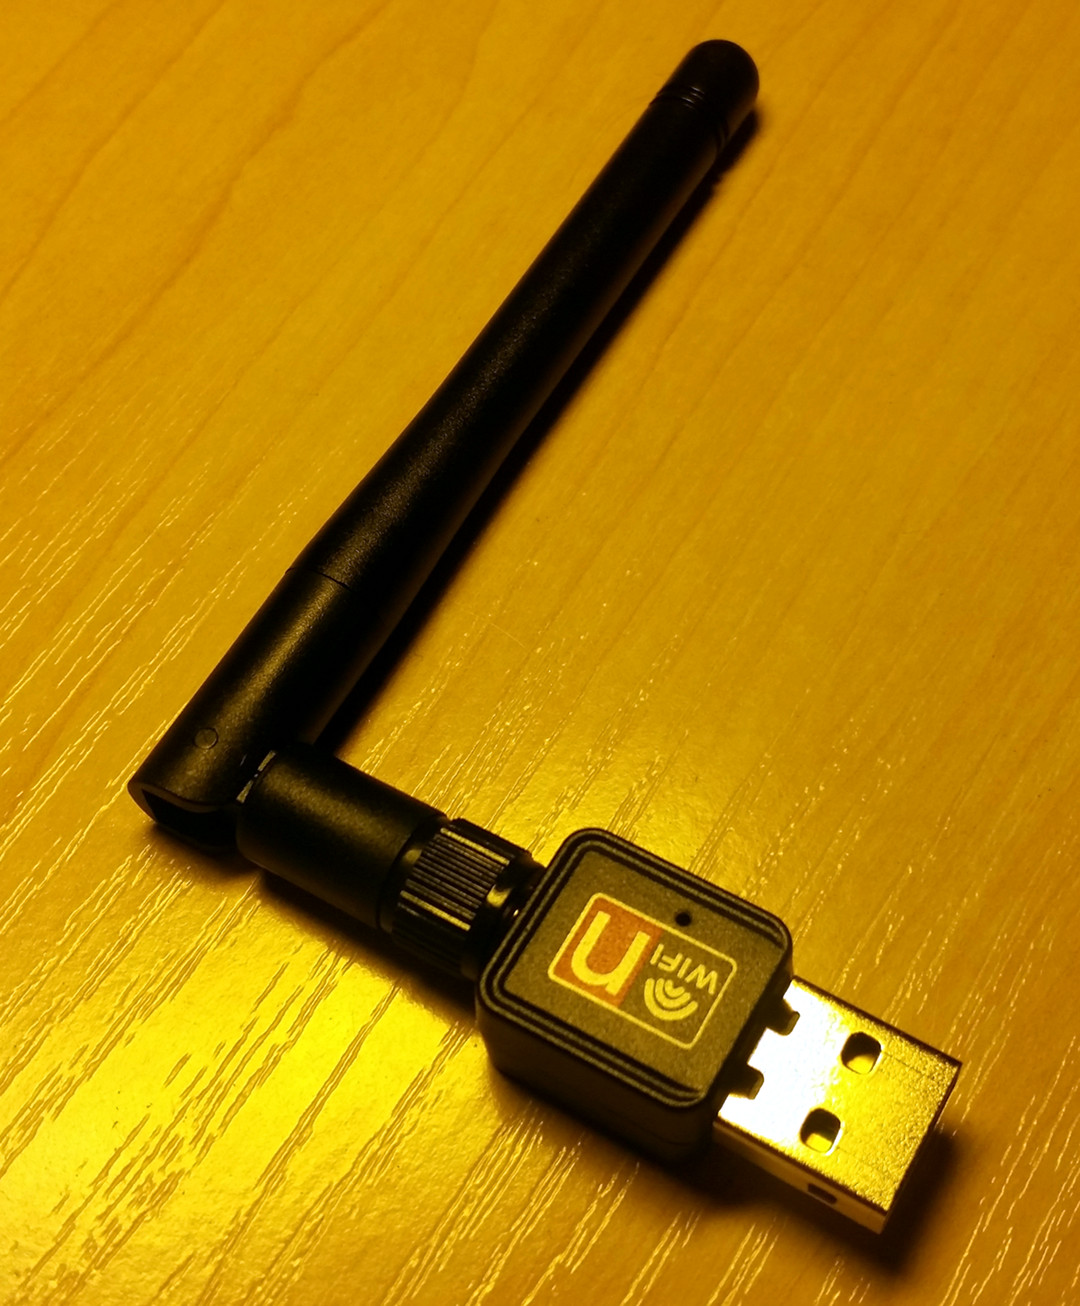
Using the lsusb it’s detected like that:
1
|
Bus 001 Device 002: ID 148f:5370
|
In order to enable it, we need additional kernel module, which is available in
OpenWRT:
- Kernel modules > Wireless Drivers > kmod-rt2800-usb
After building and booting the new image, interface should be available by
checking ifconfig -a.
Unfortunately we don’t have the new interface in OpenWRT’s configuration system.
Right now the /etc/config/wireless file looks like that:
 1
 2
 3
 4
 5
 6
 7
 8
 9
10
11
12
13
14
15
|
config wifi-device 'radio0'
 option type 'mac80211'
 option hwmode '11a'
 option path 'pci0000:00/0000:00:02.5/0000:04:00.0'
 option htmode 'VHT80'
 option disabled '0'
 option channel '36'

config wifi-iface
 option device 'radio0'
 option network 'lan'
 option mode 'ap'
 option ssid 'YourSSID'
 option encryption 'psk2+aes'
 option key 'key123'
|
In order to add new device, I found that it’s easiest to generate generic one,
with all interfaces detected and add the new one to the file. We can do it this
way:
 1
 2
 3
 4
 5
 6
 7
 8
 9
10
11
12
13
14
15
16
17
18
19
20
21
22
23
24
25
26
27
28
29
30
|
root@OpenWrt:~# wifi detect
config wifi-device  radio0
 option type     mac80211
 option channel  36
 option hwmode   11a
 option path     'pci0000:00/0000:00:02.5/0000:04:00.0'
 option htmode   VHT80
 option disabled 1

config wifi-iface
 option device   radio0
 option network  lan
 option mode     ap
 option ssid     OpenWrt
 option encryption none

config wifi-device  radio1
 option type     mac80211
 option channel  11
 option hwmode   11g
 option path     'pci0000:00/0000:00:10.0/usb1/1-2/1-2:1.0'
 option htmode   HT20
 option disabled 1

config wifi-iface
 option device   radio1
 option network  lan
 option mode     ap
 option ssid     OpenWrt
 option encryption none
|
There is an additional section with the new adapter (radio1 and wifi-iface
for radio1). We can copy this section to /etc/config/wireless and change the
options we need. After that, we can run wifi command to accept the settings
and enable all radios.
Some bandwidth results
Here are some results I’ve got when done some tests using iperf3.
802.11a (the WLE600VX card)
VHT80 mode
 1
 2
 3
 4
 5
 6
 7
 8
 9
10
11
12
13
14
15
16
17
18
19
20
21
|
-----------------------------------------------------------
Server listening on 5201
-----------------------------------------------------------
Accepted connection from 192.168.1.121, port 60530
[  5] local 192.168.1.254 port 5201 connected to 192.168.1.121 port 60532
[ ID] Interval           Transfer     Bandwidth
[  5]   0.00-1.00   sec  17.4 MBytes   146 Mbits/sec
[  5]   1.00-2.00   sec  22.6 MBytes   189 Mbits/sec
[  5]   2.00-3.00   sec  24.2 MBytes   203 Mbits/sec
[  5]   3.00-4.00   sec  25.1 MBytes   211 Mbits/sec
[  5]   4.00-5.00   sec  25.7 MBytes   215 Mbits/sec
[  5]   5.00-6.00   sec  25.2 MBytes   212 Mbits/sec
[  5]   6.00-7.00   sec  25.4 MBytes   213 Mbits/sec
[  5]   7.00-8.00   sec  25.4 MBytes   213 Mbits/sec
[  5]   8.00-9.00   sec  27.6 MBytes   232 Mbits/sec
[  5]   9.00-10.00  sec  31.0 MBytes   260 Mbits/sec
[  5]  10.00-10.02  sec   663 KBytes   243 Mbits/sec
- - - - - - - - - - - - - - - - - - - - - - - - -
[ ID] Interval           Transfer     Bandwidth       Retr
[  5]   0.00-10.02  sec   251 MBytes   210 Mbits/sec    0             sender
[  5]   0.00-10.02  sec   250 MBytes   209 Mbits/sec                  receiver
|
HT40 mode
 1
 2
 3
 4
 5
 6
 7
 8
 9
10
11
12
13
14
15
16
17
18
19
20
21
|
-----------------------------------------------------------
Server listening on 5201
-----------------------------------------------------------
Accepted connection from 192.168.1.121, port 60220
[  5] local 192.168.1.254 port 5201 connected to 192.168.1.121 port 60222
[ ID] Interval           Transfer     Bandwidth
[  5]   0.00-1.00   sec  8.90 MBytes  74.7 Mbits/sec
[  5]   1.00-2.00   sec  10.1 MBytes  85.1 Mbits/sec
[  5]   2.00-3.00   sec  10.9 MBytes  91.3 Mbits/sec
[  5]   3.00-4.00   sec  11.0 MBytes  92.3 Mbits/sec
[  5]   4.00-5.00   sec  11.1 MBytes  93.3 Mbits/sec
[  5]   5.00-6.00   sec  11.2 MBytes  93.7 Mbits/sec
[  5]   6.00-7.00   sec  13.7 MBytes   115 Mbits/sec
[  5]   7.00-8.00   sec  13.8 MBytes   116 Mbits/sec
[  5]   8.00-9.00   sec  13.6 MBytes   114 Mbits/sec
[  5]   9.00-10.00  sec  13.6 MBytes   114 Mbits/sec
[  5]  10.00-10.02  sec   307 KBytes   112 Mbits/sec
- - - - - - - - - - - - - - - - - - - - - - - - -
[ ID] Interval           Transfer     Bandwidth       Retr
[  5]   0.00-10.02  sec   118 MBytes  99.1 Mbits/sec    0             sender
[  5]   0.00-10.02  sec   118 MBytes  99.0 Mbits/sec                  receiver
|
802.11n (the Ralink’s RT5370 adapter)
HT20 mode
 1
 2
 3
 4
 5
 6
 7
 8
 9
10
11
12
13
14
15
16
17
18
19
20
21
|
-----------------------------------------------------------
Server listening on 5201
-----------------------------------------------------------
Accepted connection from 192.168.1.121, port 60032
[  5] local 192.168.1.254 port 5201 connected to 192.168.1.121 port 60034
[ ID] Interval           Transfer     Bandwidth
[  5]   0.00-1.00   sec  2.72 MBytes  22.8 Mbits/sec
[  5]   1.00-2.00   sec  2.68 MBytes  22.5 Mbits/sec
[  5]   2.00-3.00   sec  2.64 MBytes  22.1 Mbits/sec
[  5]   3.00-4.00   sec  2.78 MBytes  23.3 Mbits/sec
[  5]   4.00-5.00   sec  2.76 MBytes  23.1 Mbits/sec
[  5]   5.00-6.00   sec  2.72 MBytes  22.8 Mbits/sec
[  5]   6.00-7.00   sec  2.71 MBytes  22.7 Mbits/sec
[  5]   7.00-8.00   sec  2.78 MBytes  23.3 Mbits/sec
[  5]   8.00-9.00   sec  2.78 MBytes  23.4 Mbits/sec
[  5]   9.00-10.00  sec  2.73 MBytes  22.9 Mbits/sec
[  5]  10.00-10.02  sec  52.3 KBytes  18.7 Mbits/sec
- - - - - - - - - - - - - - - - - - - - - - - - -
[ ID] Interval           Transfer     Bandwidth       Retr
[  5]   0.00-10.02  sec  27.4 MBytes  22.9 Mbits/sec    0             sender
[  5]   0.00-10.02  sec  27.3 MBytes  22.9 Mbits/sec                  receiver
|
Completed setup
Summary
We hope you have enjoyed reading this article. If you have faced problems
installing your system of choice on any PC Engines platform, please let us know
by using comments below or by social media channels. We would be glad, to help
you solve your issues. If you are in need of a professional support, we are
always open for new challenges, so do not hesitate to drop us an email at
contact@3mdeb.com
Senior Embedded Systems Engineer with 9 years of professional experience. Skilled device driver developer for Linux and firmware in each scale. Dedicated to all wireless communication like LoRa, 802.15.4, WiFi and many other. Former Intel BIOS Software Engineer.