An important milestone has been achieved by Dasharo firmware on September 18 with the publication of NovaCustom releases that pass level 3 checks of Host Security ID. This post provides background information on what it means and explains what went into making this happen. At the moment of publication, this information is relevant only to V540TU and V560TU models (no dGPU, only integrated graphics). Models with dGPU (V540TNx and V560TNx) had their firmware release postponed due to a suspend issue, but everything said here will apply to them in the near future.
More context and some background information can be found in this talk from a TrenchBoot Summit (PDF slides are here), this vPub talk and also in the upcoming The Future of Platform Security Measurement in Linux talk on Linux Plumbers Conference.
What is Host Security ID (HSI)
HSI is essentially an attempt to come up with a metric of how secure a given
system is. Evaluating HSI score is implemented in fwupd (which itself
is a tool for applying firmware from LVFS). The state of security is
evaluated automatically and a user is presented with a report like the one
shown below. By the way, the maintainer of fwupd (Richard Hughes from Red
Hat), is among the authors of the specification that describes HSI. The other
authors are Mario Limonciello (AMD, works on fwupd as well), Alex Bazhaniuk
(Eclypsium) and Alex Matrosov (Binarly).
At its core, HSI is a set of conditions grouped into four hierarchical sets. Each successive group further restricts operation of a device and requires that all preceding groups (levels) are met.
If you take a look at the specification’s draft, you might notice this warning right at the top:
WARNING: This specification is still in active development: it is incomplete, subject to change, and may have errors; use this at your own risk. It is based on publicly available information.
Despite the warning and the fact that any scoring of this sort will always be subject to disputes due to complexity and subjectivity involved in assessing importance of different security measures, this can be considered an important milestone in the area of platform security. There just aren’t that many security “benchmarks” out there, so one may as well use this open and reasonably defined specification.
An HSI report can be produced by running fwupdmgr security (an alternative
fwupdtool security command works even without a running fwupd daemon) and
may look similar to this:
|
|
Exact meaning of security features one can see in the report is beyond the scope
of this post, but the specification tries to provide some background. Note,
however, that the output depends on the version of fwupd, kernel version,
what information firmware is publishing and state of Intel ME among other
things.
The meaning of different levels
As was mentioned earlier, each HSI level includes all previous ones, so HSI-3 implies HSI-2 and HSI-1. If something is missing from HSI-2, HSI-3 can’t be reached even if all requirements of HSI-1 and HSI-3 are met. Let’s quickly summarize what each level entails (the specification summarizes levels differently, this is a less abstract characterization).
HSI-0 essentially just means that HSI-1 wasn’t met.
HSI-1 is the least intrusive. Most of the features it checks are not permanent and can be changed at a later point.
HSI-2 is mostly about hardware-based verification of firmware. This includes “fusing”, that is performing an irreversible change at the hardware level of a particular unit to enforce firmware authorization. It freezes certain attributes of a system for good but can give a piece of mind to users worrying about unauthorized changes to their firmware.
HSI-3 itself requires availability of control-flow integrity in a CPU, inability of devices to freely access RAM and puts requirements on how system is being put in a low-power state (because some can be used to extract data from the system, see ram-wipe posts for more details: first, second).
HSI-4 checks for Supervisor Mode Access Prevention (SMAP) and memory encryption. SMAP feature prevents supervisor mode from accessing data in user mode.
There is also HSI-5 which is meant to signify out-of-band
attestation. At this point this level is merely planned, so it doesn’t even
show up in the output of fwupd.
The advantages and disadvantages of hardening
First, advantages. Security is a nice property of nearly everything, especially a computing device that manages one’s personal or work-related data. Grounding security in the state of hardware (whether as set up by firmware on boot or via more permanent measures) is a more robust approach than simply relying on software-based isolation and hardening practices. The former is basically what HSI is about (there is also runtime part concerned with software and its configuration, but it’s kept separate from HSIs). In short, all this is meant to increase confidence that a system runs what its owner expects it to run, doesn’t run anything else and makes it difficult to extract information or compromise constituent components of that system.
The disadvantages stem directly from the advantages. Security measures are often just restrictions on what can be done to a system and the simplest and most secure way of maintaining those restrictions is not permitting lifting them. This may be fine for a dumb device that is meant to execute a fixed program and nothing else, but a generic computer is much more than that and a user may not be willing to give up an ability to make changes to it. Of course this is a problem mainly when the restrictions are enforced on the user by a third-party and may be an advantage otherwise. Still, given that some of the security measures make recovery of a device harder or impossible in practice, going that far should require due consideration.
To summarize, it’s a familiar usability vs. security trade off and it really depends on the needs of a specific user. In particular, an owner being in charge of a device’s RoT/CoT can reduce the adversary’s expected value from an attack, this is what our Zarhus Provisioning Box is meant to help with.
Measured Boot and chain of trust
The main advantage (and hurdle) of achieving HSI-3 was support of hardware checking that the right firmware is being run, but this feature is part of a more generic approach of attesting security.
An approach firmware uses to assess which code and data have been used throughout a boot process to arrive at the current execution environment is called Measured Boot in case of coreboot. It’s based on the concept of a static chain of trust (SRTM in the linked documentation). Basically, every stage of the boot firmware is supposed to cryptographically hash (measure) the data it uses and the code of the next stage before it has a chance to run. The hashes are accumulated in a Trusted Platform Module (TPM) device and are also logged to event log in memory for verification purposes.
It shouldn’t be hard to see that this creates a chicken-and-egg problem for the first stage, which is a bootblock, that’s often tasked with measuring itself. Blindly trusting a bootblock to be the correct is less secure than making some part of hardware measure the bootblock before executing it. That’s where features like Intel BootGuard come into play. Quick note on naming, this particular feature can be referenced in many different ways: BootGuard, Boot Guard, IBG, BtG and CBnT (although technically it’s only a part of CBnT); they all mean the same thing.
When BootGuard is enabled, authenticity of a firmware is assessed as part of
the boot process and if the check fails, the system can refuse to boot (depends
on how it was set up). If the check is successful, appropriate hashes are sent
to the TPM device and firmware starts running. One difficulty associated with
this process is lack of means of communication between whatever implements IBG
and the firmware, thus requiring the firmware to reconstruct data that hardware
has measured to TPM in order to update event log. This difficulty was a source
of trouble, but more on that later. A bit more information on IBG will be
presented below, those interested in mastering the subject may want to look at
some of the training offers (namely, DS02RTA, DS08MSA and
DS09SBL).
Because the firmware is responsible for building event log that describes measurements, a two-part firmware like Dasharo’s coreboot+UEFI variants needs to agree on a few things:
-
Which part publishes the event log for an operating system (OS) to discover. If coreboot’s log gets discovered by an OS, then most of the measurements will be missing as EDK has its own event log. If EDK’s log wins, then it better include measurements made by coreboot. Both of these points have been addressed (coreboot changes, EDK changes).
-
Which banks (hash types) of a TPM are used. As of this publication coreboot can use only one bank that’s determined during compilation while EDK can choose a bank dynamically and use multiple at the same time. This means the outcome of a measured boot currently depends on the configuration of EDK.
Aligning handling of event logs has solved this issue while simultaneously being a prerequisite for proving that Intel BootGuard works through reconstruction of measurements. More details on the measurements in case of Dasharo can be found in the documentation.
Intel BootGuard and three incarnations of its data
One thing that made implementation not all that straightforward was three generations of data that BootGuard can measure and that firmware needs to replicate. They depend on generations of CPUs and associated chipsets:
- Pre-TigerLake (11th generation of Core series and earlier)
- TigerLake to MeteorLake (11th-14th generations of Core series)
- Meteorlake and newer (Ultra series 1 and newer)
The first two use custom formats with some differences and support measuring authority data to PCR-7. The third one has moved into direction of compatibility with TCG specifications for EFI measurements.
The difficulty was that due to absence of communication between hardware and firmware one can’t really know what format was used. Documentation exists, but its readability, completeness and unambiguity rarely matches expectations. It also never helps when the only available indication of error is that some 256-bit value looks completely different from another 256-bit value.
Before going into more details, let’s touch briefly on TPM’s structure. A TPM consists of one or multiple banks. A bank corresponds to a particular hash function (like the outdated SHA-1, which was the only option for TPM 1.x). Each bank contains a set of Platform Configuration Registers (PCRs) grouped into several subsets. When a system performs a measurement, some PCR gets updated to reflect that measurement. Group of PCRs that correspond to SRTM are reset only on boot to prevent faking their contents by malicious software. When IBG is enabled, it gets to be the first to populate certain PCRs and start building chain of trust.
PCR-7 reconstruction for Intel BootGuard
This is not very important, but worth a mention. This PCR is meant to contain hash of data that describes keys with which different components are signed. It was optional before MeteorLake and has been removed starting with MeteorLake. Use of PCR-7 was discouraged because BitLocker on Windows uses PCR-7 as well and enabling IBG could mess up disk encryption due to this conflict (given that this PCR is described as “Host Platform Manufacturer Control”, using it by IBG was more appropriate).
The support for this has been implemented for completeness since it didn’t take much effort; however, it hasn’t really been tested so far (but will be at some point).
PCR-0 reconstruction for Intel BootGuard
This is one of the most important parts to get right when it comes to supporting BootGuard. It even has a dedicated line of output in the report.
As mentioned earlier, reconstruction depends on the generation, but there is
also a tricky ACM_POLICY_STATUS field common to all generations. The field
represents contents of a register of the same name, but whether hardware uses
its value as is or masks some parts is controlled by a flag (available on
platforms starting with TigerLake). Not setting this flag initially resulted in
a mismatch not because firmware and hardware weren’t in agreement, but because
the register had a different value at the time firmware was running compared to
when IBG took the measurement.
What made verification whether PCR-0 has been reconstructed correctly more
confusing is that tools one typically uses for that weren’t supporting
reconstruction from a non-default locality until relatively recently. Locality
of a TPM is an indication of operation’s origin and it dictates which
subset of PCRs is accessible. It’s more secure to request TPM startup from
locality 3 as it’s harder to fake, so that’s how IBG has been configured. It
wasn’t really expected that tools will report PCR-0 mismatch when there is
none, but that’s what tpm2_eventlog and fwupd from several years ago do:
tpm2_eventlogfromtpm2-toolslearned about non-default locality in its v5.6, released on 8 November 2023fwupdlearned this in v1.8.0, released on 28 April 2022
A few years means that you may be using an older version in some distributions and get false-negative results because of this. By the way, coreboot wasn’t really up-to-date and free of bugs on this either:
- recording use of a non-default locality to event log was missing
- testing v1.0.0-rc4 has uncovered an issue with VBOOT trying to log a measurement before event log was even initialized
Sorting all this out made the implementation mirror hardware’s measurements correctly, but that wasn’t the end of the story yet because enabling BootGuard has implications for other features that weren’t designed with IBG in mind.
Effects of fusing Intel BootGuard
Fusing is the permanent part of IBG. When some hardware fully supports IBG and even after its activation by a proper firmware image, its state may not be permanent. The state of the hardware changes in an irreversible way at the moment called “end of manufacturing” (EOM). This applies to certain settings of the platform, BootGuard signing keys and IFD (this is configurable, but HSI-1 requires it to be locked and fusing makes the lock permanent).
IFD (Intel Flash Descriptor) is part of system’s flash chip that describes its layout (mainly defines which part is for use by BIOS and which is for Intel ME). So a fused system has layout of its chip fixed for good when it comes to writes from within the system (an external programmer can still mess with it to a degree). In addition to layout information IFD is also where HAP bit lives, implying that this method of disabling Intel ME is unavailable on fused devices.
Intel BootGuard vs. Intel ME vs. Capsule Updates
To understand the issue one needs to know some background information about implementation of capsule updates and operation of Intel ME.
As of now capsule updates replace entire contents of a flash chip. As stated above, that includes IFD, BIOS, code and data of Intel ME. IFD range is locked to be read-only. Intel ME range is also locked and is not even readable. Even if it was writable, doing so while ME is running is a bad idea as it causes ME to do weird things (can work, can refuse to boot the system, can reboot the system, other things). For this reason even without IBG ME is disabled for the duration of a capsule update. With IBG, however, we can either disable ME or perform a capsule update. This is because the two operations are incompatible at the moment:
-
as currently implemented, capsule’s contents is maintained in RAM from the moment it’s submitted to the firmware until a warm reset, during a warm reset and the next time system boots and finds that capsule in memory as instructed by EFI variables (more information about capsules is here)
-
Intel ME can be disabled in several ways (see here), but all of them require a cold reset which, unlike a warm reset, loses contents of RAM and with it an update capsule
There were some ideas about working around this by using HMRFPO (Host ME Region Flash Protection Override) command of Intel ME because documentation suggested it could survive a warm reset, but the very same documentation also suggested the exact opposite in another place :) Testing this in practice has confirmed that the latter statement is more correct or at list more up-to-date, thus leaving no chance to have a workaround.
The final conclusion was that we won’t be able to update flash chip the same
way as without IBG (even if ME could be disabled without disturbing RAM’s
contents, IFD would still be locked) and addressing this was left for a later
release. The most important part is to be able to perform Intel ME updates in
the future for the platforms fused today and there are several ways for doing
that. Those options are mentioned in #1302 and #1438 and involve either
communicating with Intel ME to ask it to do an update (FWUpdate.efi method) or
loading a capsule from disk after disabling ME via HMRFPO command (so losing
RAM’s contents doesn’t play a role). The only downside is that resolving this
for the first time may take two releases (a BIOS update to enable updating
Intel ME and another one to update Intel ME), so don’t be surprised to see two
releases done one after another, that may just be a two-step update.
User-visible information on Intel BootGuard
There are several ways a user may inspect state of BootGuard apart from
fwupd. As with other coreboot-based firmware, output of cbmem -c can be
used to find CBnT-related lines which will look something like this (the output
is not from a fused device):
|
|
There will also be lines for measurements at the end of coreboot part of logs:
|
|
tpm2_eventlog /sys/kernel/security/tpm0/binary_bios_measurements is another
way to see BootGuard-related entries of an event log:
|
|
Because tpm2-tools don’t recognize coreboot-specific entries the second one
may seem unintelligible, but it’s not hard to decode (although not really
convenient either, somebody should write a script for that one day):
|
|
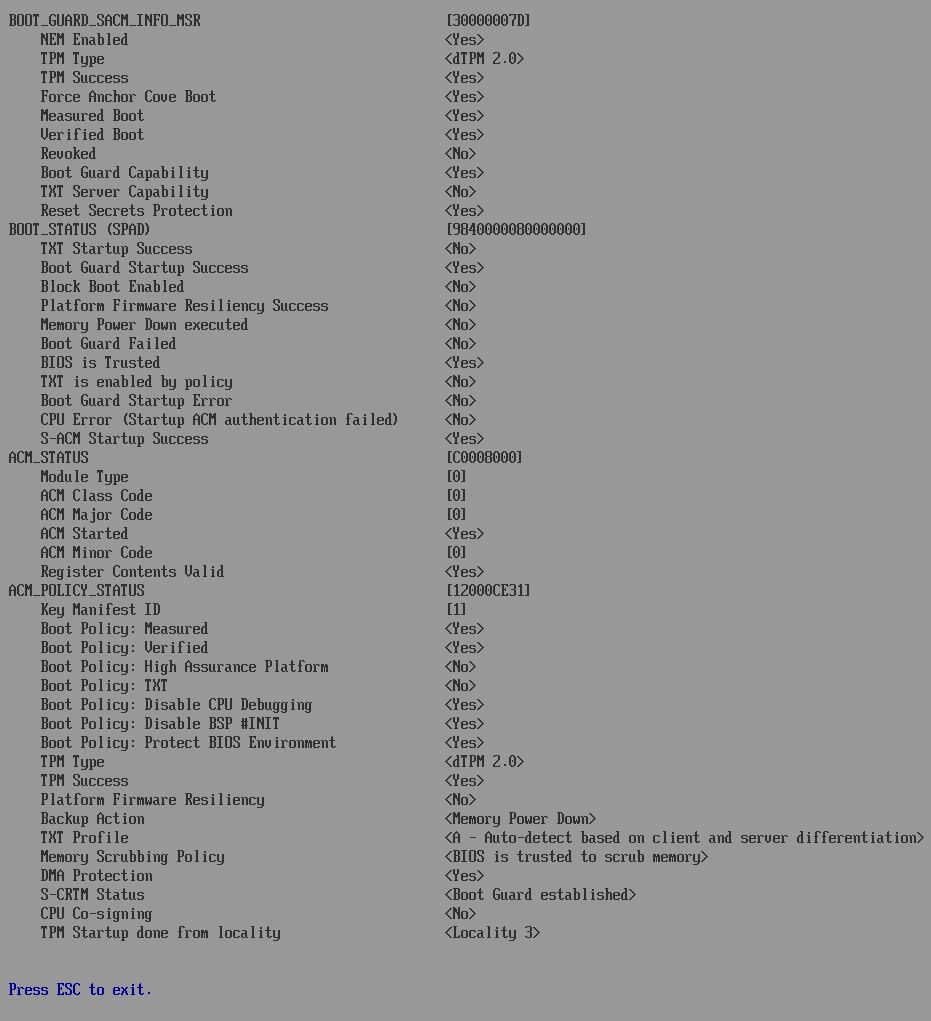
Firmware’s Setup UI now also displays details about BootGuard when it’s enabled (very similar to the log output, but easier to access):
Related issues
Here is the list of issues related to the above contents. Most of them were already linked, but not all.
-
Measured Boot: TPM2 event log does not match actual value of PCR-2 #455
-
Dasharo Enterprise roadmap for reaching fwupd HSI-4 security level #463
-
TME not active on NV4x with Dasharo Enterprise #464
-
Capsule Updates require ME to be manually disabled #1302
-
Capsules / Improve user experience / Auto-disabling Intel ME #1438
-
TPM PCR0 reconstruction fails with Boot Guard enabled #1476
-
V540TU v1.0.0-rc4 PCR1 does not match #1496
-
Check that PCR-7 (authority) measurement is properly reconstructed for BootGuard #1705
-
Make capsule updates compatible with Intel BootGuard #1706
Reaching HSI-4
The next logical step is HSI-4: SMAP and RAM encryption. Availability of SMAP depends on a CPU. The feature is over a decade old and doesn’t stand in the way of achieving HSI-4.
Encrypted RAM in case of Intel CPUs refers to Total Memory
Encryption (TME) which is implemented by Memory Management Unit (MMU) that
is part of modern CPUs (well, they are SoCs). Therefore achieving HSI-4 is
possible only on CPUs where the feature is present, which unfortunately
excludes existing MeteorLake models of NovaCustom laptops (see this
issue) even though it may seem otherwise due to the way
the feature is being marketed.
In other words, HSI-4 should just work with the right hardware. It’s just too early to claim reaching this level until we have Dasharo running on such a hardware that’s also available for purchase.
Future developments
At the moment, MeteorLake (some NovaCustom laptops) and AlderLake-N (Hardkernel ODROID-H4 PLUS) variants of Dasharo are known to work with IBG. Extending support to some pre-TigerLake platform will result in covering all three formats of BootGuard-data.
Integration between IBG and capsule updates needs to be improved, and it’s really about improving implementation of the latter, which has also been planned for reasons unrelated to IBG. Namely, to not require manually HAP-disabling Intel ME before applying a capsule update.
Summary
As can be seen by the list of things that had to be fixed or implemented a security feature like Intel BootGuard depends on hardware and a bunch of software components working together. This typically spells trouble and a lot of difficulties that need to be overcome on the path to a successful outcome. By now you should have an idea of what it takes to pull off an implementation of such features in practice, something that a proprietary firmware won’t teach you but Dasharo based on open-source coreboot and EDK projects will.
MeteorLake-based NovaCustom laptops are the first to support Dasharo
Trustroot. The support will be extended to more devices. If you
have a use case demanding hardware-based root of trust or need other
firmware-related services schedule a call or send an email at
contact<at>3mdeb<dot>com to discuss the services. If you want to be informed
about other similar developments of Dasharo firmware, sign up for our
newsletter: