Introduction
This blog post is based on my experience while implementing tests to verify the CROSSCON hypervisor’s mitigation to inter-VM cache timing attacks.
I will try to explain how the cache works, describe and simply illustrate how various cache timing attacks function, outline possible mitigations against such attacks, and share my personal experience during the implementation of the tests.
Cache
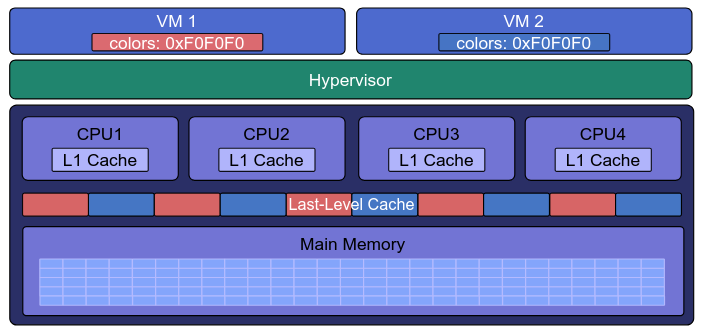
Cache is a small, fast memory used to store frequently accessed data or instructions, so the processor can retrieve them quickly without accessing slower main memory (RAM). Accessing data from cache can be up to tens times faster than from RAM. There might be multiple cache levels, each next level holding more data than previous at the cost of slower access time.
In modern systems cache is located very close to the CPU, lower levels (e.g. L1/L2) often are located inside CPU die and are for exclusive use of singular cores.
In the next parts we will need to know about 2 concepts:
- cache hit - happens if requested data was already in cache
- cache miss - happens if requested data wasn’t in cache and had to be fetched from e.g. RAM
To determine whether memory access resulted in cache hit or cache miss, we can use architecture dependent instructions or registers if they are available or we could measure how long it took and compare it to known values (by timing access that we know is cache hit or cache miss):
|
|
Correct implementation isn’t as straightforward as it might seem. Compiler or processor optimizations (e.g. read/store reordering) can cause us to measure something different than intended, and debugging such errors can be difficult.
I found this out myself during my own implementation attempts. The best approach
is to use existing, well-tested library that provides an API for such
operations. For those interested I achieved the best results by using libflush
library from ARMageddon which
offers many essential operations optimized for different architectures (x86,
ARMv8, ARMv7). This includes memory access timing, cache line flush/eviction
(removal of an address from cache), and memory barriers (to enforce store/load
order).
Cache addressing
To understand how cache attacks work we need to understand, at least somewhat, how data is stored and addressed in cache.
The cache stores data in blocks/lines, size of which depends on underlying architecture, but I only encountered 64-byte blocks (on Intel i7-14700k, i5-1240P and Cortex-A72). Memory address is divided into 3 parts, each one has different use when addressing cache:
- Tag - identifies which memory address is stored in cache line
- Index - points to cache set (will be explained a little later)
- Offset - indicated the offset within cache line
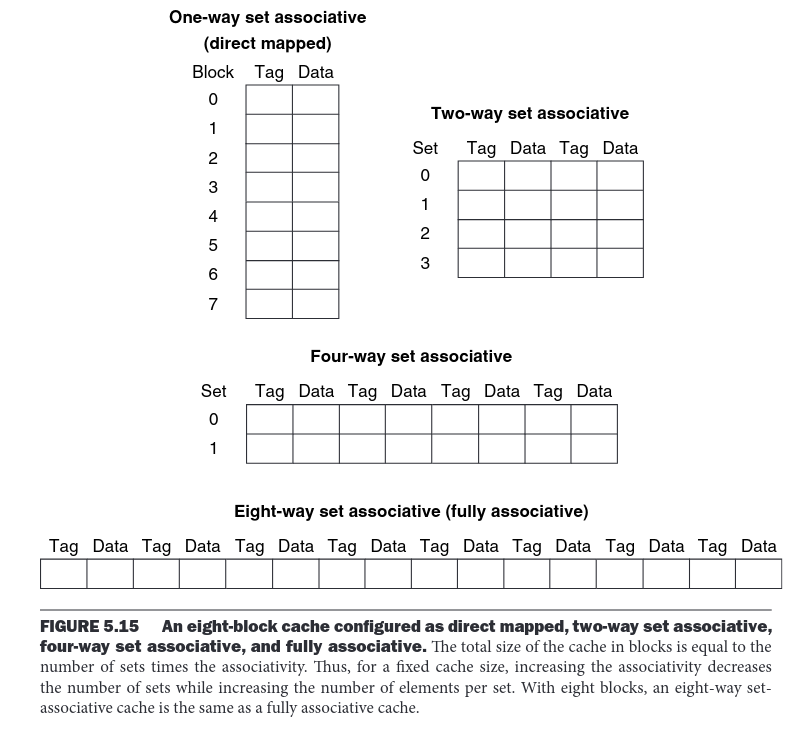
Cache architectures can be divided into 3 types:
- Direct-mapped (one-way set-associative) – a direct-mapped cache is the simplest implementation. Each memory block can be located in only one place (set), so it’s enough to check one tag to determine whether it’s in the cache or not.
- n-way set-associative – each set contains n ways. We need to search through all n ways in a set to determine whether the address is in the cache (by comparing tags).
- Fully associative – all addresses map to a single set. This requires searching through all cache lines to check whether the address (tag) is in the cache or not.
The figure below1 shows a couple of possible configurations for 8-line cache.
During my tests I only had contact with n-way set-associative cache so it’s the type I’ll focus on. The figure1 below illustrates cache addressing for 4-way set-associative cache.
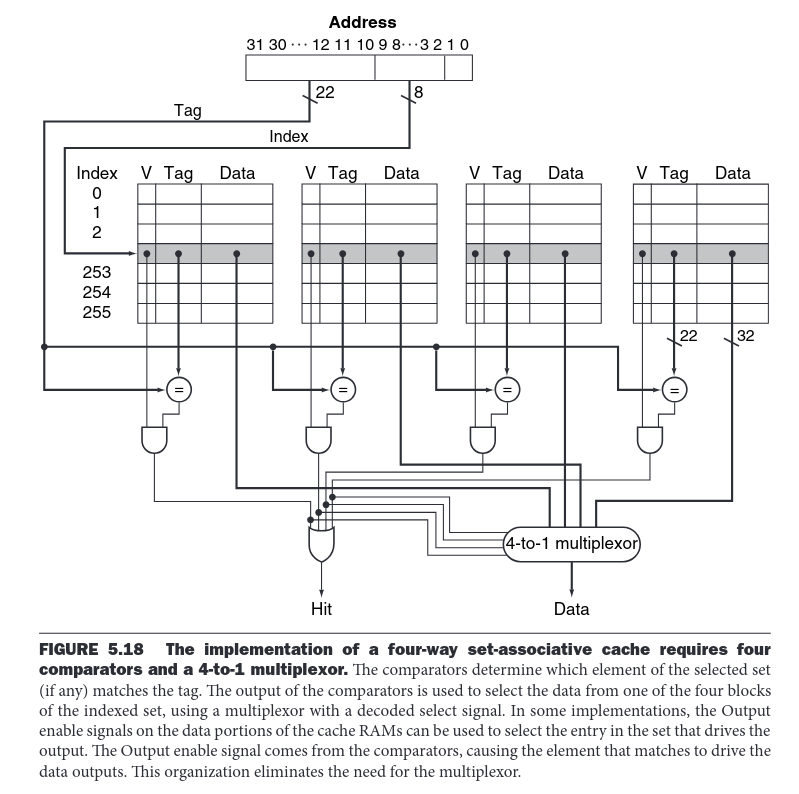
An address is mapped to a specific set. Within that set, the address can reside in one of four ways and if it’s not already in the cache, it is loaded and placed into one, evicting occupied one if needed. Which specific way is chosen depends on the replacement policy.
There are various implementations of this policy, such as LRU (Least Recently Used), random, etc. The replacement policy depends on the architecture and, if multiple options are available, on the system configuration. One example is the Cortex-A72, where the L2 replacement policy can be set to either PLRU (pseudo-LRU) or pseudo-random.
Shared memory
A lot of cache timing attacks works by using shared memory. It works by gaining information which shared address was used by program or process. Those types of attacks are usually simpler to implement as we can know exactly what data and where is it stored.
Example of memory shared by 2 processes.
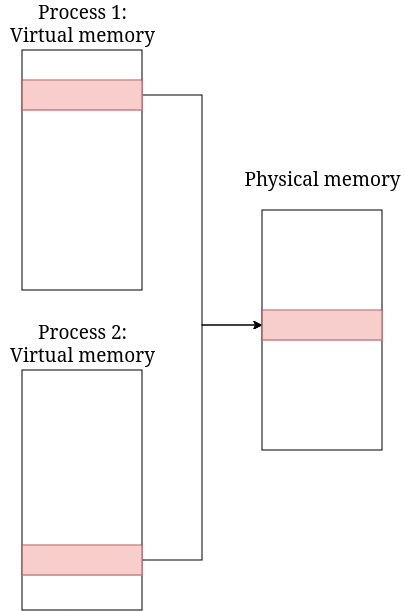
Such memory can hold various types of information e.g. executable library code (e.g. functions) or constant global data. While these might seem like non-sensitive information, knowing who accessed which data and in which order can reveal much more confidential information.
Some implementations of AES are good example of this. They use lookup tables to speed up encryption and decryption. The tables themselves are not secret, but gaining knowledge about which elements were accessed can lead to recovering encryption key. This is because access to different array elements can depend not only on e.g. text to be encrypted but the key itself.
Cache timing attacks
Cache timing attacks are a type of side-channel attack, which means they rely on indirect information such as power consumption, memory access time, etc.
In the case of cache timing attacks, the attacker manipulates the cache (either directly through available instructions or indirectly by exploiting how the cache works) and measures timing of: memory access, different cache operations, program execution time or similar.
Most of these attacks differ in their granularity. The most precise attacks can determine exactly which block or line was accessed, less precise can only determine which cache set was used.
Attack types
Below is description of 3 different attack types which I tried to implement:
-
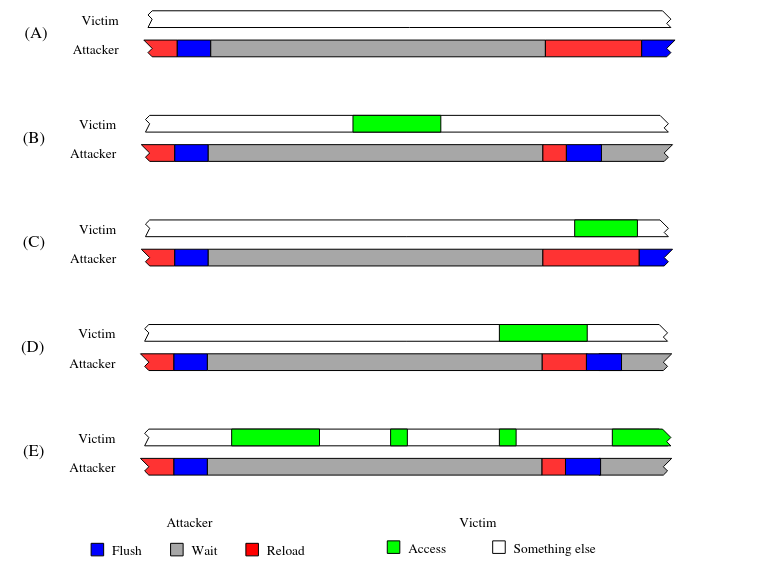
Flush+Reload- appears to be one of the simpler attacks. It consists of 2 parts:- Flush: evicting shared address from the cache
- Reload: measuring evicted memory access time
If the timing measurement indicates a cache hit, it means that someone accessed the given address between Flush and Reload. To improve detection (and reduce false negatives), a short wait is often added between Flush and Reload. This attack allows information to be obtained with cache line granularity.
The image below2 illustrates the basic mechanism of this attack:
-
Evict+Time- this attack is very similar to the previous one, but instead of measuring access time to an evicted address, it measures the execution time of a program/process. The difference in execution time when used data is in the cache and when it is evicted can indicate whether it was accessed or not.The attack is just as simple as Flush+Reload, but (un)fortunately, real-world operating system environments make this type of attack harder to execute successfully. Each time program is run may result in significantly different execution time due to other background processes, the system scheduler, etc. These differences are usually much greater than a time it takes to access memory from RAM, making practical attacks difficult. The best results can be achieved when the program has time-deterministic behavior. This attack allows information to be retrieved with block-level accuracy.
-
Prime+Probe- Unlike the previous attacks, this one can be carried out on any memory, not only shared. However, the attack is much more complex to execute, requiring knowledge of the architecture being attacked and the cache indexing method. The attack involves 2 steps:- Prime: Fill cache lines with your own data
- Probe: Check each set to see whether your data has been evicted (by measuring access time). If your data was evicted, you know someone accessed an address that maps to that set.
The biggest challenge with
Prime+Probetype of attack is mapping addresses to cache sets. The attacker must also know which addresses are used by the victim process, although deeper analysis of the program’s structure may allow this requirement to be bypassed. This attack has lower accuracy than the previous ones, it allows information to be obtained with cache set granularity.
Tests
The goal of these tests is to confirm whether we can access some information
using cache accesses. I had most success with Flush+Reload attack. It’s made
of 3 parts:
-
shared library - provides a function whose sole purpose is to access specific elements of a global array (which will reside in shared memory). These elements are 8 bytes in size, meaning that for this type of attack, we can obtain information with an accuracy of up to 8 indices (with cache line size being 64 bytes). The function returns XORed elements to prevent the compiler from optimizing away the operation due to lack of side effects. There are other ways to stop that from happening e.g. compiling without optimizations or using specific compiler behaviors like using asm volatile to stop instruction from being optimized out. I choose XOR as it was simpler to implement and has less dependency on compiler/architecture specific behaviors.
1extern uint64_t access_array(size_t count, const size_t *indices); -
first program uses previously defined function in a loop
1 2 3 4for (uint64_t i = 0; i < repeat; ++i) { result ^= access_array(argc - 1, indices); nanosleep(&ts, NULL); } -
second program which tries to sniff out information about indices which were used by the first program (which works in background)
1 2 3 4 5 6 7 8 9for (void *addr = range.start; addr < range.end; addr += CACHE_LINE_SIZE) { libflush_flush(libflush_session, addr); libflush_memory_barrier(); usleep(RELOAD_WAIT_US); libflush_memory_barrier(); uint64_t time = libflush_reload_address(libflush_session, addr); if (time <= threshold) // cache hit cache_line_hit[(addr - range.start) / CACHE_LINE_SIZE] += 1; }
Below are results which I achieved. First program was accessing indices 0, 8, and 32:
|
|
Since we are using shared memory, and we know what it contains, it’s very easy
to identify the indices that the second program accessed. The start of the array
is at cache line with offset +9. From the collected data, we can easily extract
index ranges: <0–8), <8–16), <32–40). In this case, the test also detected
access to the indices in <16–24) range (about half as often), and singular
accesses to couple other which we did not use.
The exact cause is unknown, but I suspect it’s due to architectural
optimizations (the processor noticed that we accessed address +0x40 and
+0x80, and assumed we might also want to access address +0xc0).
In the case of Evict+Time, I managed to get satisfactory results, but only
when I used the shared function directly. In such a case, the difference in
execution time was <-7, 28> units when evicting unused addresses, and around
<300, 400> units when evicting addresses used by the function.
|
|
Prime+Probe example is a work in progress.
Target testing platform
The main goal of these tests will be verifying whether the cache coloring implementation in the CROSSCON hypervisor prevents inter-VM cache attacks3.
Tests mentioned in previous sections were done on a normal OS without hypervisor, and they can’t be used as is and will need to be modified as we won’t be able to use shared library in this case.
The initial test implementations (without using libflush) did not yield
satisfactory results.
The test consisted of two VMs3: one with the Client Application
running on Linux and the other with the Trusted Application.
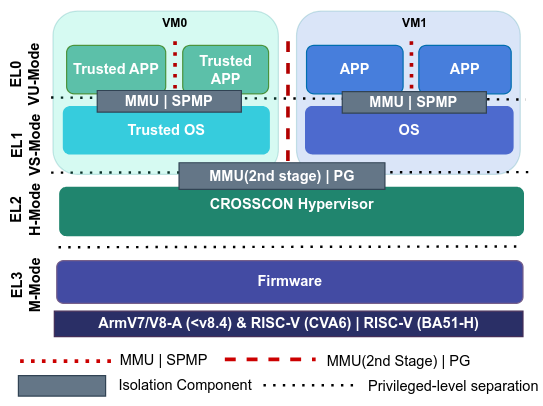
Communication between the VMs is carried out through shared memory. The CA allocated shared memory and passed it to the TA, whose sole purpose was to access this memory. The test results showed that:
- a custom implementation of cache operations (manipulation, timing
measurements) is not simple, was much slower than the existing one
(
libflush), and suffered from “optimization” issues which resulted in not detecting any accesses to shared memory. Evict+Timewas not feasible in its current form. I measured the execution time of theTEEC_InvokeCommandfunction, but unfortunately, the timing varied quite significantly (even by several microseconds). Cache eviction would cause a difference of, at most, a few dozen nanoseconds.
Second try
This time I changed my approach and decided to use 2 Linux VMs and libflush
library. Communication between VMs is done with the help of Linux ipcshmem
driver
|
|
This driver creates /dev/crossconhypipc<ID> file which can be written to, read
from or memory mapped. As of now I have implemented Evict+Time test. Test flow
can be summarized as
- open and
mmap/dev/crossconhypipc<ID> - first VM (victim) - calculate median time it takes for function that accesses shared memory to finish and then repeat it indefinitely and report any differences from median. For simplicity’s sake I decided to implement timing inside victim program itself.
- second VM (attacker) - continuously evicts requested cache line. Library function does that by using DC CIVAC AArch64 instruction
Without cache coloring there should be noticeable jump in first VM reported time difference when evicting used cache lines (and no difference when evicting other, unused, shared memory)
-
While evicting unused shared memory there is no change from baseline
1 2 3 4 5 6 7# cache_test time 0 Opening /dev/crossconhypipc0 mmaping /dev/crossconhypipc0 Libflush init Calculating median baseline. Don't evict. Calculated median time: 475 Median time diff from baseline: 10 -
while evicting used shared memory there is jump of around 100 time units
1 2 3 4 5 6 7# cache_test time 0 Opening /dev/crossconhypipc0 mmaping /dev/crossconhypipc0 Libflush init Calculating median baseline. Don't evict. Calculated median time: 475 Median time diff from baseline: 104
Running this test with cache coloring enabled gave me the same results. Possible explanations for why that could be the case:
- cache coloring implementation works as intended. It won’t stop cache timing attacks between VMs that use the same shared memory but would stop attacks from influencing different shared memory regions (there can be multiple shared memory regions defined, each with a different config)
- cache coloring implementation for shared memory should stop this attack, but it has bugs
- cache coloring/VM/hypervisor misconfiguration
If anyone’s interested in following up on this, then check follow-up comments at: crosscon/CROSSCON-Hypervisor-and-TEE-Isolation-Demos or wait for follow-up blog post with final test results.
What’s next
The previous test was done on shared memory, so in the next step, I’d like to test cache coloring for non-shared memory. Instead of implementing pseudo attacks, I could also perform static code analysis to ensure cache coloring implementation has no bugs or edge cases where it fails. After that, plenty of other hypervisor features can also be tested.
Summary
Unlock the full potential of your hardware and secure your firmware with the
experts at 3mdeb! If you’re looking to boost your product’s performance and
protect it from potential security threats, our team is here to help.
Schedule a call with us
or drop us an email at contact<at>3mdeb<dot>com to start unlocking the hidden
benefits of your hardware. And if you want to stay up-to-date on all things
firmware security and optimization, be sure to sign up for our newsletter:
-
Patterson, David A., and John L. Hennessy. Computer Organization and Design. 5th ed., Morgan Kaufmann, 2015. ↩︎
-
Flush+Reload: a High Resolution, Low Noise, L3 Cache Side-Channel Attack ↩︎