Introduction
coreboot is an open source framework for developing firmware for various architectures: x86, ARM, RISC-V, POWER PC and others. Its ultimate goal is to have as much open hardware initialization code as possible and to maintain the simplicity in the development and usability. of the solution. In this post I will show you how to build coreboot for a modern Intel platform based on 10th Generation Comet Lake S processor. You will probably see that the newer the hardware is, the more harder the build procedure is. The fact that the mainboard port exists does not mean it will build and work out of the box. It often requires much experience and intuition for a firmware developer to locate issues and fix them quickly. This post should lend you a little share of those skills.
What is Intel RVP?
Intel RVP stands for Reference Validation Platform. It is a board designed for early validation of the microarchitecture and processor series before launching the production line of processors to the market. It also serves a purpose of a CRB (Customer Reference Board), that is, a reference design of a platform with given processor family. Hardware vendor often base their designs on RVP and CRB boards, because it is a lot easier to move certain parts of a ready and validated design into a new one, than make one from scratch. The process is less error prone and allows to save time during early manufacturing. The RVP boards are also a good material for experiments with firmware and software development. Typically there are a lot of connectors on those boards, that let the users attach various peripherals and implement applications for their particular needs.

The disadvantage of RVPs is that they are not available in public. You need to have a CNDA signed with Intel to obtain the platform itself as well as its schematics and design files. But rest assured, because:
- If you are OEM/ODM with the reasonable volume you can obtain RVP through Intel representative, but don’t worry we got you covered if you just need it for firmware development
- If you know how to boot it on the reference design and you know the delta between RVP and your design, then we can easily price coreboot port for you
Preparing to work with the platform
As I have mentioned earlier, building coreboot firmware should be easy and straightforward thanks to the simplicity of the project design. Well it should… It is not always true when it comes to relatively new hardware, especially when adding a first platform supporting given microarchitecture, such as in this case.
But let’s start from the beginning. Typically when starting the work with new platform you want to check whether it works, so you plug the power supply and just try to boot it. Let’s see…
Cool! Fortunately it works, the worst part behind us. Imagine the platform does not work, you have to think what is wrong: maybe missing firmware or firmware is corrupted, improper jumper settings or the worst scenario, platform is damaged. But in my situation, nothing like this happened (typically Intel refurbished the platform before shipping by flashing the reference firmware, setting jumpers to default positions, etc.). Now next step would be to backup the golden firmware image, that is proven to work, in case we will brick the platform and need recovery. You may use the flashrom and internal programmer and read the binary back (but not recommended) or use external programmer to dump the contents of the SPI flash. I personally recommend the latter, because:
- flashrom may not support the chipset yet
- flash descriptor may lock certain regions, so you will not be able to read whole image
Typically Intel exposes a header for the firmware SPI flash, so it is quite trivial task (assuming you have the correct equipment). Dediprog is good with the Intel adaptors, but you need to pay few hundred bucks ($$$). Alternatively you may use a small embedded system with SPI like RaspberryPI or RTE, connect the SPI lines and use flashrom with linux_spi programmer to read the contents. Now when we have the golden firmware binary secured, we may proceed with experimenting with the firmware.
Building and booting coreboot
Comet Lake S RVP8 was just recently upstreamed by Intel to coreboot. But I suggest to download 1 patch ahead in the relation chain, because it seems to be related to Comet Lake S. For building the image we will use the coreboot-sdk container:
|
|
And launch the container with mounting the coreboot directory inside it:
|
|
Then run make menuconfig to open coreboot configuration menu. In the
Mainboard submenu select the mainboard vendor and model as follows:
|
|
Save the config and exit the menu. You may now start the build process by typing
make. But wait… something is wrong:
|
|
No microcode… Microcode files are automatically added to coreboot image for given microarchitecture from intel-microcode submodule. If the microcode updates were not included that means, there is probably no microcode in the repository yet… Trying to update to recent revision did not help either. What now? Without microcode, we will not boot probably either. In such case our golden firmware image and UEFITool from Long Soft will come with help. UEFITool is a cool UEFI image explorer which allows extraction of the UEFI modules. That also applies to raw files and microcode. So let’s open the binary in the tool and search for microcode! If you wonder what UEFI is, it is an Unified Extensible Firmware Interface, a standard defining the firmware design and interface to bootloaders and operating system.
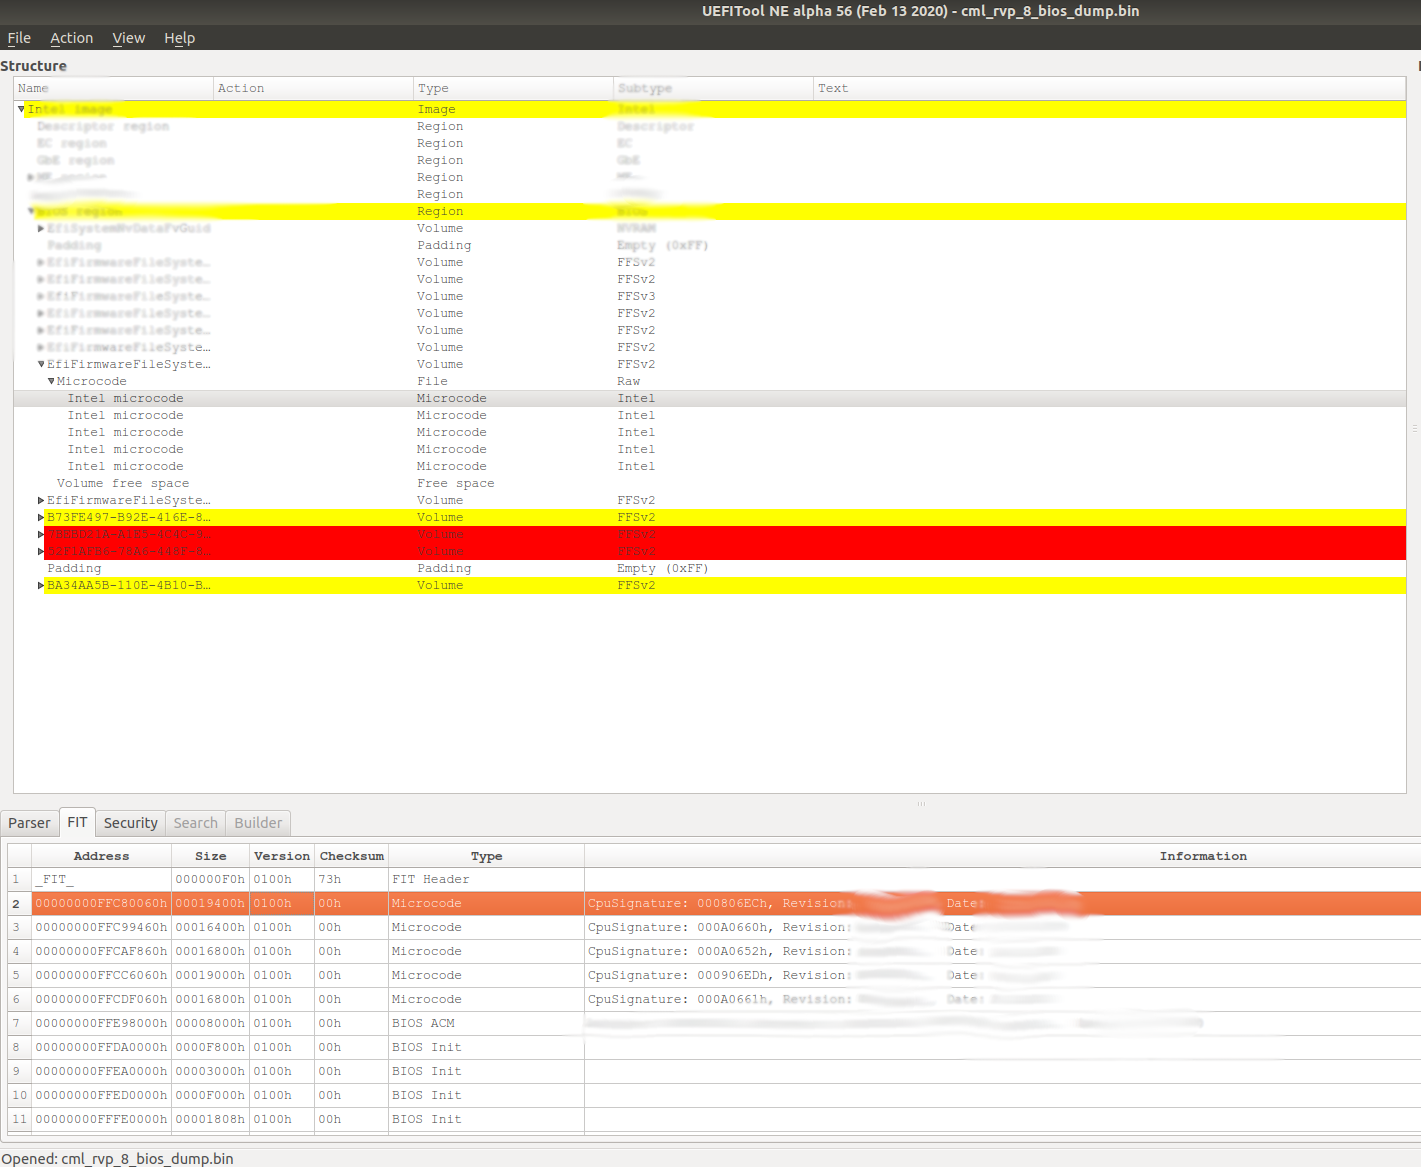
If you open the binary you should be able to find the FIT table panel at the bottom of the window, it will point the location of microcode containers. Right click the parent container Microcode of Type:File and Subtype:Raw, then choose extract body option. Save the microcode file somewhere in coreboot directory.
If we have the microcode file, launch the coreboot configuration menu in docker
container again and move to Chipset submenu. From there you should select:
|
|
And change Generate from tree to Include external microcode binary then pass
the filename and path to the extracted microcode in
Microcode binary path and filename (NEW). Then try to rebuild. Hurray, we
managed to build an image. It is time to flash it and boot it. Remember we are
building only coreboot so we must flash only BIOS region (you may achieve it by
adding --ifd- i bios flags to flashrom). So now the results are as follows:
|
|
Great… Another problem occurred, but this one is more serious. FSP memory init return an error, that means memory training has failed. So either we have unsupported memory configuration by FSP or we have incorrect FSP binary.
FSP stands for Firmware Support Package and it is a binary released by Intel to ease the development of firmware by providing hardware initialization in compact form.
How to resolve it then? At least we have a good microcode (see first lines of debug output on serial):
|
|
I have checked for update on the Intel FSP submodule by checking out the latest
revision. Checked the 3rdparty/fsp/CometLakeFspBinPkg directory and to my
surprise there were 4 different FSP binaries:
- CometLake1
- CometLake2
- CometLakeS
- CometLakeV
Previously only CometLake1 was available which is suited for
10th Generation U-Series Intel® Core™ processors according to README in this
directory. This is clearly the culprit of the problem I have hit. So I just had
to tell coreboot to use different FSP binary. Typically this is set on the
microarchitecture level. So I have searched for the appropriate directory in
src/soc/intel by looking at my config file (cat .config |grep SOC_INTEL):
|
|
But there is no cometlake directory in src/soc/intel, but for simplicity
certain directories handle multiple microarchitectures, so in this case Comet
Lake support can be found in src/soc/intel/cannonlake. And there I could find
|
|
Yes… There is only a single pointer to Comet Lake FSP. Since the submodule
have not yet been updated to latest revision, I had to do it myself. Also I have
added some quick workaround in the src/mainboard/intel/coffeelake_rvp/Kconfig
(yes, this RVP is a Coffee Lake RVP variant) to include the correct FSP files:
|
|
FSP take two paths:
- to FSP binary itself
- to FSP C header files to properly support microarchitecture specific hardware initialization
Now regenerate the config file, rebuild and flash again… Results? We have a booting SeaBIOS!!!
|
|
Time to launch some Linux. I had at hand a USB with already installed Debian Buster, so I simply plugged it in USB port and connected a HDMI cable for display. But… No graphics output from Linux. Well that is expected. We did not configure any graphics initialization method. By default coreboot and SeaBIOS will launch the option ROMs, but we didn’t include one for graphics yet (integrated graphics requires external VGA ROM). Unfortunately Comet Lake S golden binary does not include VGA option rom. What to do in such situations? We have basically 3 choices:
- somehow get the VGA option ROM
- use coreboot’s libgfxinit (no go for now, since Comet Lake is rather not supported yet)
- include VBT (Video Bios Table) and run GOP (Graphics Output Protocol) driver in FSP
You may find these options in coreboot configuration menu under Devices
submenu as Graphics initialization option. Select Run a GOP driver there and
it will automatically select to add VBT. Where to find VBT? You may use the one
included in FSP directory:
3rdparty/fsp/CometLakeFspBinPkg/CometLakeS/SampleCode/Vbt.bin but it may not
be suited for your platform. Best way to obtain it is to extract it from the
platform firmware image. Again we will use the UEFITool. Now you have to search
for VBT string. Typically the file starts with signature $VBT and is included
as a file called IntelGopVbt. Extract it and put into
3rdparty/blobs/mainboard/<vendor>/<model>/vbt.bin and rebuild an image. Now
after booting we should have a nice SeaBIOS strings on the screen and then a
GRUB menu which boots our Linux.
Final booting log is available on asciinema (up to SeaBIOS, because GRUB and Linux do not print on memory mapped serial console):

Summary
The road of a firmware developer is not easy at the beginning. But with time you earn experience and a sort of intuition that helps you locate and resolve the problems pretty quickly. The more problems you resolve the more knowledge you gather and things become more and more easier. Unfortunately booting newer microarchitectures will not become simpler, so it is good to experiment with new hardware, so that when real products and project come, you know what problems to expect and how to deal with them.
If you are OEM/ODM trying to build hardware and firmware on top of Comet Lake
microarchitecture and looking for support in the firmware field, do not hesitate
and book a call with us
or drop us email to contact<at>3mdeb<dot>com. We will help you in improving
the security of your firmware and boost your product by leveraging advanced
features of used hardware platform. If you are interested in similar content,
feel free to sign up for our newsletter: