In this article we present support for starting TrenchBoot’s Landing Zone from another bootloader: iPXE. It may not be as featureful as GRUB2, but it has just enough juice to start DRTM using images obtained from a remote server. You will lose that fancy graphical menu and initial splash screen, but do you really need it?
Update: it seems that iPXE works on UEFI platforms only if it is started by CSM, or chainloaded from another bootloader started that way. Without it iPXE is not able to obtain and pass further the memory maps.
Reasoning
We had to develop a quick way of testing new versions of Landing Zone and kernel images. Having Linux installed on the platform worked initially, but every now and then we managed to break that installation beyond repair and had to start from scratch. Also those platforms were used by a group of developers, it wasn’t always clear in what state the system was. Of course, we could go with full NixOS installation, but it is time-consuming and requires physical presence to insert prepared USB drive with installer image - due to unusual circumstances (COVID-19 lockdown, remote work) such task is no longer trivial.
iPXE can be easily chained - one instance of bootloader (iPXE or a different one) can either download or start new iPXE image from a disk. The best part of it is that chainloading is supported by unmodified versions of bootloaders - you can test it without messing with your current installation. Isn’t that a treat?
Building iPXE binary
Code can be found in our iPXE fork, landing_zone branch. It can be build either as a standalone binary or as a coreboot PXE ROM. Let’s start with the latter one.
Embedded in coreboot
Follow HTTPS enabling tutorial, with two important changes:
- clone from PC Engines repository and switch to proper branch:
|
|
- after starting Docker, copy config from a different file:
|
|
You can either go with make menuconfig to double check if all options are set
properly, including change to iPXE version, or change it to make olddefconfig
and skip graphical menu. The rest of build and flashing process is the same.
Remember to do a
make distcleanbeforemake menuconfigwhen touching any iPXE options. To save recompilation time, coreboot build system does not clean the payloads automatically, you have to explicitly tell it to do so. You also have to copy the config file again.
Standalone binary
This builds a generic image which can be used for chainloading, both on coreboot (legacy) and UEFI platforms with CSM. We can choose between building one binary with (almost) all PCI based NIC drivers that iPXE has or just for a given device. The first one results in a file a bit bigger than 300 kB, depending on the configuration, while the latter fits in about a fifth of that size.
As most projects, iPXE has some dependencies required to build. We can either
install them one by one, or we can just use a known-good Docker image.
coreboot-sdk builds iPXE as a part of a whole ROM image, so it has everything
needed and can be used for the standalone built as well.
|
|
All build targets are summarised on
iPXE website. We will build .lkrn
file, as it is the most portable option of those listed when it comes to
chainloading. It mimics Linux’s kernel, so every bootloader capable of booting
Linux (using 16-bit entry point) can also boot this flavour of iPXE image.
Most of the features are turned off to save the size by default. In order to
switch them on, we need to define some symbols in configuration file(s). For the
list of all configurable options, see here. The
best way of enabling a feature is to #define it in appropriate file in
src/config/local/. We can either manually enable each option or (the lazy way)
just copy the general.h from
PC Engines coreboot repo
to src/config/local/general.h. After we are happy with our config, we can
finally build iPXE binary:
|
|
If you want smaller binary, but only for one NIC model, you can change the last
line accordingly, e.g. for apu2 it can become bin/8086157b.lkrn. This is also
the path to the resulting binary, relative to src directory.
Additional step required for serial output on other platforms
Such binary will use int 10h to print its messages, which thanks to SeaBIOS
and sercon-port file in CBFS is redirected also to serial port on coreboot
platforms. If you want to get output on serial for different platforms (e.g. a
proprietary UEFI), it can be done by defining CONSOLE_SERIAL. A commented out
example is in src/config/console.h, but more elegant way is to use local
configuration, so lets do this.
|
|
That’s it, now we can rebuild the image. Unfortunately, this image will double
every character for platforms with sercon redirection, it is impossible to fix
one issue without breaking the other:
|
|
Starting
Embedded iPXE is started just as in previous post. For a standalone binary the exact instructions for chainloading iPXE depend on bootloader used and the location of binary. Two common examples are starting from a remote server with another iPXE or loading the file from a local disk using GRUB2.
iPXE
|
|
Command line for target iPXE image can be appended to the line above after the
URL. You can use chain (...)/ipxe.lkrn shell to skip the Press Ctrl-B line.
In theory, you can also pass instructions to connect to the network and download
final image(s) or menu script this way (dhcp net0 && chain ...), but it would
require special escaping,
otherwise the ampersands would be treated as AND for chain in the first iPXE’s
shell, not in the second one.
Another option is to load a script containing the command line as an initrd:
|
|
Note that when the set of supported devices in first and second instance of iPXE
differs, so may differ netN mapping. This is one way of making iPXE work with
other NICs, including wireless ones, for apu platforms. There is an official
image available at https://boot.ipxe.org/ipxe.lkrn. You can also use one of
our images with LZ support.
GRUB2
|
|
It is important to use linux16 and not linux, as the latter assumes that the
kernel supports 32-bit boot protocol. As with starting from iPXE, command line
can be specified after the file name. In this case, a simple \&\& is enough to
properly pass it as a part of iPXE command line. The initrd way is also
possible.
Usage
From the user’s point of view, this is very similar to what has to be done for
normal Linux, except that we need to load additional piece of the puzzle - a
file containing Landing Zone. It can be loaded with module command - in fact
any of module, initrd or imgfetch would work, as they are all
aliasing the same function.
This is what we use to start simple Linux for testing PCR values (assuming
network is already configured by dhcp or manually):
|
|
We’ve put those lines into a script, so it can be started with just:
|
|
Of course, this script must be fetched after the network is already set up.
Feel free to test it on your box - it should work on all recent AMD platforms (starting from ~2007, but we haven’t tested such old CPUs yet) with dTPM. Unfortunately, fTPM included in newer AMD CPUs is not good enough.
PCR values
The initramfs used for testing has some BusyBox commands, but the most important
for us is a binary from tpm2-tools - tpm2_pcrread:
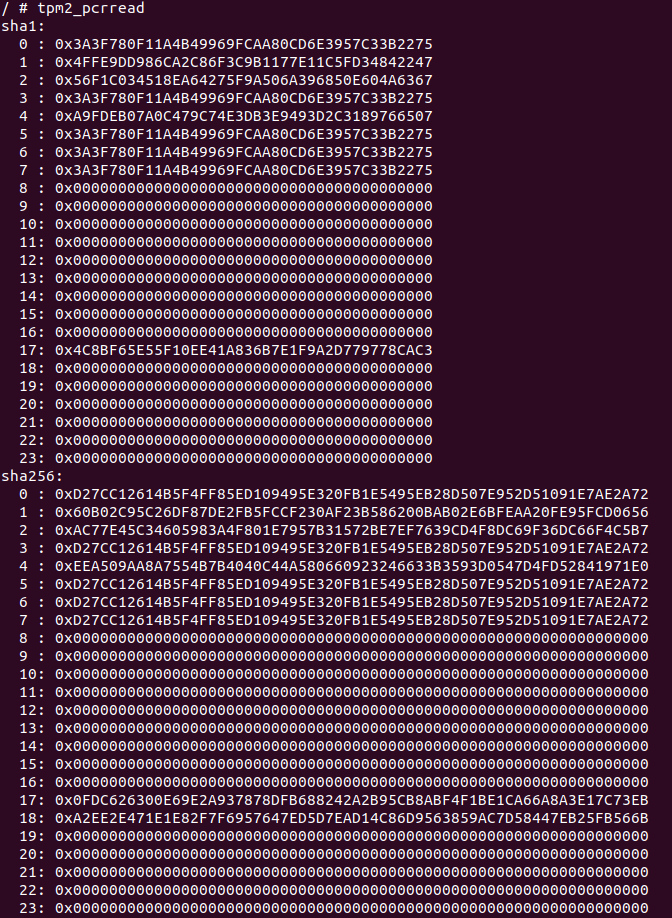
These values are from apu2 platform, using the binaries from our server at the time of writing this post. Here’s a short description of the values:
- PCRs 0-7 - these come from SRTM, and are of no interest right now. They depend on version of coreboot (or other firmware) used for starting the platform.
- PCRs 17-22 have initial values of all 1s (0xFFFF…), they are reset to 0s as
a result of SKINIT instruction. They can be extended from a locality 2 or
higher.
- SKINIT sends a part of LZ (constant code and data part, not including data set by a bootloader as it can change) to TPM, which then extends PCR17 for all supported algorithms (SHA1 and SHA256 in this case)
- LZ extends PCR17 (SHA256) with the hash of the kernel
- Kernel extends PCR18 with the hash of zero page (a set of data passed to kernel by a bootloader, such as command line and memory maps) and PCR17 with the hash of initrd
- All other PCRs are free to be used by a user
The above rules mean that SHA256 should be checked e.g. by TPM sealing. PCR17 is constant for the same code base. PCR18 should be used with care, as it includes hash of sometimes unexpected data. An example of such is the cursor position set by a bootloader, so automatically booted OS entry will result in different PCR value than the same set of commands written by hand. We have also observed some platforms (albeit Intel, so may not apply here) for which memory map after a cold boot was different than after reboot.
To sum up, when you run this test on your machine, PCR17 values should be
exactly the same (unless we update the binaries at some point) as depicted
above, the rest of them may differ. They can be calculated by scripts from
Landing Zone repository.
extend_all.sh should print proper SHA256, and extend_lz_only.sh - SHA1.
Troubleshooting
Machine reboots immediately after jumping into kernel
This usually means that the TPM is not found. Make sure it is connected and enabled in BIOS/UEFI setup menu.
PCRs 17-22 are all FFs
Firmware TPM (fTPM) was used instead of discrete TPM (dTPM). fTPM doesn’t have means of changing the locality, so it cannot be used. Sometimes dTPM is used automatically if connected, but usually you have to explicitly choose it in BIOS menu.
PCRs have wrong values
Most common wrong value is 31A2DC4C22F9C5444A41625D05F95898E055F750 for SHA1
of PCR17. It means that TPM extended a data stream of zero length (as in
/dev/null).
For SHA256 this would be
1C9ECEC90E28D2461650418635878A5C91E49F47586ECF75F2B0CBB94E897112, such value should also raise suspicion.
This happens when the platform is in wrong state during SKINIT call. As part of preparing for SKINIT, the INIT signal is broadcasted to APs, after which it needs some time to propagate. We experimentally set this value to 2^16 CPU clock cycles, because value of 1000 suggested by AMD was not enough. If this still happens on any platform, please let us know.
Unsupported device. The device is a TPM 1.2
Try cat /sys/class/tpm/tpm0/device/pcrs instead. Format of the output will be
slightly different. TPM 1.2 does not require SHA256, in this case SHA1 PCR
should be extended with LZ, kernel and initrd.
We test mainly TPM 2.0 as of now, so if there are any issues with TPM 1.2 support don’t hesitate to let us know.
Summary
We hope that test presented here will be a fast and safe way of checking if your platform is DRTM-ready. You won’t have to go through the time-consuming task of installing the new OS just to check whether it will work. It also enables us to start a relatively safe [1] OS on the top of unknown (assume unsafe) environment without too much preparation required.
If you think we can help in improving the security of your firmware or you
looking for someone who can boost your product by leveraging advanced features
of used hardware platform, feel free to book a call with
us or
drop us email to contact<at>3mdeb<dot>com. And if you want to stay up-to-date
on all things firmware security and optimization, be sure to sign up for our
newsletter:
[1]) There are still some safety issues like using unmeasured ACPI code and a whole lot of problems that can be caused by a malicious SMM code. Protection against DMA attacks is also somewhat lacking at the moment, but we are working on it.