Introduction
The ESP8266 WiFi microcontroller is very popular among hobbyists. It has great potential and is cheap, which makes it a great module to start the IoT adventure.
ESP8266 has many dedicated firmwares and frameworks. It can be programmed straight from the Arduino IDE, using micropython, Lua scripts, JavaScript and many more. None of them interested us too much. A good alternative for us was to develop the firmware in C using the SDKs released by Espressif (ESP’s vendor). At the beginning we were a bit skeptical about this chip, but eventually we managed to build several stable IoT products based on it, that, for example, cooperate with AWS IoT services.
When you start working with this chip, the number of frameworks, tools or hardware versions is overwhelming. Official site and documentation doesn’t really help with that… That’s why we decided to gather here the most important information and prepare instructions how to easy get started.
Hardware
There are many versions of ESP8266 chips. All of them are based on 32-bit Tensilica L106 processor, which can be clocked with 160MHz (80MHz default). With some hacks it’s possible to get even 346 MHz!
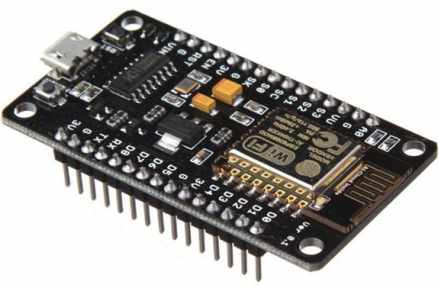
Different versions of chips may differ in the number of gpios, pinout, memory size and some of them can have better WiFi network coverage. In this article, we’ll based on NodeMCU development board with ESP-12 module. The board has a USB-UART converter, voltage regulator, buttons and gold pin headers. There is no need for any soldering. It’s a really convenient solution.

Get started
Espressif provides two types of SDK:
-
RTOS SDK - based on FreeRTOS,
-
Non-OS SDK - based on timers and callbacks.
More details about those SDKs you can find in Chapter 1.3. ESP8266 SDK of ESP8266 SDK - Getting Started Guide. Good alternative for Espressif RTOS SDK is ESP-Open-RTOS. In this post, however, we will focus on the Non-OS SDK. If you are interested in the RTOS SDK please let us know. We will try to prepare a post on this topic as well.
Preparing the environment
Before we go to the code example we have to prepare environment for work. Things we need are:
- Xtensa lx106 architecture toolchain,
- ESP8266 SDK published by vendor,
- tool for flashing the on-chip memories.
Of course, we can assemble all the tools manually, but it’s not the optimal solution. Instead, we can use ESP-Open-SDK, which contains everything we need in one place. If you also prefer this solution, the only thing you have to do is to execute those simple steps:
-
clone repository:
1git clone --recursive https://github.com/pfalcon/esp-open-sdk.git -
install dependencies:
1
2
3
sudo apt-get install make unrar-free autoconf automake libtool gcc g++ gperf \ flex bison texinfo gawk ncurses-dev libexpat-dev python-dev python python-serial \ sed git unzip bash help2man wget bzip2 libtool-bin -
build the toolchain:
We can build the toolchain in two ways:
-
with a completely standalone ESP8266 SDK containing the vendor SDK files merged into the toolchain
-
with a separate toolchain and vendor SDK files
We definitely prefer the second option. It will be needed to add extra -I and -L flags during compilation, but this approach gives us some benefits. We’ll have a better control in what we do and we’ll can easily use different version of sdk when needed. To build the separate version all you need is to use make with
STANDALONE=n.1make STANDALONE=nIt’ll take few minutes, so be patient. When the compilation process is
-
completed, the toolchain will be available in the xtensa-lx106-elf/
subdirectory. At the end of build process, command for adding the
xtensa-lx106-elf/bin/ subdirectory to your PATH environment variable will
be shown. You can save it, because it will be needed to execute it each time
you want to use the xtensa-lx106-elf-gcc and other tools in a new shell
session. In my case, command looks like below:
|
|
Build led blink example
In the esp-open-sdk directory you will also find the LED blink demo
application. It’s located in examples/blinky directory. If you have built the
non-standalone version of toolchain as I did, then you will need to make
small changes in the Makefile:
|
|
Now, just set the PATH variable and use make in examples/blinky directory.
As a result, two files should be built: blinky-0x00000.bin and
blinky-0x10000.bin.
Flash the firmware
Before we flash built firmware, lets erase whole memory of the chip. We can
use the esptool.py for this purpose. It’s placed in xtensa-lx106-elf/bin/
directory, so if you have this directory added to the PATH, then you can use
this tool in any directory. In order to erase the flash memory use command
below:
|
|
Now, lets flash built firmware. Name of each output file contains memory address to which the specific part should be flashed.
|
|
After you flash the firmware, you will notice that LED doesn’t blink. It’s because we erased the whole memory and there’s nothing there beyond our blinky led application firmware. Programs which use the SDK need additional firmware in specific flash memory location. Detailed description of the flash maps can be found in Chapter 4. Flash Maps of ESP8266 SDK - Getting Started Guide.
There are two types of flash memory maps for different firmware:
- FOTA (Firmware Over-The-Air) firmware, which is used for applications with update possibilities
- Non-OTA firmware, which is used in standard applications.
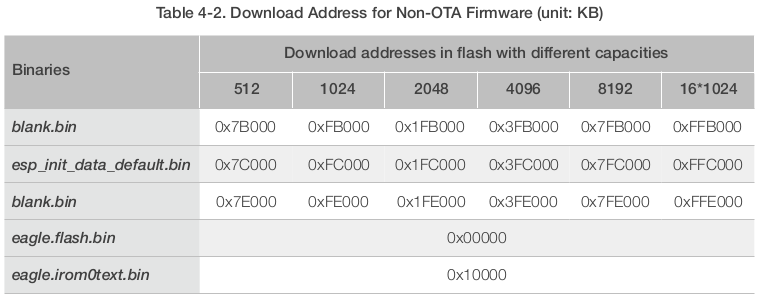
In our case Non-OTA firmware will be needed. Flash maps in that case looks like below. Description of each block can be found in documentation I linked earlier.

Needed files are located in esp-open-sdk/sdk/bin directory. For clarity,
esp-open-sdk/sdk/ is a
ESP8266_NONOS_SDK
repository used as a git submodule. Let’s deal with flashing additional
firmware now. Specific addresses for specific files looks like below:

Our chip has 4096KB of memory so we’ll use addresses from that column. We
already flashed the application firmware at 0x00000 and 0x10000, so now
it’s enough to flash only blank.bin, esp_init_data_default_v05.bin binaries.
After that blue LED should start blinking.
|
|
As you may already noticed, there is no main() function in blinky.c. In case
of Non-OS SDK the main function is named as user_init(). There is more
specific details about developing firmware for ESP8266 using Non-OS SDK, but
everything is well described in the
ESP8266 Non-OS SDK - API Reference.
If you would like to get more information, it’s a good document to read at this
point.
Summary
If you need a support in IoT nodes firmware / gateways applications
development, or looking for someone who can boost your IoT product by
leveraging advanced features feel free to book a call with
us
or drop us email to contact<at>3mdeb<dot>com. And if you want to stay
up-to-date on all things firmware security and optimization, be sure to sign up
for our newsletter:
