Recently we attended ECC2017 conference. One of topics that we considered
was a system for development and validation automation. Unfortunately this talk
was not accepted, but we present some research below and plan to provide more
soon. As maintainers of PC Engines platforms in coreboot we debug and fix quite
a lot of bugs, but to take full responsibility for our code everything should be
validated each time we do release. Limited resources lead us to automation and
as Python enthusiasts we decided to evaluate Robot Framework as first candidate.
When preparing to mentioned conference I found that we lack PXE server from
which I could run or install needed OSes. Also there was no ready to use
configuration that gave ability to utilize diskless boot and try recent Linux. I
started to fight with PXE server configuration, but then I realized that without
DHCP I have to provide booting information every time typing in iPXE shell or
integrate custom script. In long term those were not good solutions.
Robot Framework first try
Project by itself seems to be very popular and at first glance is well designed.
It gives ability to leverage enormous amount of Python libraries and has
integrated most important ones. I decided to start with installation in
virtualenv:
 1
 2
 3
 4
 5
 6
 7
 8
 9
10
11
12
13
14
15
16
17
|
[23:00:11]
pietrushnic:storage $ virtualenv robot-venv
Running virtualenv with interpreter /usr/bin/python2
New python executable in /home/pietrushnic/storage/robot-venv/bin/python2
Also creating executable in /home/pietrushnic/storage/robot-venv/bin/python
Installing setuptools, pkg_resources, pip, wheel...done.
[23:00:29] pietrushnic:storage $ source robot-venv/bin/activate
(robot-venv) [23:00:36] pietrushnic:storage $ pip install robotframework
Collecting robotframework
  Downloading robotframework-3.0.2.tar.gz (440kB)
    100% |????????????????????????????????| 450kB 2.2MB/s
Building wheels for collected packages: robotframework
  Running setup.py bdist_wheel for robotframework ... done
  Stored in directory: /home/pietrushnic/.cache/pip/wheels/b4/9b/b2/75d7e5f88f21673eed3472266a1f4e72672328cc174655a1b6
Successfully built robotframework
Installing collected packages: robotframework
Successfully installed robotframework-3.0.2
|
Verification:
1
2
|
(robot-venv) [23:00:46] pietrushnic:storage $ robot --version
Robot Framework 3.0.2 (Python 2.7.13 on linux2)
|
Quick start guide
1
2
3
4
|
sudo apt-get install docutils
git clone https://github.com/robotframework/QuickStartGuide.git
cd QuickStartGuide
robot QuickStart.rst
|
Output should look like this:
 1
 2
 3
 4
 5
 6
 7
 8
 9
10
11
12
13
14
15
16
17
18
19
20
|
==============================================================================
QuickStart
==============================================================================
User can create an account and log in                                 | PASS |
------------------------------------------------------------------------------
User cannot log in with bad password                                  | PASS |
------------------------------------------------------------------------------
User can change password                                              | PASS |
------------------------------------------------------------------------------
Invalid password                                                      | PASS |
------------------------------------------------------------------------------
User status is stored in database                                     | PASS |
------------------------------------------------------------------------------
QuickStart                                                            | PASS |
5 critical tests, 5 passed, 0 failed
5 tests total, 5 passed, 0 failed
==============================================================================
Output:  /home/pietrushnic/storage/wdc/projects/2017/pcengines/apu/src/QuickStartGuide/output.xml
Log:     /home/pietrushnic/storage/wdc/projects/2017/pcengines/apu/src/QuickStartGuide/log.html
Report:  /home/pietrushnic/storage/wdc/projects/2017/pcengines/apu/src/QuickStartGuide/report.html
|
What is great about that? Output is clean and can be easily understood. In
addition it generates log and report. Both generated files are clean and
eye-catching.
Let’s try something real on PC Engines APU2
My typical output on minicom during boot was:
1
2
3
4
5
6
7
|
PC Engines apu2
coreboot build 07/18/2017
BIOS version
4080 MB ECC DRAM

SeaBIOS (version rel-1.10.2.1)
Press F10 key now for boot menu, N for PXE boot
|
After N for PXE boot show script should send N or n what should send me to
iPXE> prompt. Initially I thought about using
robotframework-seriallibrary, but limitation led me to search for different
solution. robotframework-seriallibrary was designed to handle single byte
communication not serial output streams from operating system. For example
read_until function check for termination character, instead of matching
string pattern, what was expected during iPXE testing. ser2net and telnet
solution was suggested on mailing list and eventually was much better
choice for my use case.
1
|
sudo apt-get install ser2net
|
Quick test with config file ser2net_apu.cfg
1
|
13542:telnet:600:/dev/ttyUSB0:115200 8DATABITS NONE 1STOPBIT
|
To prove that ser2net works correctly:
 1
 2
 3
 4
 5
 6
 7
 8
 9
10
11
12
|
[0:19:39] pietrushnic:pcengines $ telnet localhost 13542
Trying ::1...
Connected to localhost.
Escape character is '^]'.
PC Engines apu2
coreboot build 07/18/2017
BIOS version
4080 MB ECC DRAM


telnet> q
Connection closed.
|
Telnet module for Robot Framework
After playing some time I got to point when I can enter iPXE command prompt. My
test looks pretty simple:
 1
 2
 3
 4
 5
 6
 7
 8
 9
10
11
12
13
14
15
16
17
|
***settings***
Library    Telnet

***Test Cases***
Enter PXE with 'n'
    Open Connection    localhost    port=13542
    Set Encoding    errors=strict
    Set Timeout    30
    Read Until    N for PXE boot
    Write Bare    n
    Read Until    Booting from ROM
    Read Until    autoboot
    # move arrow up
    Write Bare    x1b[A
    Read Until    autoboot
    Write Bare    n
    Read Until    iPXE>
|
Most complex part was related to pushing arrow keys through terminal. Magic is
in x1b[A what triggers escape sequence matching arrow up key on keyboard.
Other keys are:
1
2
3
|
x1b[B - down key
x1b[C - right key
x1b[D - left key
|
Debugging pxelinux booting
Serial console handling in Robot Framework is not trivial task. Especially, if
You are doing it first time. What I learned is that below parameters are
critical to correct understand what is going on behind the scene:
- enable debug log by using
-b <file> parameter
- set debug level
-L <level> Command for running framework should look like
that:
1
2
|
robot -b debug.log -L TRACE <script_name>
</script_name>
|
iPXE on apu2
I tried to create Robot Framework script, but faced weird issue when trying to
send more then one character. I described my findings in this email. As I
wrote it happens that Telnet.write() function is too fast and iPXE cannot
handle incoming characters. It took couple hours to figure it out and without
debugging output it would not be possible.
Booting pxelinux on apu2 using Robot Framework
Finally I managed to boot to iPXE shell and reliably send commands. Next step
was to provide an address of PXE server for downloading and booting purpose.
Setup PXE server for apu2
Communication with apu2 goes only through serial console or ssh when service is
ready, because of that typical Debian netboot had to be modified. In addition to
that I decided to create bigger booting menu, based on netboot package, for
various systems so You can see little bit different structure in future. To
setup PXE server easy way please follow:
1
2
3
4
|
git clone https://github.com/3mdeb/pxe-server.git
cd pxe-server
git clone https://github.com/3mdeb/netboot.git
NETBOOT_DIR=./netboot ./init.sh
|
At point of writing this blog post support was very limited and menu had just
Debian i386 installer.
Full Robot Framework script
Below is my full script. Please note that I’m using custom method
Write Bare Slow. This is because of flaw related to slow iPXE input. To use
this code You can utilize our fork of robotframework.
 1
 2
 3
 4
 5
 6
 7
 8
 9
10
11
12
13
14
15
16
17
18
19
20
21
22
23
24
25
26
27
28
29
30
31
32
33
34
35
36
37
38
39
|
***settings***
Library    Telnet

***Test Cases***
Enter iPXE shell
    # provide ser2net port where serial was redirected
    Open Connection    localhost    port=%{S2N_PORT}
    Set Encoding    errors=strict
    Set Timeout    30
    # find string indicating network booting is enabled
    Read Until    N for PXE boot
    # use n/N to enter network boot menu
    Write Bare    n
    Read Until    Booting from ROM
    Read Until    autoboot
    # move arrow up to choose iPXE shell position
    # https://github.com/pcengines/apu2-documentation/blob/master/ipxe/menu.ipxe
    Write Bare    x1b[A
    Read Until    autoboot
    # press enter
    Write Bare    \n
    # make sure we are inside iPXE shell
    Read Until    iPXE> x1b[?25h

Download and boot pxelinux
    # request IP address
    Write Bare Slow  dhcp net0n
    Read Until    ok
    Read Until    iPXE>
    # provide pxelinux filename on PXE server
    Write Bare Slow  set filename pxelinux.0\n
    Read Until    iPXE>
    # provide PXE server IP address
    Write Bare Slow  set next-server %{PXE_SRV_IP}\n
    Read Until    iPXE>
    # download and boot pxelinux
    Write Bare Slow  chain tftp://${next-server}/${filename}\n
    Read Until    PXE server boot menu
    Close Connection
|
Configuration for ser2net port and PXE server IP address are passed through
environment variables.
Automated PXE booting
Assuming Your PXE server works fine You can run:
1
2
3
|
git clone https://github.com/pcengines/apu-test-suite.git
cd apu-test-suite
sudo ser2net -c ser2net_apu.cfg
|
Then please change port and IP address accordingly:
1
|
S2N_PORT=13542 PXE_SRV_IP=<ip_addr> robot -b debug.log -L TRACE pxe_boot.robot
|
</ip_addr> Please note that port is hardcoded in ser2net_apu.cfg. Output in
terminal should look like this:
 1
 2
 3
 4
 5
 6
 7
 8
 9
10
11
12
13
14
15
|
==============================================================================
Pxe Boot
==============================================================================
Enter iPXE shell                                                      | PASS |
------------------------------------------------------------------------------
Download and boot pxelinux                                            | PASS |
------------------------------------------------------------------------------
Pxe Boot                                                              | PASS |
2 critical tests, 2 passed, 0 failed
2 tests total, 2 passed, 0 failed
==============================================================================
Debug:   /home/pietrushnic/storage/wdc/projects/2017/pcengines/apu/src/apu-test-suite/debug.log
Output:  /home/pietrushnic/storage/wdc/projects/2017/pcengines/apu/src/apu-test-suite/output.xml
Log:     /home/pietrushnic/storage/wdc/projects/2017/pcengines/apu/src/apu-test-suite/log.html
Report:  /home/pietrushnic/storage/wdc/projects/2017/pcengines/apu/src/apu-test-suite/report.html
|
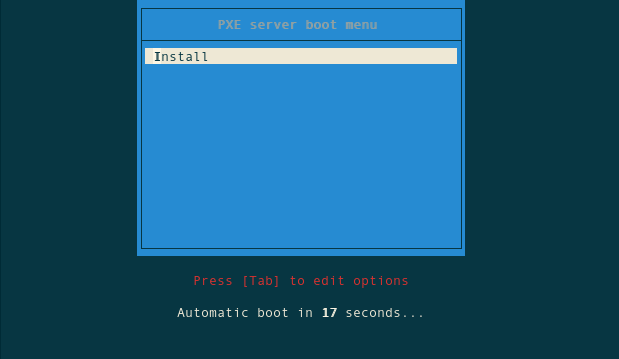
This means PXE boot menu is already in Your telnet, to connect to it simply
type:
After refreshing Your screen with <CTRL>-L You should see boot menu:
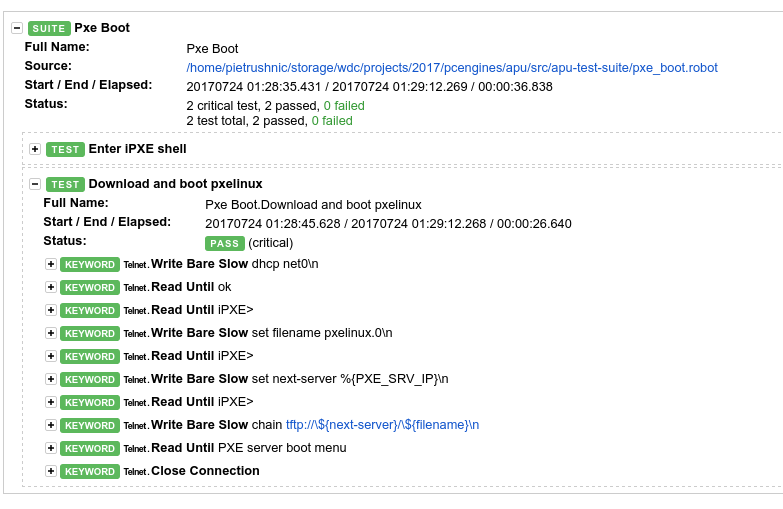
Moreover You can investigate in details what happened using automatically
generated HTML page:
Summary
Why bother? Firmware debugging effort consists of tons of repeatable tasks. Lots
of them can be automated. Even if debugging is finished and problem was root
caused and fixed, we should make sure it will never return. That’s why if we
face hacking session with big number of debug-code-test cycle we should think
about automation as soon as possible. I tried to build PXE server for apu2
platform many times and always failed running out of time. Typical booting cycle
took me ~90s, automated environment does it in 37s. This is not blasting result,
but automation gives me solid ground for growing further test case and keep me
away from typing mistakes. If You have any comments or problems related to above
blog post please let us know we would be glad to help You. If You are trying to
automate Your embedded device validation we would be glad to hear more about
that.
If you are interested in further reading about Python, check out
“How to Hire a Great Python Developer”
post which includes a series of questions on key features and capabilities of
the Python language.
Piotr Król
Founder of 3mdeb, a passionate advocate for open-source firmware solutions, driven by a belief in transparency, innovation, and trustworthiness. Every day is a new opportunity to embody the company's vision, emphasizing user liberty, simplicity, and privacy. Beyond business, a casual chess and bridge player, finding peace in nature and nourishment in theology, philosophy, and psychology. A person striving to foster a healthy community, grounded in collaboration and shared growth, while nurturing a lifelong curiosity and a desire to deeply understand the world.